Chapter 7
Games That Scroll
An effective means of showing a much larger environment than can actually fit on the screen at any one time is to scroll the screen. Examples where only a portion of the total information can be shown are numerous, and range from the simple listing of a long BASIC program to the scanning of a large terrain map such as those used in the war game Eastern Front.
Perhaps its best use, however, is the dynamic feel that it gives to scrolling arcade games like Super Cobra, Zaxxon, and Caverns of Mars. These games have multi-screen worlds which scroll on or off the screen as a player's ship moves. These games show only a window or part of the entire background world at one time. They differ from games that have background stars and aliens that appear to be traveling toward you from top to bottom. Scrolling games have objects or terrain in relatively stable positions within the game's world. They can be reached by traveling to that particular section of the world.
There are two ways to scroll screen data. Most conventional micro-computers move the data through a fixed screen area. This requires an enormous memory shuffle involving many thousands of bytes. In the case of an Apple computer, rough horizontal scrolling can be achieved by shuffling all 8K of screen memory data. Other computers that are endowed with character set graphics can reduce the workload to a manageable 1K of screen data. In nearly all cases, scrolling is coarse and jerky because individual bytes of data represent either seven or eight individual pixels. Moving one byte moves many pixels at one time.
An easier method, and the one the Atari engineers chose, is to move the screen window or screen area over the data. Luckily, the ANTIC graphics microprocessor uses the Load Memory Scan (LMS) instruction to determine where it finds its screen data. A normal display list will have one LMS instruction at its beginning. The RAM area that it points to has the screen data in linear sequence. If we change the starting screen address by manipulating the operand bytes of the LMS instruction, a primitive coarse scroll can be achieved. In effect, we have moved the screen window over the data just by changing two address bytes. This is exactly equivalent to the conventional method of moving all of screen RAM.
Atari computers are also equipped with both vertical and horizontal fine scrolling registers. These enable the computer to scroll the screen in steps smaller than character or pixel size. While the effect is impressive, the technique requires implementation at a Machine language level and will be discussed later.
Coarse Vertical Scrolling
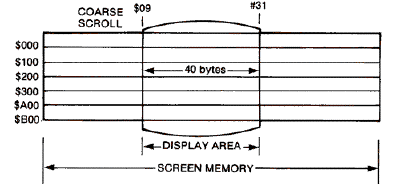
Coarse vertical scrolling, similar to the way a long BASIC program listing scrolls, is quite easy to implement from BASIC. If we consider a Graphics 0 playfield, each row of character data consists of forty characters. The second row of data begins forty bytes beyond the first row of data. When ANTIC begins fetching display data from screen RAM, it begins with the first row, using data beginning at the address in the operand of its LMS instruction. It fetches forty bytes sequentially for each of the twenty-four lines of character data.
It would be very easy to modify the two-byte operand of the LMS instruction so that it begins fetching screen data beginning with the RAM screen address of the second line or forty bytes later. To do this we need only modify the fourth and fifth bytes of our display list. The 0th, first, and second bytes are blank 8 scan-line instructions, the third is the LMS instruction, the fourth and fifth bytes are the low byte and high byte address of screen data respectively. Each time we scroll the screen upward one mode line, we need to advance the LMS address by forty bytes. You need only make sure that the low byte doesn't exceed a value of 255. If it does, you adjust the low byte by subtracting 256, and increment the high byte by one. The example below begins its scrolling at the very bottom of memory and scrolls until near the top of memory.
Download VERTSCR.BAS (Saved BASIC)
Download / View VERTSCR.LST (Listed BASIC)
As you watch the screen scroll upward, you will notice sometimes that the scrolling becomes momentarily discontinuous. This is a problem that occurs only in BASIC when scrolling is done outside the Vertical Blank period. Sometimes BASIC hasn't had time to POKE both the high and low bytes into the display list before the interrupt occurs. In the event that only one byte has been POKEd, the starting address in the LMS instruction is incorrect and the screen jerks. A more serious discontinuity occurs at 4K boundaries because ANTIC can't cross a 4K boundary using a single LMS instruction. Using LMS instructions for each mode line should solve the problem.
Coarse Horizontal Scrolling
Horizontal scrolling is much more difficult to do than vertical scrolling. The problem is that screen data is organized serially. Attempting to scroll to the right causes the computer to try to display data in the first line that would normally belong in the second line. We begin to get a snaking scroll throughout the entire display as the leftmost byte on each line will be scrolled into the rightmost position of the next higher line, and the following bytes shift one to the left.
The solution is to expand the screen data area and break it up into a series of independent horizontal data areas for each mode line. Each RAM area is still one-dimensional and serial in nature, but it extends much further than the screen shows. Since the purpose in scrolling a screen is to show more information than the screen can hold, we have allotted extra RAM for each mode line to hold this information. Now, if we move the screen window over the screen data, the data moves into view without affecting the data in any of the subsequent mode lines.
As a first step, you will need to organize your screen data by allocating a certain number of bytes of RAM for each mode line. Since the LMS operand consists of a low and a high byte, it is much easier to calculate addresses if each subsequent mode line is exactly 256 bytes long. This simplifies calculations since the high byte screen address for each mode line is a page, or one unit, apart. Since each mode line accesses a different page of screen memory, a special display list must be constructed that has an LMS for each mode line. As an example, we will horizontally scroll a BASIC mode 2 (ANTIC 7) screen. There are twelve mode lines on the screen, each using 256 bytes of memory, or a total of 3K of RAM memory. Since ANTIC displays twenty bytes per line, our world consists of nearly twenty-three screens of data arranged end to end horizontally. If we choose to use the lowest portion of RAM beginning with zero page which we know has interesting data, the display list is as follows:
	112
	112	8 blank scan lines
	112
	71	LMS for 0th row BASIC 2 (64+7)
	0	Low byte screen memory
	0	High byte starting zero page
	71	LMS for first row
0	low byte
1	High byte starting page one
71
0
2
.
.
71	LMS for eleventh row
0 	Low byte
11	High byte
65	JMP to beginning of display list
	0	Low byte
	6	High byte page six
To execute a horizontal scroll, each and every LMS operand in the display list must be incremented for a rightward scroll and decremented for a leftward scroll. Since we set up screen memory one page per mode line, only the low byte address need be changed. Also, since the entire screen scrolls as a unit, at least in our case, all of the low byte operands are changed at the same time and have the same value. Program logic should also insure that the image doesn't scroll beyond the limits of the allocated RAM areas, otherwise the display will become garbaged.
The following example uses the preceding display list to scroll our screen horizontally through the lowest twelve pages of memory used by the OS and DOS. We have also placed our display list in page six (sixth row of our display) so that you can watch the data in the list change as the screen actually scrolls. Changes are made to each of the low byte operands of the LMS instructions via a FOR ... NEXT loop. They are the fourth, seventh, tenth, etc., positions in the display list. This is at DLIST+(3*J)+1 where J goes from 1 to 12. Also, since we can't scroll into screen RAM beyond the end of each page without messing up the display, program logic dictates that the right edge of our window does not exceed 255. Therefore, the left edge must not exceed 255 - 20 = 235 bytes. The screen is scrolled from 0 to 235.
Download HORIZSCR.BAS (Saved BASIC)
Download / View HORIZSCR.LST (Listed BASIC)
Obviously, the technique doesn't produce smooth wraparound, although the program repeats itself by beginning again at the left edge of screen RAM. The fault isn't with the technique but in the screen data. If you want wraparound, the data on the last screen must match that of the first screen. This would mean in our example that the last twenty bytes of each line exactly match the first twenty bytes of each line.
It wouldn't be difficult to combine horizontal scrolling with vertical scrolling to get diagonal scrolling. Since we achieve scrolling by adding or subtracting one from the LMS operand, and vertical scrolling by adding or subtracting the line length from the LMS operand, diagonal scrolling occurs when both operations are done simultaneously. If we wish to scroll down and to the left we would add 256 bytes to the high byte and 1 byte to the low byte of each scan line. While this might appear to be a simple procedure in this special case, any other configuration of screen RAM will involve two-byte additions.
Fine Scrolling
We can create much finer scrolling in steps smaller than pixel or character size by enabling the fine scrolling registers. There are two of these, one for horizontal scrolling (HSCROL) at $D404, and one for vertical scrolling (VSCROL) at $D405. They are enabled by setting appropriate bits in the display list instruction bytes for the mode lines in which we want fine scrolling. Vertical fine scrolling is enabled by setting bit 5 in the instruction bit. Similarly, horizontal fine scrolling is enabled by setting bit 4 in the instruction byte.
| Function | set bit |
add decimal | add hex |
|---|---|---|---|
| Load Memory Scan | 6 | 64 | 40 |
| Vertical scroll | 5 | 32 | 20 |
| Horizontal scroll | 4 | 16 | 10 |
For example, if we were to enable fine horizontal scrolling in our example above, each of the LMS instructions would be 64+7+16 = 87.
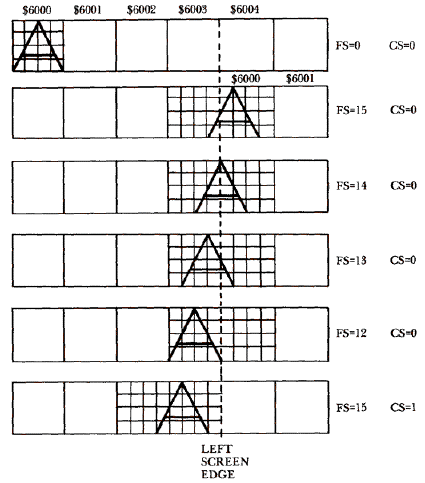
The two fine scroll registers each have a limited range equal to 16 scan lines (0- 15) in the vertical direction, and 16 color clocks (0-15) in the horizontal direction. If we attempt to scroll beyond these values, ANTIC simply ignores the higher bits of the scroll registers. In order to achieve fine scrolling over a wider range, we need to combine fine scrolling with coarse scrolling. The technique is to fine scroll the image until the amount of fine scrolling equals the size of the pixel or character. Then you reset the fine scrolling register back to zero and coarse scroll the screen one unit. An example of fine scrolling in the vertical direction is shown in the following picture:
A minor problem occurs when you attempt to fine scroll data into the bottom mode line. Images tend to pop in suddenly rather than scroll in smoothly because there is no buffer of data for the next line. To get proper fine scrolling you will need to dedicate one mode line to act as a buffer. This can be done by simply not setting the vertical scroll bit in the display list instruction in the last mode line. The window will now scroll without the unpleasant jerk, but will be shortened by one mode line.
Fine scrolling in the horizontal direction is complicated by the fact that ANTIC sets aside a buffer on either end of the mode line so that portions of the pixel or character can scroll on or off the screen smoothly. When fine scrolling is enabled in the horizontal direction, ANTIC fetches more information (8 bytes/mode line) than the normal playfield (160 color clocks wide. It sets aside a buffer of sixteen color clocks on each side and retrieves forty-eight bytes of information per line rather than the usual forty bytes. This is usually not a problem if the programmer has organized his screen data in long horizontal rows. If, on the other hand, the fine scroll register is set to zero, the window is actually looking at the sixteen color clock buffer rather than the first byte in the display for that mode line. For example, in a BASIC mode two (ANTIC 7) line where each character is eight color clocks wide, ANTIC places the first two bytes of the mode line in the buffer so that the first two bytes or sixteen color clocks aren't displayed in the screen window. BASIC mode 0 (ANTIC 2) and ANTIC mode four displays, that use characters only four color clocks wide, will be offset by four bytes. This problem can be virtually corrected by advancing the vertical fine scroll register by fifteen color clocks. You will still be off by one color clock, but since you are planning to scroll the screen anyway, it doesn't matter.
The example illustrated below shows what is involved in fine scrolling ANTIC 2 (BASIC 0) or ANTIC 4 characters horizontally. Each of these characters is only four color clocks wide so that it requires only four fine scroll increments before you need to coarse scroll and reset the fine scroll register. The fine scroll register goes backward from 15 to 12 before being reset to 15. The top row shows that ANTIC actually places the first character into the buffer rather than into the first visible screen position if the fine scroll register is set to zero. The second row shows the correction obtained by setting the fine scroll register to 15. While it seems that a value of 16 should correct it totally, in fact the high bit would be ignored, and you would obtain the result of the top row.
Whether the movement be vertical, horizontal, or diagonal, the most difficult aspect of using Machine language to scroll the screen is calculating the LMS addresses for each of the mode lines. Multiplication of numbers other than powers of two, requires a complicated and time-consuming subroutine. Fortunately, several special or contrived scrolling cases make the calculation fairly easy. We will discuss these situations first.
Vertical Scrolling
Pure vertical scrolling is obviously the easiest case. It requires only one LMS instruction because screen memory is continous throughout the display. Still, if we had to calculate the starting address of the display from scratch each time we scrolled, we would still need an elaborate multiplication subroutine because multiplication by forty bytes or #$28 is not an easy feat. Luckily, rough scrolling is usually done a line at a time. Since we know the current address of the screen, we need only add forty bytes to this address to scroll the screen upwards, or subtract forty bytes to scroll the screen downwards. This only requires a double-byte add or double-byte subtraction.
Horizontal Scrolling
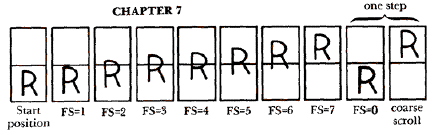
Pure horizontal scrolling, on the other hand, can become very complicated and require dozens of multiplications, if the screen size isn't a special case. The most common special case is one where each mode line is exactly 256 bytes or one page in memory. The LMS address for the subsequent mode lines are exactly $100 apart in memory. This becomes very convenient since you don't need to do an addition or subtraction on each of the current LMS addresses in order the rough scroll. Instead you can merely store the new value of the horizontal rough scroll offset into each of the low byte addresses for the LMS instructions. If you are in GRAPHICS 1 (ANTIC 6), this means that you have to complete twenty-four store operations in a simple loop. Perhaps the best example of this is our scrolling game example in the final section of this chapter. There are twenty-two rows of ANTIC 6 characters, each one page in length for a total of 5 1/2K of screen memory. The variable XS determines the rough scroll position and the variable FS, the fine scroll position. Fine scroll naturally progresses from 0 to 7 before there is a need to increment XS. However, as we discussed earlier, the actual value placed into the fine scroll hardware register is HSCROL = 15 - FS. Wraparound in this example is at XS=235. When XS exceeds 235, XS is reset to 0.
All twenty-two low byte addresses are updated in the display list during VBlank. The first of these addresses is at NDLIST+8. The next address is three bytes later. We can take advantage of indirect addressing using the Y register if we increase the Y register by 3 between store operations. The code below illustrates the technique.
         LDY #$00          ;COUNTER
.4       LDA XS            ;POSITION AT SCREEN LEFT
         STA NDLIST+8,Y    ;LOACATION OF FIRST LOW BYTE ADDRESS
         INY               ;LOW BYTES ARE THREE APART
         INY
         INY
         CPY #$4B          ;END OF LIST?
         BNE .4            ;NEXT ELEMENT
Obviously, if we choose to include vertical scrolling as well, we need only increment each of the high byte addresses of the LMS instruction to rough scroll the screen upwards by one mode line. The main problem is that a screen 256 bytes wide (six plus screens) uses a very great amount of screen memory. A depth of two screens in GRAPHICS 1 (ANTIC 6) would require 12K, and six screens would require 36K. This is an enormous amount of screen memory in addition to the game code, even for a 48K Atari.
Eight Way Scrolling - Special Case
A simple but contrived eight-way scrolling example could be developed that has a width of 128 bytes. The depth of course will be determined by the amount of screen memory available. The advantage of a 128-byte width over a 256-byte width is that it will allow a deeper scrolling playfield without requiring a complicated multiplication subroutine. Even so, the calculation is not as simple as the example above. First, it requires calculating the display address of the initial LMS instruction based on the rough scroll position YS. Each subsequent LMS address is determined by adding $80 to the previous one, then adding the horizontal rough scroll position XS to that.
ADDRESS = SCREEN + (YS*$80) + XS
We used a trick to avoid the initial multiplication usually needed to find the first LMS address. Since the high byte of the address increases every time our vertical rough scroll position (YS) increases by two, then:
SCHI = SCREEN/256 + YS/2
Odd values of YS set the carry bit after the division. If that occurs #$80 is added to the low byte of the first instruction. Afterwards the horizontal rough scroll offset XS is added.
SCLO = Screen address low byte + #$80 + XS (if carry set after division)
SCLO = Screen address low byte + XS (if carry clear after division)
Since each of the mode lines are scrolled equally horizontally, you only need to add #$80 in a double-byte addition to find the starting address of the next mode line. Again, this whole operation can be performed using indirect indexing. The first LMS low byte address is at NDLIST+7, and the high byte address is at NDLIST+8. We can index both of these addresses using the Y register, then increment the Y register by 3 in a loop to reach subsequent LMS address pairs. The routine exits the loop when all of the mode line addresses have been calculated or when the Y register equals (#ROWS * 3)-3.
Download 8WAYTEST.EXE (Executable program)
Download 8WAYTEST.OBJ (Object code)
Download / View 8WAYTEST.LST (Assembler listing)
Download / View 8WAYTEST.S (Source file)
Download / View 8WAYTEST.RAW (As printed in book)
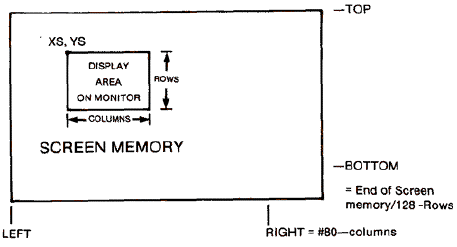
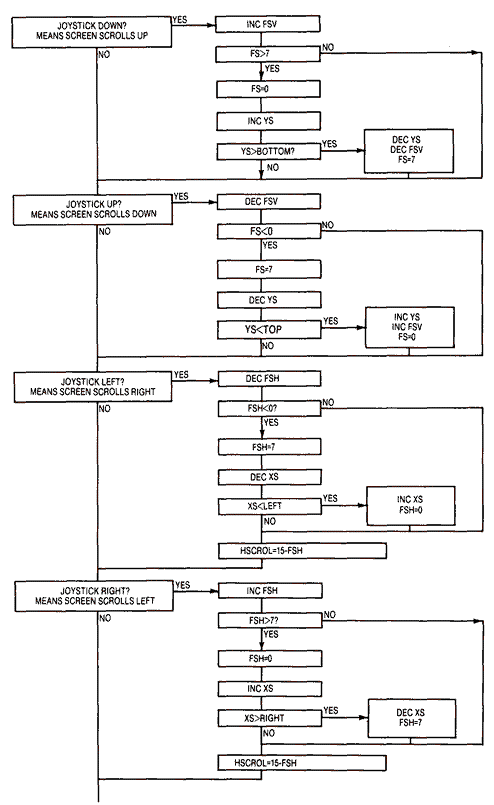
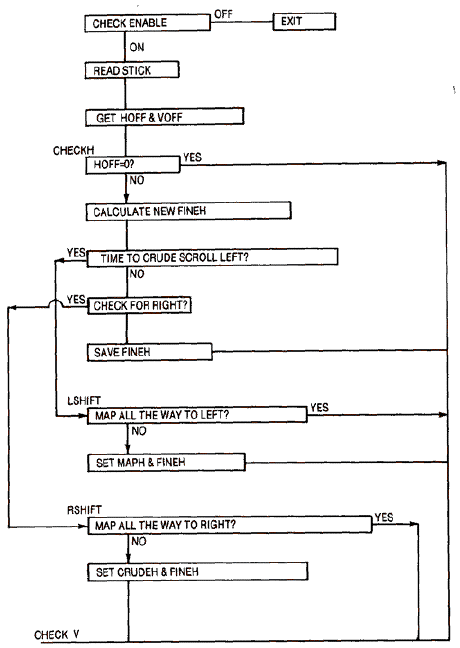
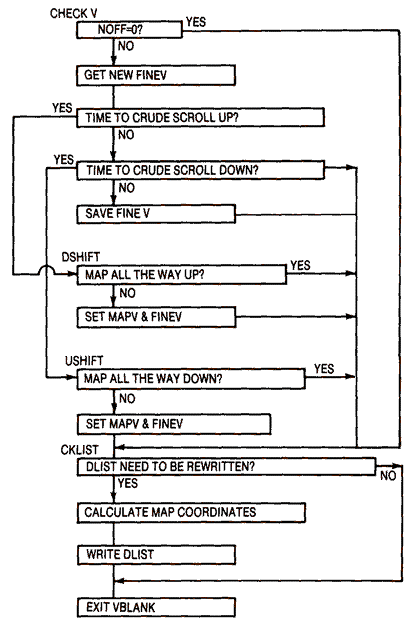
The subroutine that updates the display list is driven by an eight-direction joystick routine. This routine calculates both the fine scrolling and rough scrolling values. The rough scrolling values XS and YS are inputted to the subroutine. The boundaries of the screen are indicated by the variables TOP, BOTTOM, LEFT, and RIGHT. Both TOP and LEFT are equal to zero and RIGHT is #$80. BOTTOM is user definable but must be equal or less than screen memory in bytes divided by 128. The flow chart is shown below.
Use of Lookup Tables to Determine LMS Screen Addresses
Another technique that would give you more flexibility in sizing your screen would be to use lookup tables to determine the LMS addresses for any given vertical scrolling offset YS. You can use each of the two tables, one containing the low byte address, the other the high byte address for each of the possible scrolled positions. By indexing into the start of the tables with YS, you can lookup each of your LMS addresses, then add the horizontal offset. The two tables are LMSHI and LMSLO. Both are formed by calculating all possible LMS addresses for the entire screen memory of your scrolling range.
	LDY #$00
	LDX YS	        ;ROUGH VERTICAL SCROLL OFFSET
LOOP	LDA LMSHI	;HIGH BYTE ADDRESS FROM TABLE
	STA NDLIST+5,Y	;HIGH BYTE LMS
	LDA LMSLO	;LOW BYTE ADDRESS FROM TABLE
	CLC
	ADC XS	        ;ADD HORIZONTAL OFFSET
	STA NDLIST+4,Y	;LOW BYTE LMS
	LDA NDLIST+5,Y
        ADC #$00        ;REST OF DOUBLE BYTE ADD
        STA NDLIST+5,Y
        INY             ;LMS INSTRUCTIONS-THREE BYTES APART
        INY
        INY
        CPX #$16        ;FINISHEDWITH # OF MODE LINES?
        BLT LOOP
General Case Eight-Way Scrolling
We have developed a general case eight-way scrolling example in which the programmer can define his own screen dimensions. Screens can be any width or height as long as the product of the height and width does not exceed the memory in the computer, in this case 64K. The following example is in GRAPHICS 0 (ANTIC 2), but there is no reason that you can't modify the display list to use a different graphics mode. Each mode line in the example is 1024 bytes in width and there are 64 rows of data. Thus, you are able to observe the entire memory of the Atari computer by scrolling with a joystick.
The routine is not exceptionally fast because it is the general case. It makes extensive use of sixteen-bit multiplication, thus wasting considerable time doing calculations. We don't recommend it for standard arcade games in which the screen is updated sixty times a second, but it is quite useful in tactical war games or other types of displays in which the screen changes less frequently. Both the flowchart and code follow.
Download 8WAY.EXE (Executable program)
Download 8WAY.OBJ (Object code)
Download / View 8WAY.LST (Assembler listing)
Download / View 8WAY.S (Source file)
Download / View 8WAY.RAW (As printed in book)
Strike Force--A Scrolling Game
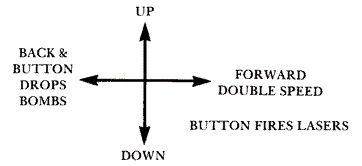
Since horizontally scrolling shoot-'em-up arcade games like Super Cobra and Scrambler are immensely popular and not difficult to implement on the Atari, we included one called Strike Force as an example. The game involves flying an attack ship in a mission of destruction against an enemy attack fleet and their ground installations. The joystick-controlled ship is armed with bombs and lasers. It can fly at two speeds forward but can't reverse direction. Up and down joystick movements control altitude, while pushing the stick forward doubles the speed. The trigger fires the ship's lasers, except when the stick is pushed to the left. That drops bombs.
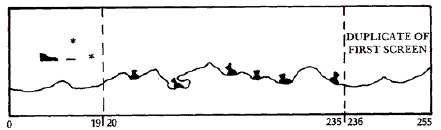
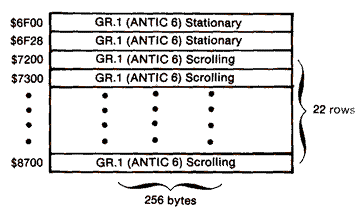
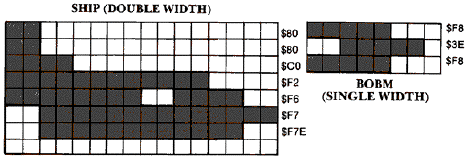
The continuously scrolling terrain stretches over thirteen screens. The last screen is a duplicate of the first to allow for wraparound. The tan-colored terrain consists of redefined Graphics 1 (ANTIC 6) characters using playfield register #0. The screen data for each of the twenty-two mode lines is 256 bytes or one page of memory. Screen memory requires 5 1/2 K.
Four active laser bases and seven missile bases populate the mountainous terrain. These redefined characters reference playfield register #1. They are red in color. While the missile bases don't launch their rockets, the laser bases produce deadly laser fire which should be avoided.
The player's ship, player #0, is double-width and light blue. Its single-width bombs use player #3. The aliens, one green and one red, use players #1 and #2 respectively. Since the ship's laser fire consists of quadruple-width missiles and the aliens use single-width projectiles, we can't combine the missiles to make an extra player. This limits the number of aliens on the screen at any one time to two.
SCROLLING GAME
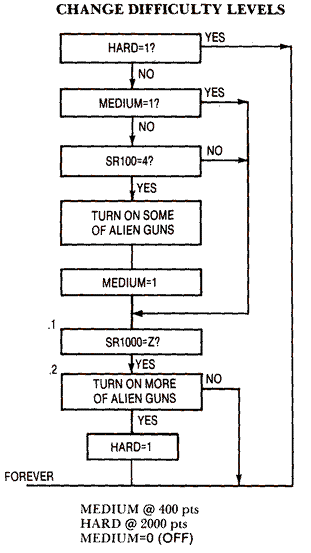
While a two-prong alien attack can be handled quite skillfully by seasoned players who quickly learn patterns, the aliens in this game are chosen randomly from five different shapes and five different pre-programmed attack patterns. Thus, an alien shape doesn't necessarily correspond to a specific attack pattern. This subtlety makes learning the game difficult. Also, since games should increase in difficulty as they progress, alien firepower increases at 400 points, and again at 2000 points, until the game becomes nearly impossible for the average player.
Memory Layout
Once you have defined the basic design concept of your game, you need to decide where to put your program code, screen memory, display list, character set, and player-missile area. There aren't many constraints to where you put things in the Atari, except that the player-missile area must be on a 2K boundary, and the character set must be on a 1K boundary, and you should avoid the lower portion of memory, especially if DOS is used to load the program. The fact that Synassembler resides from $9C00 to $BFFF forces us to locate everything below that area. Therefore, we choose to locate our player-missile area at $8000, the character set above that at $9000 and our display list at the top at $9400. The two lines of scoring information begin at $6F00 and the 5 1/2K of screen area extends from $7000 to $8700.
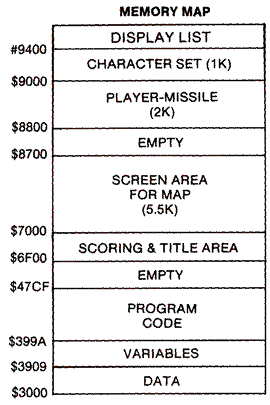
We assembled our code at $3000, but we could have moved it higher in memory. It really doesn't make any difference in this case since our program code contains the data for the screen, character set, and display list. It wouldn't be any shorter if everything were pushed closer together in memory.
Display List
The display list is quite similar to the one developed earlier in the chapter for the rough horizontal scrolling example in BASIC. Separate LMS instructions are required for each of the twenty-two scrolling mode lines. In addition, there are two stationary ANTIC 6 mode lines used for scoring data at the top of the display. Since these lines use the ROM character set while the remainder of the display uses a custom character set, we need to do a Display List Interrupt on the second line in order for it to take effect in the third mode line. Each scrolling mode line is 256 bytes or one page apart so that the high-byte operands of each LMS instruction are one apart.
     $70  8 blank scan lines
      70
      70
      46  |LMS ANTIC mode 6 -no scroll
      00  |Low byte score screen area
      6F  |High byte
      86  2nd score line -no scroll & DLI to take place next line
      56  |LMS ANTIC mode 6 horiz. scroll
      00  |Low byte of Ist or top row scrolling terrain
      72  |High byte
      56  LMS
      00  Low byte of 2nd row
      73  High byte
      .
      .
      56  |LMS
      00  |Low byte of 22nd row scrolling terrain
      86  |High byte
      41  |Jump and wait for VBlank
      00  |Low byte address of display list
      94  |High byte
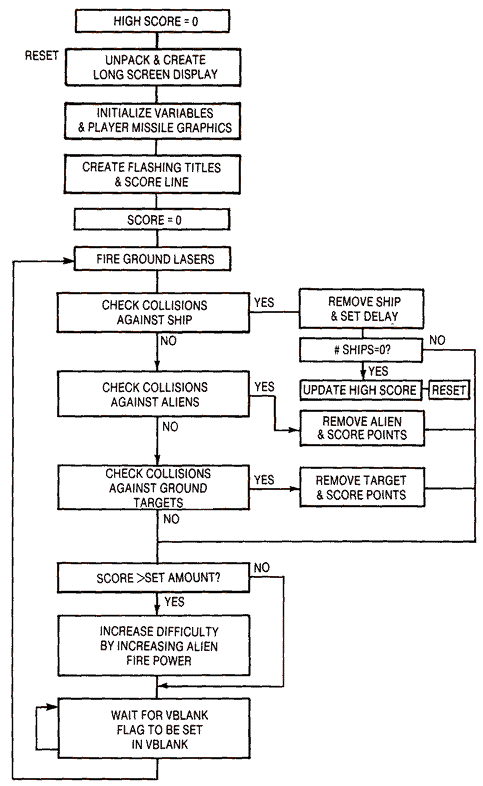
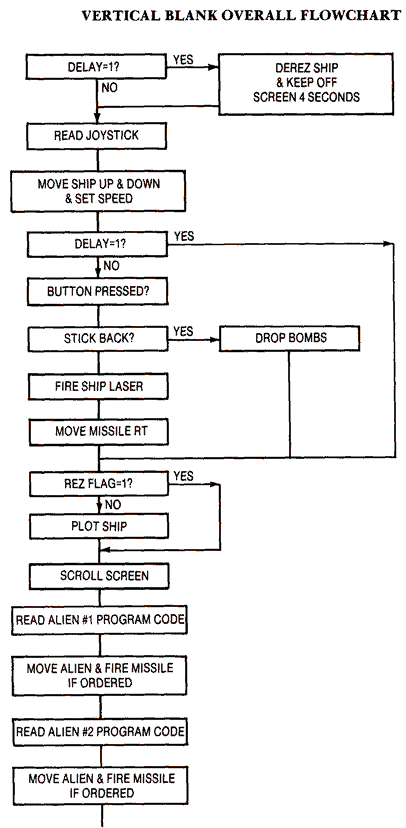
The overall flowchart of the game is divided into Vertical Blank code and a main code loop outside Vertical Blank. The two sections are synchronized so that the main loop code will execute once, then wait in a tight loop for a flag to be set, signaling that the Vertical Blank code is finished. Although in retrospect it appears that the entire game could have been placed in Deferred VBlank, doing it this way assured that in the event the code became too long, the next Vertical Blank Interrupt wouldn't occur while the program was still in the previous one, thereby crashing.
The Vertical Blank code includes code that reads the joystick, controls all the ship's functions, including lasers and bomb drops, and interprets and executes the programmable code for the two aliens. The code in the main loop checks collisions in all combinations and takes appropriate action. This includes removing shot aliens and ground targets, derezing the player's ship when necessary, and updating the score. In addition, laser base fire, and the checks that control and increase the difficulty, are controlled here.
Unscramble Screen Data Routine
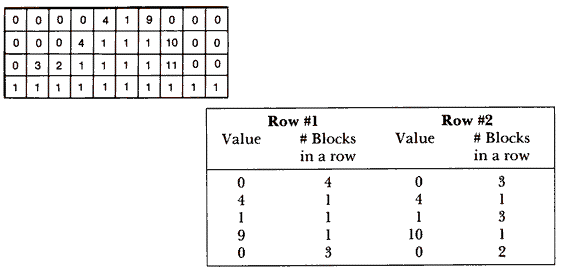
Normally, one would use some sort of homemade scrolling map editor to create the screen data necessary to form a 12-screen world. But these editors, if designed properly, automatically save the data to disk as a data file. In order to allow the reader to type in the required 5 1/2K of screen data without supplying an editor, the data was compacted to a mere 550 bytes. We simply took into account that the upper half of the screen was blank, and that large sections of the lower portion had sequences of similar characters.
Two tables were set up. One called VALUE contains the value of a particular sequence of blocks, and the other table called BLOCKS contains the number of number of those characters in a row. The small four-row sample illustrated below shows how the data for the two tables is obtained.
The unpacking routine that places the character data into screen memory is extremely sensitive to data errors in which the length of a single row isn't exactly 256 bytes, the length of one mode line. If a mistake occurs, data in the following rows isn't just offset, but it often doesn't even appear. The routine assumes that it will finish storing the number of repeat character bytes at exactly the same time that the Y register, which has meanwhile been keeping track of its position along the row, reaches the end (zero). At that point it jumps to the next row. Unfortunately, the Y register counter is being incremented in a loop while the number of characters in a row is being decremented. in the X register. For example, if the number of blocks in a row were one too many for the 256-block row, the Y register would have passed the zero point and the test for the end of the row would be missed. The row wouldn't be incremented. and the rest of the data would overwrite previous character data on the same mode line. While I thought of fixing it by testing whether the Y register became zero while in the loop, I'm not sure which case is worse, knowing that you made a mistake in the data for that row, or observing a completely weird display afterward.
Custom Character Set
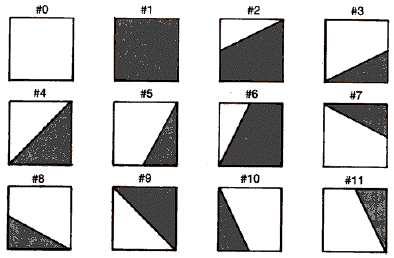
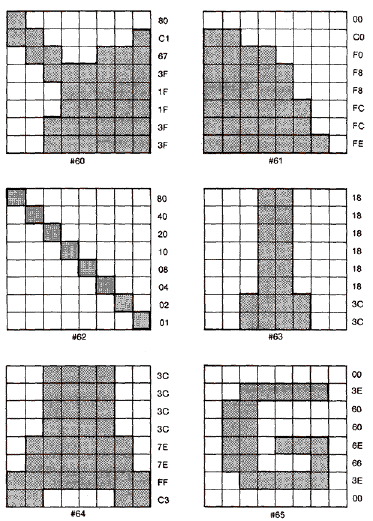
The display uses a custom character set composed of twelve combinations of sloping terrain. Character #0 is blank. Since these are internal characters 0-11, they use color register #0 to set their color. We chose tan. The rockets, laser base, and its moving laser beam are also custom characters. Since we wanted to use a different color, we placed them in the upper half of the character set. Internal characters 64-127 refer to color register #1. The two high bits of the character number select the color register. The rockets are internal characters #63 and #64, the laser bases are characters #60 and #61, and the beam is character #62. We chose red primarily so that the laser beam showed up as red. Since the remainder of the character set was of no

interest, it wasn't copied from ROM and then modified. Instead, the character data was copied from tables directly into the specified positions in character set memory.
However, since we did need the letters for the GAME OVER message which scrolls across the playfield at the conclusion of the game, the data for these letters are stored as characters $65-$71, They too, appear in red. All of these tables occupy only 192 bytes of program memory.
Ship Operation
The joystick-controlled spaceship, while stationary on the horizontal axis during scrolling, can be moved vertically to adjust altitude. Pushing forward or to the left on the stick doubles the speed and consequently the rate of scrolling and horizontal speed of the attacking aliens. The latter is necessary to maintain the alien's position above the faster scrolling terrain. When the stick is pushed forward, the variable SPEED is set to one, otherwise it remains zero. There are also two different engine
sounds depending on the speed. Keeping the ship stationary in the horizontal direction was supposed to keep the programming simpler. Still, it wouldn't have altered the code much if the ship were free to move in that axis, as long as it was restrained from approaching too closely to the right edge of the screen. This is necessary to prevent the bombs from falling beyond the screen boundary. Introducing this motion might make an interesting exercise for those who understand the program.
Ship's Laser
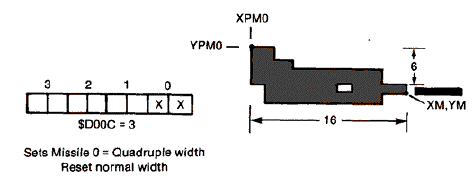
Pressing the joystick trigger activates the ship's lasers. This works in any of the neutral or forward stick positions. The laser is a quadruple-width missile #0. The size can be set independently of the normal-size alien missiles by setting both of the lower two bits in SIZEM ($D00C = 3). This hardware register is divided into bit pairs for each of the four missiles. The missile shape is just one pixel high by two pixels wide.
Only one ship's missile or laser beam can be on the screen at any one time. To prevent it from refiring before it either strikes its target or exits screen right, a flag called TMIS0 is set. TMIS0 = 0 the first time through the routine so that it adjusts the missile's position to fire initially from the ship's nose and plots it there. It then resets the flag to 1 and turns on the laser fire sound timer. During subsequent cycles through the routine, the TMIS0 flag causes it to branch to the code that moves the
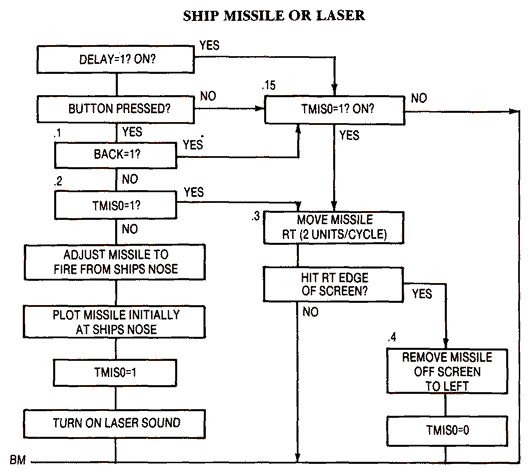
beam 2 units/cycle to the right. The position is tested against the screen boundary on the right side. If it hits it, the missile is removed and placed offscreen to the far left and TMIS0 is set to zero. Collisions, of course, cause the same effect, but they are tested elsewhere. To prevent the laser from being fired while the ship is offscreen after a derez, a DELAY flag is tested. The missile can't be fired if the flag is set, but a missile fired previously will continue along its track.
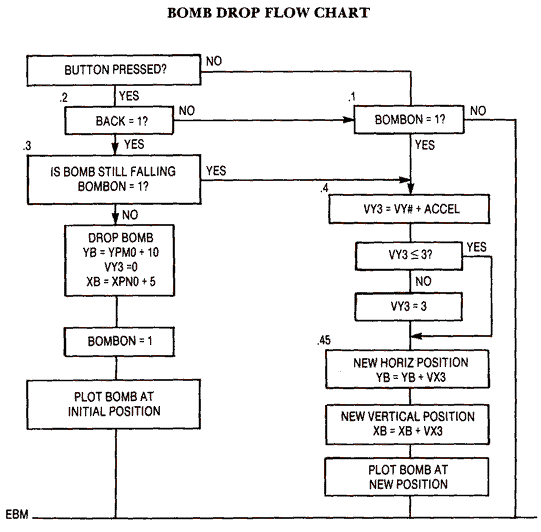
Bomb Drop
In a realistic bomb drop, the bomb arcs slowly at first and then accelerates rapidly downward until it falls almost entirely vertically. You can implement such a drop on the Atari with only a minimal knowledge of physics. Gravity or acceleration only acts on the bomb in the Y direction. While the velocity in the Y direction increases with time, the velocity in the X direction remains constant, if we neglect air resistance. An object that has a velocity in a particular direction will move in that direction. Its new position is equal to its old position plus its change in position during that period (velocity). We can summarize this as follows:
VY = VY + GRAVITY
YB = YB + VY
VX = CONSTANT
XB = XB + VX
Choosing a realistic acceleration value is largely experimental. Even an acceleration of + 1/frame would cause the vertical velocity to grow enormous over as little as 15 animation frames (1/4 second). If the bomb is to arc slowly, VY will have to be somewhat smaller than VX = 2 during the first few frames, yet not grow too much larger later, or the bomb will drop like a lead weight. In order for VY to increase slowly every fourth frame, the acceleration must be less than unity. A clever approach is to increment a variable called VTEMP and divide by 4 each time. It will take four cycles to increase VY by one unit/frame. This keeps the bomb from accelerating too fast, but it still will fall too rapidly from great heights. The solution is to clip VY so that it doesn't become too high. While the values are largely experimental, a maximum value of VY = 3 produces realistic-looking bomb trajectories.
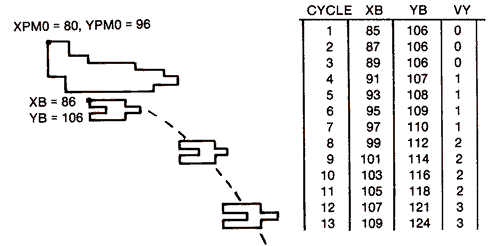
The bomb subroutine uses a flag called BOMBON to determine if it should plot the bomb initially directly beneath the plane, or accelerate and move it as it falls. The bomb must begin its descent from the center of our plane because bomb bays are located at the plane's center of gravity. Therefore, the bomb needs repositioning from the ship's coordinates XPMO, YPMO at the tip of the tail. YB = YPMO+10 and XB = XPMO+5. The bomb is plotted there, and the BOMBON flag is set to 1.
When the bomb subroutine is entered on subsequent frames, it branches to the bomb falling code where the bomb's velocity and position for each direction is calculated. It is then plotted in that position. Of course, the bomb is removed during the collision test if it strikes either the ground or any of the laser base or missile targets, but that occurs elsewhere in the main line code. The BOMBON flag is reset to zero there, so that another bomb can be dropped if the trigger is pressed while the stick is pushed back or to the left.
Ship's Explosion and Delay
The player's ship explodes upon collision with the terrain, an alien, or enemy fire from either the laser bases or alien craft. Although there are many methods to explode a ship, we choose to use the deresolution method employed earlier in the Space War game in Chapter 5. The appearance is of a ship that is slowly disintegrating. As you recall, it uses a random number generator to degrade a duplicate of the ship's shape. It is a fairly complicated routine that uses a series of AND and ORA instructions to control the image's rate of degradation so that the random flickering of the individual pixels lasts at least forty-eight cycles. We aren't going to explain the routine again, so we suggest you look at it in the last section of Chapter 5.
Since their should be a several second rest between the ship's deresolution and its reappearance to battle once again, many of the subroutines that operate on a per cycle basis should be shut off during this period. These include the start of another enemy attack once they clear the screen, and the ability to fire lasers and drop bombs once your ship is killed. While it might be easier to set one delay flag during the explosion and branch past all of the code, you need to be selective in what is shut down, otherwise laser beams and falling bombs might vanish in mid-flight and the screen would suddenly stop scrolling with aliens frozen in position. The game should go on. After all, it is only your ship that has been destroyed; everyone else is still alive.
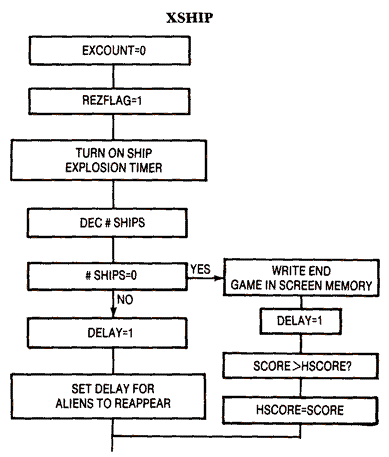
We need to set several flags in the XSHIP subroutine that is called whenever the ship collides with anything. Setting REZFLAG = 1 turns on the actual explosion subroutine. Setting DELAY = 1 starts the four second delay. In addition, this lengthens the timer delays, NDELAY1 and NDELAY2, that control when the next set of aliens reappear. If we are out of ships, the words "Game Over" are written into screen memory just beyond the right edge of the screen.
There is a section of code at the beginning of the Vertical Blank Interrupt routine that actually monitors all of these flags so that the ship is derezed first and then removed from the screen until the four second delay ends. It keeps track of the timer at location $13. This location is incremented roughly every four seconds. When it is
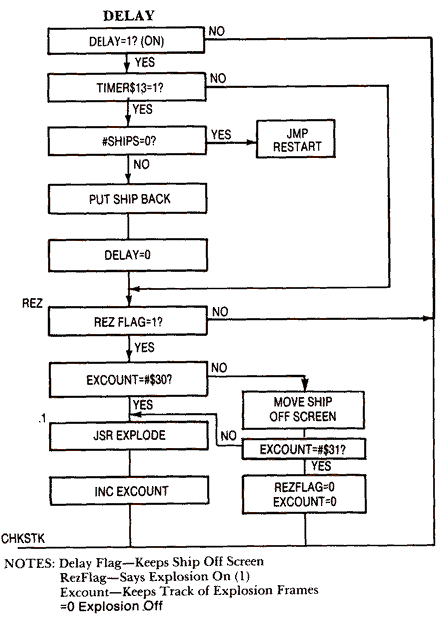
non-zero, the routine checks if any ships are left, and if so, puts the ship back and resets the delay timer to zero. Obviously, if we are out of ships, the game is over, and it is time to jump to the very beginning of the game code.
Long before the timer at $13 ever becomes non-zero, the routine determines where it is in the derez cycle via a counter called EXCOUNT. The explosion subroutine increments EXCOUNT after each cycle. When EXCOUNT reaches 48 cycles, the ship is virtually disintegrated. This is done one cycle earlier than the cycle that resets REZFLAG = 0. If at least one of the ship's pixels is in contact with the playfield, a collision value will be returned even though we just ordered the ship offscreen. The computer updates it's collision registers before we have time to move our ship. If we don't delay setting REZFLAG = 0 by one cycle, our collision test may detect a bogus collision and the player loses another ship. The ship is then moved off the screen. This is done one cycle earlier than the cycle that resets REZFLAG = 0 because if at least one of the ship's pixels is in contact with the playfield, a collision value will be returned even though we just ordered the ship off screen. The computer updates it's collision registers before we have time to move our ship. If we don't delay setting REZFLAG = 0 by one cycle, our collision test may detect a bogus collision and the player loses another ship.
Scrolling
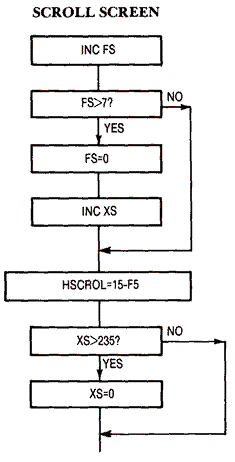
The screen scrolls leftward at a constant rate of one color clock per second except when the control stick is pushed to the right. It then scrolls at two color clocks per second so that it appears that the ship is flying at twice the speed. To scroll the screen smoothly you need to alternate between adjusting the fine scroll register over eight color clocks, and rough scrolling the screen by adjusting the LMS operands of all twenty-two ANTIC 6 mode lines.
In our case, we increment a variable called FS, short for fine scroll, each cycle. This variable goes from 0-7, and is backwards from the horizontal fine scrolling register HSCROL at $D404. HSCROL is initially set at 15 when FS equals 0 and counts down as FS increases. Thus, HSCROL = 15-FS. The fine scroll register is reset every eight clock cycles and the rough scroll variable XS is incremented. When the screen has been rough scrolled 235 times, it is time to stop and reset the rough scroll register XS back to zero. If we try to go further, for example to XS = 236, ANTIC will fetch the first nineteen bytes of that scan line correctly, but the twentieth will be data for the following scan line. This obviously produces a faulty display that becomes worse the further we move into the wraparound zone. This end zone should be an exact duplicate of the first screen so that when we jump from XS=235 to XS=O, the screen will remain unchanged.
Programmable Aliens
It usually requires an extensive amount of program logic to achieve a variety of enemy patterns within a game. Some games, like this one, use preset patterns that are independent of the player's action, while others react to evasive techniques used by the player. Obviously, the computer's reaction to the player's actions produces more challenging games, but if the programmer isn't careful he may design a game in which it is impossible to survive.
For example, in this game aliens follow some sort of zig-zag pattern, change their speed, and shoot in predetermined directions as they close on your position. It would be quite easy to program them to home in on your position with their guns or just on your vertical position for eventual collision. There would be only two possible results: you would either be able to shoot them easily if they matched your vertical position quickly for they would always be directly in your line of fire; or they would home in on you at the last split second and you would have no chance of survival. Likewise, you could never evade their guns, if they were programmed to shoot with uncanny accuracy. Perhaps a better method might be to make random variations on a predetermined path.
We chose a slightly different tack to solve the problem of easy programmability, while still offering enough variations to make learning the alien attack patterns difficult. We actually developed five different patterns for each alien player, and to make it easy to change wrote a scheduling routine that bases all enemy actions on an internal timer and a set of tables.
The first three bytes in the table contain the X1, Y1 starting position of the alien, followed by the value NDELAY1, which is the delay in cycles before the next alien appears after the current one is killed or exits the screen. Each group of six bytes that follows is an instruction containing the high and-low-byte time to read the next instruction (TIME1L,TIME1H), the alien velocity (VX1,VY1), whether to shoot or not (SHOOT1), and the direction of the shot (DIR1). We are limited to eight different instructions for each programmable alien because five different patterns are stored in one 256-byte page of memory. Thus, each complete program occupies 6*8 + 3 = 51 bytes of memory. We have set aside two blocks of memory, one for each player.
If you look at the data in our table ENEMY1 for the 0th shape, it is as follows:
X1       Y1       NDELAY1
$D0      $50      $30

TIME1L     TIME1H        VX1      VY1      SHOOT       DIR
$28        $00           $FF      $00      $00         $00
$50        $00           $FF      $01      $00         $00
$70        $00           $FF      $00      $01         $07
$FF        $00           $FF      $00      $00         $00
If you match it against the diagram below, you will see that the alien enters the screen at X=$D0, Y=$50. These are player-missile screen coordinates and are completely independent of the scrolling playfield. The value NDELAY1 = $30 means that there will be a delay of forty-eight screen cycles between one programmable alien using player #2 leaving the screen, and the next one entering. The alien begins moving leftward in step with the scrolling terrain below until the internal timer (TIMER1) reaches $28. It then reads in the next six-byte instruction. This instruction tells it to begin moving diagonally downward. VX1 =$FF and VY1 =$01. It also obtains a new timer value of $50 so that the next instruction isn't read until its internal timer reaches $50. At that time VY1 = 0 and the alien continues its path along the horizontal axis. Its gun is turned on, and it shoots in a direction of 7, up and to the left. It reads its last instruction at TIME1=$70 and shuts off its guns. It will continue moving horizontally until it exits screen left.
There is a delay timer, TDELAY1, that prevents a new alien from appearing immediately after the first. The value of NDELAY1 that was looked up in the tables by the prior alien is transferred to TDELAY1 after that alien exits the screen. If TDELAY1 is positive when it enters the routine that reads the programmable alien code, it branches past it and just decrements this timer once each cycle. There is a secondary flag called ONSCRN1 that is set to one during alien initialization after the
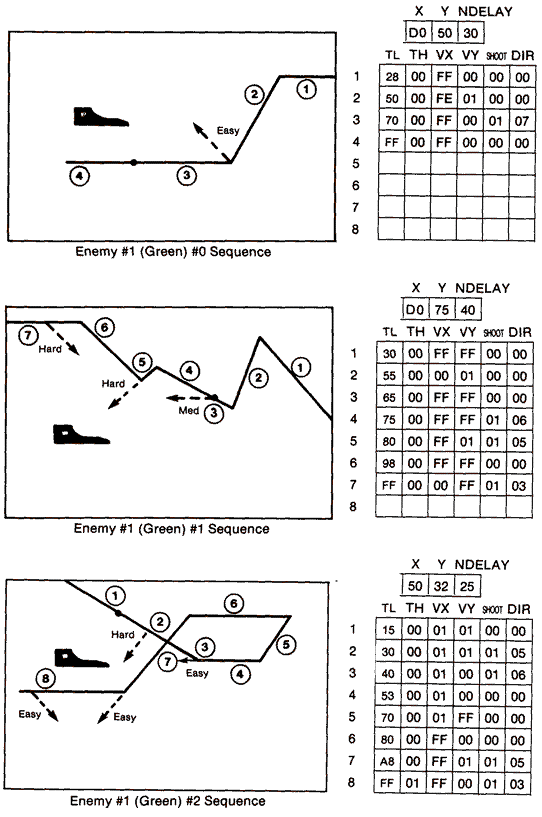
delay has ended. Once this flag is set, the program compares its timer, TIMER1, to that of TIME1 which it obtained from the first set of instructions. If it is equal, the program looks up the next set of instructions. It then moves the alien, jumps to a separate subroutine to fire the missile, checks if the alien is still on the screen, and finally plots the alien.
During initialization, one of five sets of pointers to the programmable data is chosen randomly. Then, one of five alien shapes is randomly picked. This prevents the player from predetermining the pattern from the alien's shape. The ONSCRN flag is then set and the initial values for X1,Y1, NTDELAY1, VX1, VY1, TIMEL1, TIMEH1, SHOOT1, and DIR1 are obtained.
The obvious advantage of developing this routine was that we were able to create an attack pattern, test it, then modify it until it became sufficiently challenging. Of course, when we did this, we hadn't put in the CHANCE subroutine. Therefore, it was easier to control which programmable alien code we were working with. Since the X-register determines which program is loaded, it is fairly easy to skip the CHANCE subroutine and load the X-register with a value from 0 to 4.
The game turned out to be much more difficult than anticipated because the level of alien firepower was too intense. It was relatively easy to cut the firepower at the beginning of the game, and then raise it as the player's score increased. The game shifts to intermediate level at 400 points, then to expert level at 2000 points. Most of the shoot flags in the programmable tables are set to zero at the beginning of the game and then restored as the game progresses. Consequently, it was quite easy to develop a game that increases in difficulty with the player's skill.
Ground Lasers
The four ground lasers use animated character graphics to move their laser beams. The segment of the beam uses internal character #62. Each base uses two flags to keep track of the status of the base and two timers to slow the beam down and delay it between firings.
The main loop code performs a simple test to determine if it should call the subroutine LASER. A timer called LDELAY is set to #$50 after each shot to insure that it rests slightly more than one second before refiring. The timer decrements once each cycle, so eventually it will reach zero and call the LASER subroutine.
Since it is possible to destroy one or more bases, the GALIVE flag keeps track of active bases. Bases are alive when GALIVE = 1. The LASON flag is used to prevent the routine from reinitializing the beam after it begins its track from just above and to the left of the laser base. When LASON = 1, it skips the initialization and proceeds with the movement each time LCOUNT reaches zero until the beam, which is plotted at GROUNDL, GROUNDH, reaches the top mode line at GROUNDH = #$70.
The beam, which is traveling at a forty-five degree angle, is first erased at its old position GROUNDL,GROUNDH by writing a blank character #0. The new position is one character to the left and one mode line (256 bytes) lower in memory. Therefore, the new position is at GROUNDL-1,GROUNDH-1, and we plot internal character #62 in this position of screen memory. The beam would move much too rapidly if it were moved every cycle. We can slow it down and move it every third cycle by our usual countdown timer method. LCOUNT is reset to 3 each time the beam is moved and then decremented with each cycle. The beam is moved only when LCOUNT reacbes zero, thus slowing the beam down.

Collision Tests
There is a long series of collision tests in the main code loop that cover every possible interaction between any two screen objects. The tests can be performed outside the VBlank because the main code only executes once every VBlank cycle and will do the test after the collision registers have been set from the previous frame.
The first few tests involve collisions of our ship with the playfleld, enemy aliens, and their missiles. Ground-based laser fire is considered playfield in the tests. In all cases, collisions result in the elimination of our ship via the XSHIP subroutine. We only score points in the case where our ship collides with an enemy ship. A kill of any nature is worth points even if it costs you dearly. The explosion sound timers are also set here.
The second series of tests involve collisions of the two aliens with the playfield and our ship's laser. All cases result in the elimination of the alien ship. Points are only scored if the alien craft are killed by our ship's laser fire.
The final series of tests involve collisions of bombs and our ship's laser fire with the playfield. Collisions with the ground (playfield #0) are simple and only result in the removal of the weapon. Collisions with ground targets (playfield #1), however, are more complicated because we need to calculate which target is to be removed in the subroutine RTARGET.
Fortunately, all of the targets are widely spaced so that we basically only need to compare the position of our laser or bomb with that of the playfield beneath. To convert the player position of the missile or bomb (POS) to that of the playfield requires us to first determine how many character positions are between it and the playfield's left screen edge, and add the rough scrolling offset into the playfield map, XS. The formula is:
BTARGET = XS + INT(POS/8)
Using this formula produces inaccuracies because we don't take into consideration the possibility that either the fine scrolling register or the left edge of the bomb may clip the far edge of the target in its arc, and thus throw off our calculation. Obviously, if we are testing for an exact horizontal match between the weapon's position and all of the available ground targets, we are going to miss occasionally. If we expand the test to include the BTARGET-1 and BTARGET+1, a match would always be assured.
Our subroutine decrements BTARGET and first compares it to horizontal positions of each of the four laser bases. It removes it if it finds a match and sets a flag STRIKE = 1. It continues to do the same test with the seven missile bases. If STRIKE doesn't equal one when it is finished, it increments BTARGET and tries the tests again. It will eventually find its target on one of the three passes, remove it, trip the explosion sound time, score some points, and exit the subroutine.
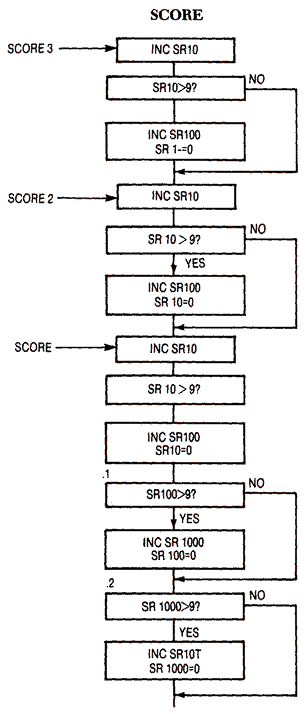
Scoring
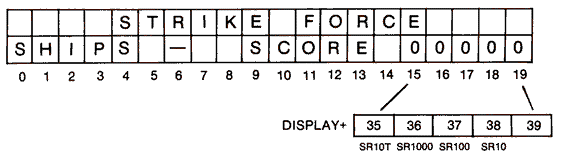
The scoring subroutine differs little from those of many of the others used in this book. It and others keep track of the different decimal digits separately so that they don't have to convert an internal hexadecimal score to decimal. There are separate counters for the tens digit, hundreds digit, thousands digit, etc. Carrys are performed into the next higher digit whenever one or more of these digits exceeds a value of nine. The actual positions of each of these counters in the score line is shown below.
The scoring values for each target in the game are worth differing point values. Missile bases are worth 10 points, alien ships 20 points, and laser bases 30 points. Fairly high scores can be achieved by players since there are an unlimited number of aliens, and missile bases are replenished after all seven have been destroyed.
There are three separate entrance points to the subroutine. Notice that the first three blocks of each in the flowchart are identical. Each of these small sections increments the tens digit SR10 by one, and takes care of a carry to the hundreds digit if necessary. When 20 points are awarded for a target it enters at SCORE2, a lower point in the subroutine, and increments this digit twice. By entering at SCORE3, 30 points are scored since it passes through all three sections of the same code.
Retaining the player's high score turned out to be especially important in Strike Force. Many players had difficulty with the game, scored low, and refused to play it after two or three tries. When the high score feature was added, they would play for much longer periods to beat their last high score. Since the game resets automatically through the System Reset Vector, it was necessary to place the initialization for the high score digits or variables prior to that address in the game. The score variables for the last game aren't reset until after the START key is pressed. This makes it possible to see both the high score and the score for the previous game while in the "attack mode." Space was tight in the two-line display so that the two scores alternate in the display's slow-blinking cycle.
The high score is updated in the subroutine XSHIP when the game is over. Each of the current high score digits, starting with the highest, is subtracted from each of the score digits. If any become negative in the process, it means we haven't reached a new high score and the routine aborts. It updates only when it detects a positive result. Zero results are ignored. Once a positive or negative result is obtained, the rest of the lower digits are ignored for they would only confuse the routine. For example, if SCORE were 00630, and HISCORE were 00580, it would get a positive number in the hundreds digit. This means we have a new high score. If we were to continue the test we would get a negative number in the tens digit. This would mean we don't have a new high score. Since only the first positive or negative result is meaningful, it is best to ignore the remaining digits.
Sound
The game uses all four sound channels. Channel one is used for the laser fire sound, channel two for the short explosion sounds of the aliens and ground targets, channel three for the engine sound, and channel four for the sound of the ship's longer explosion. Four separate channels are required so that one sound doesn't interfere with another in the event that several occur simultaneously.
The sound subroutine resides and operates in the VBlank routine, They are essentially always on but require setting a positive value in a flag to trip them. For example, the laser sound can be tripped by setting SLTIME = 1. Each of the routines, which are described more fully in the sound section in chapter eight, use internal countdown timers to gradually lower the tone and volume. The engine sound, on the other hand, just produces a continuous sound using some distortion. The frequency is changed to a higher pitch when the ship speeds up.
Download SCROLL.EXE (Executable program)
Download / View SCROLL.LST (Assembler listing)
Download / View SCROLL.S (Source file)
Return to Table of Contents | Previous Chapter | Next Chapter