LAURENCE PRESS
COMPUTERS AND SERIAL IMAGERY
The reason I'm painting this way is that I want to be a machine, and I feel that whatever I do and do machine-like is what I want to do. Andy Warhol, 1963.
Rose is a rose is a rose is a rose. Gertrude Stein, 1922.
In his survey of serial imagery in paint1, John Coplans defines serial imagery as "a type of repeated form or structure shared equally by each work in a group of related works made by one artist." This article will describe some of the ways in which I have used a computer to generate series of related images, but first let me discuss a few examples of serial imagery in other media.
The tradition of serial imagery in painting began with Monet who, being vitally concerned with light, often painted the same object or scene repeatedly under varying light conditions. Between 1891 and 1926, Monet painted series of groups of poplar trees, haystacks, the Rouen Cathedral, mornings on the Seine, Japanese footbridges, the Waterloo Bridge, and water lilies. Since Monet, many painters (mostly abstract) have worked serially. Andy Warhol, with his painted (and printed) series of movie stars, Mona Lisas, soup cans, coke bottles, etc. is the foremost serial artist today.
Serial imagery may also be found outside of painting. While Monet was doubtless motivated by a fascination with changing light, he may well have also been familiar with the photographic series of E.J. Muybridge, Thomas Eakins and E.J. Marey.2 These were made in the 1870's and 1880's and often depict movement in an animal or a human athlete in a series of stills. Some of these are discrete images, separated in time by fractions of a second, and others are superimposed stroboscopic images similar to Duchamp's "Nude Descending a Staircase" or certain present-day advertisements depicting spunky, milk-drinking gymnasts tumbling about in red leotards. Today, one finds photographers such as Ray K. Metzger working with serial imagery.3
Larry Bell and Donald Judd are two modern sculptors who create series. Bell makes series of transparent boxes, each of which refract light in a slightly different manner (these are illustrated in 1). Judd makes series of identical modules which he might attach to a wall in a vertical 'stack' as well as series of objects which vary in size and/or placement according to some mathematical progression.4
Computers are well suited to the production of series of images. A series of identical images may be made by simply re-running a program, or variation from one image to the next may be induced by changing some parameter value with each run of the program.
I have experimented with series of line printer pictures made from single, digitized images. Each series includes an unmodified reproduction of the original and several copies which have been transformed along some dimension. For instance, a series might be made by reproducing an image with no random noise, with 5% noise, 10% noise ... 100% noise. Before describing some of the transformations I've tried, let me say a few words about figure 1, which illustrates the mechanics of producing these pictures.
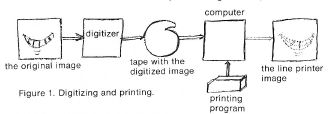
Digitizing and Printing
The process begins with a photographic print or negative which is automatically scanned and digitized. This is done by a machine which breaks the photo up into a 256 by 256 point grid and records the amount of light which is reflected back when a beam is focused on each of the grid points. If a grid point is in a very dark area of the image being scanned, little light will be reflected back and a high percentage will be reflected in a white area. The proportion of light reflected back is mapped onto a scale ranging from 0 (pure black) to 127 (pure white) and these 'light intensity scores' of each grid point are written on a magnetic tape. Scanning and digitizing an image in this manner takes about ten minutes.
At this point we have a magnetic tape with 65,536 numbers on it, which may be used to make any number of line printer (or other sorts of) images. The program to do this is fairly straightforward. Each row of the original is printed on a single line printer line. Varying degrees of shading are achieved by overprinting. For example to print a black grid point the characters O, M, W, and # would all be printed on top of each other; to print a grey point, the characters X and * might be superimposed and a white point would be represented by not printing anything. Table 1 shows the overprinting that I have used to get eight different grey-scale levels.
| Grey-scale level | Printed characters |
| 1 (white) | blank |
| 2 | - |
| 3 | = |
| 4 | +,+ |
| 5 | X,* |
| 6 | X,X,= |
| 7 | O,X,* |
| 8 (black) | O,M,W,# |
Table 1. Grey-scale overprinting.
Notice that there are only eight different grey-scale levels on the printed output, while each of the grid points was represented by a light intensity score ranging from 0 to 127. The most important parameters of the picture printing program are the 'clipping factors' which specify which parts of the range 0–127 are to be printed as grey scale levels 1 through 8. For example, one might specify that all grid points in the range 0–48 print at level 8 (black), 49–55 print at level 7,..., 100–127 print at level 1 (white).
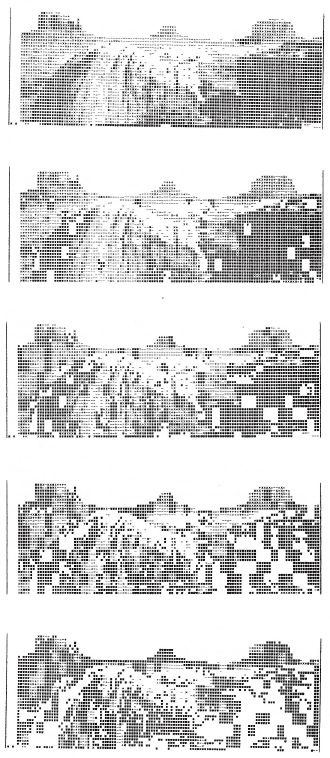
Compressed desert scene with correlated noise
Transformations
With these mechanics of digitizing and printing understood, let me continue with a description of some of the transformations I have used to generate series of related images from the same initial photograph.
1. Varying contrast.
Varying the clipping factors that are specified when an image is printed causes the degree of contrast in the print to vary. For instance, if one merely specifies that every point scoring above 150 print as white and every point scoring below 150 print as black, a high contrast, 'kodalith-like' image results. If the grey levels are distributed evenly across the light intensity range, a more 'washed out' image is produced.
2. Negative-positive.
By modifying the printing program to invert all grey-scale levels before printing (i.e. 1 becomes 8, 2 becomes 7,..., 8 becomes 1) one gets a negative of the original. A single series may be produced which consists of a high contrast negative, normal negative, washed out negative, washed out positive, normal positive, and a high contrast positive of an image.
3. Varying noise level.
Random noise may be introduced into an image in a number of ways. For instance, the printing program may be modified to print grey level 8 points as grey level 1 with a specified probability p. If p were set to 0, a normal image would be made; if p were set to .10, the black areas of the image would be 'peppered' with white; if p were set to .5, a mottled texture would replace all black areas of the image; and if p were set to 1, all black areas would print as white.
Many variations on this theme are possible. For instance, I have tried leaving all white (grey level 1) points white while switching all other grey levels to white with probability p; printing a randomly selected grey level at each point with probability p; printing a randomly selected grey level at each point with probability p, but leaving all white points white; etc.
Regardless of how the noise is introduced, a series may be generated by simply varying the parameter p from image to image.
4. Correlated noise.
In the examples in the previous section, each grid point was examined independently and either altered or not altered with probability p. It is also possible to consider groups of points and alter the entire group with probability p. For instance, if one looks at 4 by 3 blocks of grid points rather than each individual point, the effect is to generate noise with a 'checkerboard' feeling. As with the single-point noise discussed above, many randomization algorithms are possible when dealing with blocks of points.
5. Smoothing.
The inverse of adding noise is to perform some sort of averaging operation to remove noise. For example, one could reduce noise by replacing each n by m array of grid points with their average light intensity score (if the entire array were replaced by just one point, the picture size would also be reduced). Another possibility is to find grid points for which the light intensity deviates by more than some threshold amount t from the average of the surrounding grid points, and replacing those deviant points with the surrounding average. Series of images are generated by varying the parameters m and n in the first example or t in the second.
6. Insertion of arbitrary material.
It is possible to print arbitrary textures of character strings at various points in an image. For instance, one can replace all areas within a replace all areas within a specified light intensity range with some meaningful printed word. I have made pictures of Marilyn Monroe with the word 'ANDY' or 'MARILYN' inserted in all white (grey level 1) areas. Alternatively, some texture such as random noise, all black, all white, alternating white and black points, random white and black points, etc. may be substituted for areas of an image that fall within a specified light intensity range.
Another possibility is to insert words or textures in certain portions of an image regardless of the light intensities. The arbitrary material could be placed in randomly chosen spots, in the upper right hand corner, in one inch wide vertical stripes, in the center of the image, etc.
In any case, the results are more pleasing (to me) if the arbitrarily textured areas are outlined in white (grey level 1) points. In fact, regardless of how an image is transformed, white lines may be placed around areas of a given grey level, at random, or in arbitrarily selected areas of an image. This is another example of the insertion of arbitrary material.
In all of these cases, series may be generated by varying the amount and placement of the arbitrary material. For instance an image of Marilyn Monroe might be varied from an unmodified output to a few areas filled with the string 'MARILYN'...to an entire page filled with the string 'MARILYN.'
7. Stretching and compression.
An image may be compressed by deleting rows or columns of grid points or it may be expanded by repeating rows of columns of grid points. A series might begin with a vertically oriented image that has been compressed to just a few rows of output, followed by successively longer images up to a copy expanded to perhaps 5 times the normal length.
Note that if rows and columns are repeated or deleted, the scale of the image is altered, but it remains in proportion. For myself, I prefer the distortion of proportion which occurs when an image is expanded or compressed in only one direction.
I was fortunate to get 'bootleg' access to the equipment at the University of Southern California Image Processing Institute for the experiments described above. Had I not been so fortunate, I would have had to pay $25.00 for each image that I had digitized and anywhere from $.50 to $2.50 for each line printer output, depending upon its size. (They were made on an IBM 360/44 which is fairly well print bound for all of the transformations that I've described.)
It is uncomfortable to be begging for 'bootleg' time. The problem is that computer art doesn't really fit anywhere. Neither computer scientists and computer science departments, nor artists and art departments generally take it seriously enough to underwrite experimentation. Perhaps this is as it should be, or perhaps the quality of our work will win a place for computer generated art, I think that the jury is (justifiably) still out.
Venice, California
October 1975
REFERENCES
1. Coplans, John, Serial Imagery, New York Graphic Society, New York, 1968.
2. Newhall, Beaumont, The History of Photography, Museum of Modern Art, New York, 1964.
3. Lyons, Nathan, Contemporary Photographers, the Persistence of Vision, Horizon Press, New York, 1969.
4. Agee, William, "Unit, Series, Site: a Judd Lexicon," Art in America, May-June, 1975.
Return to Table of Contents | Previous Section | Next Section