High Speed Animation
With Character Graphics
Charles Brannon
Sound, color, and detail are all important in an arcade-style game, but movement generates the most interest. It's programmed into the brain. In all vision oriented creatures, motion takes precedence over all other visual stimulation. A frog notices a fly not because of any characteristic shape, or even its buzz, but because of its movement.
In a good arcade game, there is a lot of motion. Alien ships swarm and dive, invaders weave back and forth, ghosts chase, balls bounce--the mere description sounds exciting. If we want to develop a thrilling game, we must be able to quickly move objects around on the screen.
Speed is the key word. Let's face it--arcade games require fast animation of many objects. True arcade-quality games almost always require a high-speed language such as FORTH or machine language.
But BASIC is nota high-speed language. Its generality, style, and ambiguity make it easy to learn and use, but hard for a computer to efficiently execute. However, since BASIC is easier to use and modify for most people, let's see what we can do to make the most of what we've got.
Optimizing BASIC
Remember that computers are rather simple-minded, so try to break your task into small pieces. Try to have BASIC do as little work as possible. For example, to create a glowing image, we just need to change its colors rapidly. For example, to flash something drawn in in COLOR 1, we could code:
100 FOR I = 1 TO 100
110 SETCOLOR 0,INT(16*RND (0)),INT(16*RND(0))
120 NEXT I
The FOR/NEXT loop controls the duration of the flashing effect, but line 110 is the heart. It picks a random color and a random luminance for COLOR 1 (color register zero). To speed this up, we could POKE directly into the color register. There is one memory location (for our purposes) for each color register. These are located from 704-707 (the player/missile color registers) and from 708 to 712 (COLOR 0 to COLOR 4). Each can hold an even number from 0-254, according to the formula:
COLORBYTE = HUE*16 + LUMINANCE
So we could speed up line 110 by using:
110 POKE 7O8,INT(16*RND(0))*16+INT(16*RND(0))
This is still rather slow, since BASIC must interpret the long expression of INT's and RND's and perform three multiplications. Fortunately, there is another memory location called RANDOM ($D20A, or 53770 in decimal) that will give us a random number from 0-255. We can read RANDOM with PEEK(53770), and POKE it directly into color register zero:
110 POKE 708,PEEK(53770)
We've reduced a slow, albeit more readable and understandable, BASIC instruction with a direct POKE to a color register. POKEs are the key to fast graphics, then.
Animation
What about animation? The first thing that comes to mind is the technique of drawing a figure on a high-resolution screen such as GRAPHICS 7, redrawing it at a new location, and then erasing the old image. The following routine will move a box from left to right in GRAPHICS 7:
100 GRAPHICS 7
110 FOR I=1 TO 100
120 COLOR 1:GOSUB 200:REM DRAW A BOX
130 COLOR 0:GOSUB 200:REM ERASE IT
140 NEXT I
150 END
199 REM DRAWS A BOX:
200 PLOT I,0:DRAWTO I+10,0
210 DRAWTO I+10,10:DRAWTO I,10
220 DRAWTO I,0:RETURN
As you can see, the motion is smooth, but slow and flickery. This is unavoidable in BASIC. BASIC just can't draw things fast enough to provide fast animation.
What About P/M Graphics?
The Atari solution to high-speed animation is player/missile graphics. These shapes can be moved over the playfield without erasing what they pass over, unlike the method mentioned above. Unfortunately, P/M graphics are not suitable for purely BASIC programs, unless you want only horizontal movement. Vertical motion in BASIC is also slow and flickery.
One solution is machine language, and you will find some machine language routines for using P/M graphics from BASIC in this book. But if you're not ready for machine language, can't quite grasp P/M graphics, or if you're looking for an easier way to quickly move dozens of objects, read on.
POKEing Graphics
What if we could use POKE to generate graphics? That way, we could simplify graphics the same way we did the color registers. Did you ever wonder how the Atari displays a screen? It's a complex subject, but it can be simplified:
COMPUTER -> MEMORY -> ANTIC/CTIA -> TV
When the computer wants to display something, say the character "A", it places a number representing "A" into memory. The ANTIC chip, a video microprocessor, continually looks at the memory, calculates a TV display, and sends this information to the CTIA (or GTIA in recent Ataris), which draws the picture on the television screen.
The computer could directly tell the CTIA what to do, but if it did bypass ANTIC, the computer would be responsible for all display, leaving little or no time for its main job--computing! So the memory is like an image of the TV screen. Since the computer can both read and write to memory, it can place characters on the screen by writing to this memory, and can look at the TV indirectly by reading this memory.
Perhaps our scheme is becoming clear. Instead of using PLOT, DRAWTO, or POSITION and PRINT (which are slow, slow, slow), we can use POKE to directly place a character on the screen. To move the letter "A" across the screen, we just POKE a 33 (the value corresponding to an "A") into the screen memory, and erase it by replacing it with a space. A fragment of code might look like this:
SCREEN=PEEK (88)+256*PEEK(89)
FOR I=1 TO 39: POKE SCREEN+I,33:POKE SCREEN+I-1,0:NEXT I
This would move the letter "A" left to right, assuming the variable SCREEN has been set to the start of screen memory. Notice how fast the character moves. Imagine that the "A" is a spaceship, or an alien invader. That's some fast animation!
Defeat The Invading Q's!
But an "A" is notan alien invader, and it isn't much fun shooting at letters of the alphabet. Fortunately, there are two solutions. First, we can use some special characters built into the Atari. For example, press CTRL-T (hold down the CTRL key and press "T"). You'll see a "ball" character. This could be used as a ball in a pong-type game.
Next, try CTRL-A, CTRL-T, and CTRL-D, in that order. You should see a "tie fighter," right out of Star Wars.You can see the potential here, but it's not easy to get much color from a GRAPHICS 0 display. Instead, you can use these character graphicsin graphics modes one and two, which generate large-size, five-color text. It's rather complicated to use the CTRL graphics in these modes, but another option is available.
Custom Characters
As you are probably aware, you can rather easily redefine any character. You could, for example, change the alphabet into a foreign-language alphabet, such as Greek. You could also redefine a character into a spaceship or a blue meanie. These redefined characters can be shaped to resemble almost anything, and then moved about at high speed. The details of customizing the Atari character set are explained in the previous chapter.
Since each character is 8x8 blocks, and takes up only one byte of memory on the screen, you can move up to 64 pixels (8x8) with a single POKE. Using PEEK, you can scan ahead in the direction of movement for a collision with other screen objects, much faster than you could with POSITION and LOCATE statements.
Finding The Screen
For the sake of example, let's use a GRAPHICS 1 screen. The computer must store the information for the screen somewhere in its memory. Since this is the same memory that you use to store programs or other information, the screen memory must be somewhere out of the way. The GRAPHICS command always places the screen where it perceives the top of memory to be. If you have a 32K machine, the top of memory is at location 32767 (32*1024-1). On an 8K machine, the screen would reside at just under the 8191 byte limit. Furthermore, the screen memory starts at different places in each graphics mode. For example, GRAPHICS 8 must start the screen 8,000 bytes from the top of memory.
Locating the starting address of screen memory would seem to be rather tricky. Sure, you could probably look the value up in a large table (indexed by memory size and graphics mode), but why not just ask the computer?
A Double Byter
As it turns out, the starting address of screen memory is stored at locations 88 and 89. Since a memory location can hold only a number from 0-255, it is obvious why two memory locations are needed to hold numbers as large as 65,535. The two locations each hold a part of the number. So, we can use PEEK to calculate the starting address of the screen:
SCREEN=PEEK(88)+256*PEEK(89)
The second part of the number is always multiplied by 256 and added to the first. There are many of these double-byte locations in the Atari, and you use the same formula to read them.
Now that we have the screen address, we're ready to begin. Note that you should place the screen calculation line after the GRAPHICS statement in your program.
A Better Way
Formerly, you probably used something like POSITION X,Y:PRINT#6;"A" or COLOR 65:PLOT X,Y to place a character on a graphics mode 1 or 2 display, at horizontal location X, and vertical location Y. For GRAPHICS 1, X can range from 0 to 19, and Y ranges from 0-23. It's almost that simple to POKE a value into screen memory, using:
POKE SCREEN+X+20*Y,33
(SCREEN is the address of screen memory)
The vertical component, Y, is multiplied by 20. Think of screen memory as 24 rows of 20 characters. You could go strictly left to right, from 0 to 19, then wrap around to 20 through 39, 40 through 59, etc. But if you want to access the screen by X,Y coordinates, you multiply Y by 20 to reach line Y. You can see that the last memory location would be at X,Y:19,23. Using "X + 20 * Y", this would give us 479. So to place an "A" at the top left corner of the screen (home, or the origin), use POKE SCREEN,33. To place a "B" at the lower right-hand corner, then, we could use POKE SCREEN + 19 + 20*23,34 or POKE SCREEN+479,34.
Internal Vs. ASCII
If you already happen to know the ASCII value of "A", which is 65, you may wonder why we POKEd the screen with a 33. The reason is that although you use ASCII to PRINT characters to the screen, printer, or disk drive, the Atari uses an internal character set for its own uses. Two of these uses are for character set look-up and for storing information in screen memory.
Why doesn't the Atari use ASCII internally? Well, graphics modes one and two permit you to display four colors of characters. This requires two bits to hold the colors from 0-3. These bits are stored as part of the character's numeric, or binary, value. This leaves only six bits for the character, restricting it to the range of 0-63. Whew! This is only half of a full 128-byte character set, so Atari restructured the order of the characters so that uppercase and punctuation are in the top half, and lowercase and graphics in the lower, a feat not possible with standard ASCII. This way, with a "switch" POKE, you could use either half in graphics mode one or two. (The lower half is used in a demo in the Atari BASIC Reference Manual, "Seagull over Ocean," on page H-11, and in our example program at the end of this article.)
The result of this is that we must translate between ASCII and the internal character set. You can compare the two using Figure 1, or look up the number of a character in Table 1. As "A" is 65 in ASCII and 33 internally, you may be tempted to think the translation is as simple as subtracting 32 from the ASCII value. This works fairly well in graphics modes 1 and 2; but, as you can see from Figure 1, lowercase doesn't move at all, and you must add 64 to convert the "control graphics" characters from ASCII (also called ATASCII for ATari ASCII) to the internal character set.
Action!
Let's look at a fragment of code that moves the character "A" diagonally from top left towards bottom right. Again, the "A" could be redefined with a custom character set, or you could use another character by looking it up in Table 1 and replacing the 33 below:
10 GRAPHICS 1+16:REM Full screen
20 SCREEN=PEEK(88)+256*PEEK(89)
30 FOR I=0 TO 19
40 POKE SCREEN+I+20*I,33
50 NEXT I
60 GOTO 60:REM Wait for [BREAK]
The sample program should be fairly self-explanatory. The "I" index ranges from 0 to 19, which is used to select both a horizontal and vertical value. The "33" places an "A" on the screen. This is not erased, so we get a diagonal line of "A's". Add this line to erase an "A" after it's drawn. This creates the illusion of movement.
45 POKE SCREEN+I+20*I,0
A Star Maker
Let's add a line that litters the screen with stars, as in an outer space scene. The code for our star will be 14, the period:
22 FOR I=1 TO 50
24 POKE SCREEN+INT(480*RND(0)),14
26 NEXT I
We don't care to independently control both the X and Y coordinates of each star. We just want to pick a random screen location from 0-479 (0,0 to 19,23). The above piece of code will place about 50 stars on the screen. There could be fewer than 50 stars, even though the index ranges from 1 to 50. Can you see why? Imagine what would happen if the same random number were picked twice within the loop. The second star would simply replace the first. We could make our star-maker fragment more intelligent by having it look to see if there is already a star where it wants to place one.
Taking A PEEK
With PLOT, you can use LOCATE, to "read" a point on the screen. This is much slower than PEEK. We use the same formula as POKE to read point X,Y (since we're looking at the same memory): Z = PEEK(SCREEN + X + 20 * Y). Of course, the variables X,Y, and Z are entirely arbitrary. We can change line 24 to look at the screen before it plunks down a star, and force it to find a blank spot:
24 R=SCREEN+INT(480*RND(0)):IF PEEK(R)<>0 THEN 24
25 POKE R,14
We could likewise place a lookahead statement into the loop that moves the "A" to see if it hits a star:
55 IF PEEK(SCREEN+I+20*I)<>0 THEN 60
60 POKE SCREEN+I+20*I,10
70 GOTO 70
We place this statement at line 35, before line 40, for if we placed it after line 40, the PEEK would read the "A" we just POKEd in line 40, and would of course detect a collision. As is, it checks the intended position first, and if there is something other than a space (code 0), there must be a star there, so we exit to line 60, which places an asterisk, representing an explosion, at the intended position.
If we didn't want to explode when we collided with a star, we could have left out line 35. When the "A" traveled over a star, it would merely erase it. If we wanted to have the "A" just pass over the star nondestructively, we could use PEEK to read the contents of the next position of the "A", save it in a variable, and then restore the old value when we're ready to move the "A" to its next position:
35 P=PEEK(SCREEN+I+20*I)
45 POKE SCREEN+I+20*I,P (instead of 0)
60 Delete this line if you changed it above.
A Sample Program
A complete program using all these techniques is presented at the end of this article (Program 1). Using GRAPHICS 1, it draws a border around the screen. If every animated object checks for a collision with the border, we won't have to worry about errant creatures flying off the screen (out of the boundaries of screen memory) into our program's memory. If you don't use a border in your game, you should make sure that any POKE is within the range of SCREEN + 0 to SCREEN + 479 for GRAPHICS 1. (You can refer to Table 2 for screen limits for other graphics modes.)
Two objects are moved, the player (moved with the joystick), and a bouncing ball. The game is written using the lower half of the character set. SETCOLOR 0,0,0 is used to make the hearts (which map into the same area as SPACE does in the top half) disappear. POKE 756,226 selects the bottom half.
The ball is CTRL-T, but the player can be any of eight characters, depending on which direction he is facing. Only one character representing the character is used at a time, however.
Four-Color Mapping
Figure 1 (Internal Character Set) comes in handy for figuring out what colors a character will be. For example, you know that you can get four colors of "A" by using "A", lowercase "a", inverse video "A", and inverse video lowercase "a". Not so obvious is, say, the dollar sign. There's no such thing as a lowercase dollar sign, but you can still get four colors.
Just count down two rows to see the character you should use. If you count down two rows from "A", you will find a lowercase "a". Two rows down from the dollar sign is CTRL-D. Incidentally, we can tell that the strange graphics symbol two rows down from the dollar sign is indeed a CTRL-D, since it is underneath the letter "D".
If we are using the second half of the character set for our game, we can use the same figure (Figure 1) to see where the strange graphics characters map out. To get a blue club, we just use an inverse-video "0". (See how the "0" is two rows above the club, CTRL-P?) I'm sure you will find many uses for Figure 1 in the future.
Analyzing The Sample Game
Let's look at Program 1 together. In addition to using character graphics for animation, this program uses a few programming tricks that require explanation.
Initialization
Lines 100-180 initialize the direction and character arrays (described later). Lines 190-230 set up the GRAPHICS 1 screen, select the lower half of the character set, and set color register zero to black in order to erase the inevitable hearts. Line 240 defines variables for two characters used, the ball and the star (which is CTRL-I, a small block).
Lines 250-370 draw a border around the screen (Lines 270-300 draw the sides, 310-350 the top and bottom, and 370 the corners). Lines 390-400 scatter stars upon the screen. The IF statement checks to see if the intended spot is empty before POKEing a star. This prevents a star from overwriting the screen border just drawn.
The variables PX and PY, initialized in line 410, hold the player's horizontal and vertical position, respectively (1-18 and 1-22). Line 410 also places the upward-facing player character on the screen. Line 420 initializes the ball X,Y variables and effectively selects a random starting location for the ball.
Line 410 sets the ball's horizontal and vertical displacement variables. Each move, DX is added to BX, and DY to BY. If DX and DY are 1, then the ball will move diagonally towards the lower right ( + 1 right, + 1 left). DX and DY can take on other values from -1,0, and + 1. In this program, either DX,DY, or both DX and DY are switched (their sign is changed, as in DX=-DX) to bounce the ball in an opposite direction when it hits the wall or a star.
The Main Loop
The main program, in the form of a continuous loop, goes from 460-770. Lines 460-600 let the player move, if he wants to (the joystick is pushed); otherwise the ball moves.
Temporary variables hold the updated values of PX and PY. These variables are changed by the arrays DX and DY, which, like DX and DY for the ball, make the player move up, down, left, or right. ST, the joystick position, is used as an index into the array, instantly selecting the proper displacement. For example, a joystick reading of 14 means up. DY(14) equals -1, and DX(14) is 0. This subtracts one from the player Y value (moving it up), and leaves the horizontal value unchanged. If DX was non-zero, a diagonal motion would result. Puzzle over the concept of displacement, but remember the technique. Using an array as a look-up table saves you from having to use a list of IF/THEN statements such as IF ST = 14 THEN PY = PY-1:GOTO xxx. This saves memory, and, more importantly, time. Table lookup gives BASIC less work to do and results in some very fast games.
Collision Detection
Line 510 calculates PPOS, which is the absolute memory address of the player in screen memory. We can then easily check for a collision, as in lines 520-530. Remember, the player hasn't moved yet, since we've only used temporary variables. We're just checking the anticipated move. Since the ball and the star have already been processed, if there is any other character detected in line 540, it must be one of the characters in the boundary. If so, we cannot let the player advance, since this would erase the boundary and let him escape from the screen. (Shades of TRON!) Since PX and PY haven't been changed yet, we just exit and let the ball move. The player hasn't gone anywhere.
Assuming the player makes a legal move, table lookup is used once again to find the character corresponding to the direction the player is facing. The characters used are arrows and the diagonal corner characters. The previous player character, still pointed to by PX and PY, is erased in line 580, and the new character is POKEd into PPOS, the updated location. Now PX and PY are changed to reflect the new location (line 600).
Moving The Ball
Lines 640-730 move the ball. This is a fairly simple routine. All we do is update the X and Y variables (using temporary variables as we did with the player), with DX and DY. The ball's position in screen memory is calculated in line 650. Line 660 checks for a collision with the player character, meaning that the ball is caught. Since there are eight player characters, we could need up to eight IF clauses. But since the only thing drawn in COLOR 2 (green by default) is the character, all we need do is check for a character in the range of 64-96. (All characters from 64-96 are drawn in COLOR 2.)
If the ball hits anything else, lines 700-720 reverse the ball's direction. The RND (RaNDom) statements insure that the ball won't get caught in an endless ricochet loop. Finally, lines 740 to 760 update the ball, as we did with the player. It's a good thing that the computer executes all this faster than we can read about it!
Game Over
The two exit routines at lines 1000 and 2000 either cheer the player for catching the ball or result in his explosion if he collides with a star. Line 1040 flips the ball character with the cross (CTRL-S) character. Line 1050 is the heart of the sound effect. Line 1070 wraps up the sound effects for the win routine. There is no scoring in this game; you either win or lose. You can add features to the game, of course. But remember, since we're using the lower half of the character set, there aren't any numerals to print a score with.
Line 2000 explodes the character and produces the explosion sound. The high-speed color POKE is used extensively to provide flashing (lines 2040 and 2090). The explosion effect is produced by POKEing the graphics characters from CTRL-A to CTRL-F into the player's position. This doesn't look too much like an explosion, but it does produce a flickering effect. If you expanded this program into a full-fledged game, you could add an option for three lives here.
Custom Characters Are More Fun
I previously mentioned that a custom character set adds flair to a program like this. To avoid confusion, I refrained from using a custom character set in Program 1. You should type in and try to understand Program 1 before adjusting it with Program 2, which adds custom characters to the game. The changes to Program 1 given in Program 2 are trivial, but they make the game much more fun. Good, detailed graphics really jazz up a game.
The subroutine at line 5000 places the character set in memory, just below the screen. The character data is in the DATA statements from 5005-5024. It takes several seconds to initialize the character set. However, since RUN does not clear out this memory, we can check to see if the character set has already been initialized, as in line 5001. Subsequent RUNs start instantly.
The up/down/left/right arrows have been redefined as a sort of cup, or scoop, that you use to catch the ball. Since diagonal movement is permitted in the game, the corner characters (CTRL Q,E,Z and C) are redefined as diagonal scoops. Unfortunately, these same characters are also used as the corners of the screen border. To avoid too much modification of Program 1, the scoops are used as the corners of the border anyway, and the connecting characters (CTRL-R and SHIFT =) are thickened.
Finally, five characters have been defined for the explosion of the player. These depict a small center core expanding outward in five stages. When POKEd rapidly into the same spot, they create a good explosion effect. Since CTRL-A through CTRL-F (used in Program 1 for the explosion) already contain custom characters, five characters from CTRL-J to CTRL-N were used instead, and line 2030 changed appropriately.
The speed of PEEKs and POKEs lets you program some really fast games in BASIC. The more objects you move, the slower the game will run, of course. But you may very well find that you must insert delay loops just to slow down the game enough to play it!
Table 1. Internal Character Set.
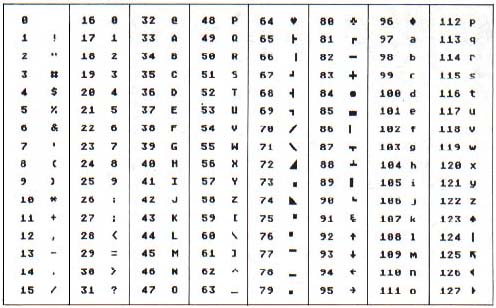
Figure 1. Atari Character Sets.
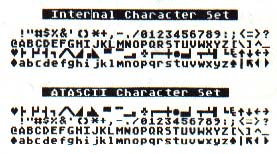
Table 2. Screen limits and Characteristics.
| Mode | X-Limit | Y-Limit | Range | Bytes/Line |
|
0 1 2 |
39 19 19 |
23 23 11 |
0-959 0-479 0-239 |
40* 20 20 |
Assumes full screen mode (no text window).
*This is the number in the formula:
SCREEN + X + 20*Y. Use SCREEN + X + 40*Y for GRAPHICS 0.
Download P122L1.BAS (Saved BASIC)
Download / View P122L1.LST (Listed BASIC)
Download / View P122L2.LST (Listed BASIC)
Return to Table of Contents | Previous Section | Next Section