Screen Save Routine
Joseph Trem
It certainly would be great if you could preserve for posterity those neat graphics designs you've learned to create. Here's one way.
The following utility routine can be appended to the end of your favorite drawing programs and will enable you to save those Rembrandts. A sample drawing is included at the beginning of this utility.
The Atari computer is fascinating indeed. The more you delve, the more intriguing it becomes. This program is based on three screen-related memory addresses--87, 88, and 89. Location 87 contains the graphics mode presently in use. Type "GRAPHICS 7", then type "PRINT PEEK(87)". The computer will respond with "7". Locations 88 and 89 store the starting addresses of screen memory; 88 contains the low byte and 89 contains the high byte. Again, type "GRAPHICS 7", then type "PRINT PEEK(88) + PEEK(89)*256". This will return the memory starting address for GRAPHICS 7. Note that each computer may return a different number depending on the memory size of the machine. Now type "POKE(memory start), 255". This will light up one full byte at the top left corner of the screen (Figure 1).
Type "POKE(memory start + 40,255)", and this will light up the next full byte directly under the first byte. Knowing this, it is possible to keep track of every byte on the screen. There are 40 bytes horizontally and 80 bytes vertically in GRAPHICS 7. In the utility program, line 32240 locates the starting address of your picture. Lines 32125 and 32225 scan and set screen memory locations. You may adapt these lines to any graphics mode using the chart provided. For example, if you happen to be using GRAPHICS 5, change the "40*80" in those lines to "20*40". (See Figure 2.)
After running this program, you may want to append only the utility part to your favorite drawing program. Here's how to do it. First, make sure your drawing program does not exceed line 30999. Now type LIST"C:",31000,32240 or LIST"D:filename", 31000,32240. This will save only lines 31000 through 32240. When completed, type NEW and load your drawing program. Now load your utility program back in. This is done by typing ENTER "C:" or ENTER "D:filename". This will append your utility to the end of any drawing program.
Some programs may have to be modified slightly, but with a little effort you may find it worth it. Run your program. Draw your masterpiece. When you are satisfied with your creation, press the BREAK key and type "GOTO 31000". This will initialize the save and load routine. Then sit back, relax, and surprise someone with a genuine work of art worthy only of the great masters.
10 Initializes SCREEN SAVE ROUTINE
40-195 Draws sample picture (e.g., space game playfield).
200 Reinitializes menu after drawing.
30000 Sets GR.2 and title.
31000 Opens IOCB for keyboard.
32000-32060 Prints menu. Gets keyboard input and directs to
appropriate line.
32100-32103 Prints save menu. Gets keyboard input and directs
to appropriate line.
32105-32208 Prints disk instructions.
32110-32210 Prints cassette instructions.
32200 Prints load menu.
32122 Stores graphics mode and color register data.
32125 Stores screen RAM data.
32222 Reads graphics mode and color register data and POKEs
it into correct locations.
32225 Reads screen RAM data and POKEs into correct locations.
32240 Determines start address of screen.
Figure 1.
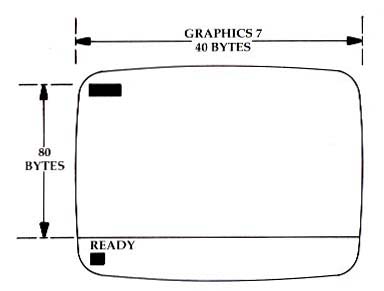
Figure 2.
| HORIZONTAL BYTES |
VERTICAL BYTES |
|
|
GR.8 GR.7 GR.6 GR.5 GR.4 GR.3 GR.2 GR.1 GR.0 (full screen) |
40 40 20 20 10 10 20 20 40 |
160 80 80 40 40 20 10 20 24 |
Download P242L1.BAS (Saved BASIC)
Download / View P242L1.LST (Listed BASIC)
Return to Table of Contents | Previous Section | Next Section