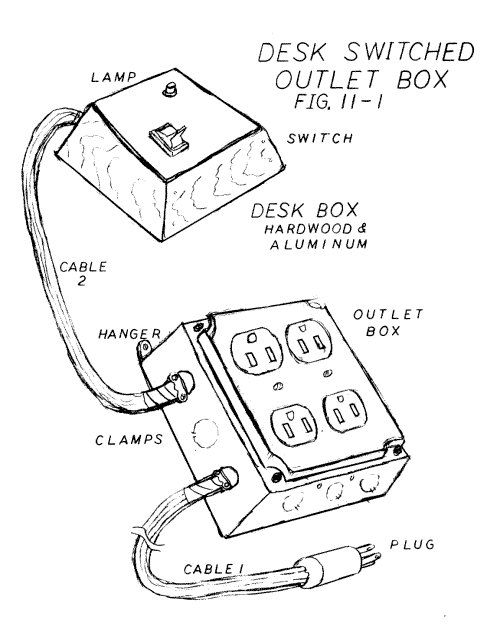
11 Desk Switched Outlet Box
On the Apple and most other home computers the ON/OFF switch is not conveniently
located and frequently wears out. This switch usually causes more problems
than any other single piece of hardware in the system. The switch itself
is difficult to replace because it is built into the power supply box. It
would also be handy to automatically turn on other devices like the monitor
and the printer at the same time that the computer is switched on. There
are commercial switched outlets that serve this purpose, but they are priced
much too high ($30-$50) in relation to the materials they contain. Besides,
the switches in these units are usually located beside the outlets and thus
are no easier to reach than the original Apple switch.
This chapter covers the construction of a desk switched
outlet box in which the ON/OFF switch is placed in an attractive box beside
the computer and the outlets are in back of and below the desk. Special add-on
features, including a power-on light, a voltage spike suppressor, and an
electromagnetic interference filter are also outlined. You can install only
those features that you decide you need.
The materials for this project are readily available.
Most can be found at any hardware store that has a home electric department
and the rest can be found at Radio Shack. A few simple household tools including
a screwdriver, long-nose pliers, and a soldering iron are required. Construction
involves primarily the assembly of ready-made parts.
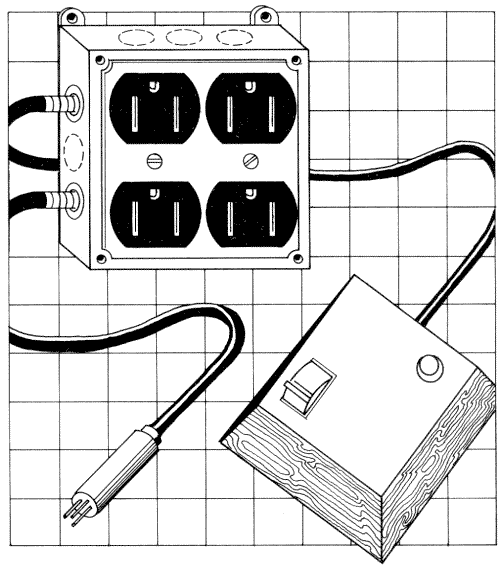
CONSTRUCTION OF THE OUTLET BOX
The outlet box is a standard 4-inch square conduit box with a front plate
for two duplex outlets, a cover (if the front plate does not include one),
and two cable clamps. If you want to include some of the special features
you will need a larger box. Local electrical supply houses usually carry
larger multiple conduit boxes or single outlet boxes that bolt together side
by side to house any number of outlets.
We pop riveted a small sheet metal tab to the back of
the box so that we could hang it under the desk with two panhead screws.
If you plan to place the box on the back of your desk you can attach plastic
feet or cover the bottom with felt.
To install the cable clamps, knock out two of the metal
slugs, place the clamps through the hole, and tighten the nut inside the
box. The clamping screws should face the front of the box. A bit of Loctite
or Super Glue on the nut threads will secure the nut.
The box for the ON/OFF switch should be decorative. You
can, of course, use any metal or plastic box, but most electronic and electrical
boxes look out of place on a desk. Our prototype switch box has sloping hardwood
sides and a sheet metal top and bottom, as shown in figure 11-1. Making the
sloping sides is a good exercise in the use of a radial arm or table saw.
If you don't have a shop manual that demonstrates how to set the angles you
will have to do some trial and error work on scrap wood. The corners are
held together with wood glue and finishing nails driven into predrilled holes.
After the four sides were glued together, the top was sloped and the bottom
flattened with hand tools. You will have to file out a notch in the back
for the cable. Sand the hardwood pieces and finish them with polyurethane
varnish.
Cut the top and bottom plates from aluminum or steel.
Drill and file the top to fit the switch and the lamp. Drill and counter-sink
holes in the bottom plate for six #6 flathead screws. Attach the top to the
box with silicone sealant or epoxy so that no screws will show. Finish the
top plate with an orbital sander to a. uniform matte finish and then varnish
the entire box.
ELECTRICAL ASSEMBLY
For the electrical work you will need wire strippers, long-nose pliers, wire
cutters, and a medium-size standard screwdriver. This project requires a
soldering iron of about 50 watts to tin the wires and solder the connections
on the switch and lamp. A 50 watt iron is larger than the size called for
in the other controller projects, but it is a standard iron used for many
household jobs.
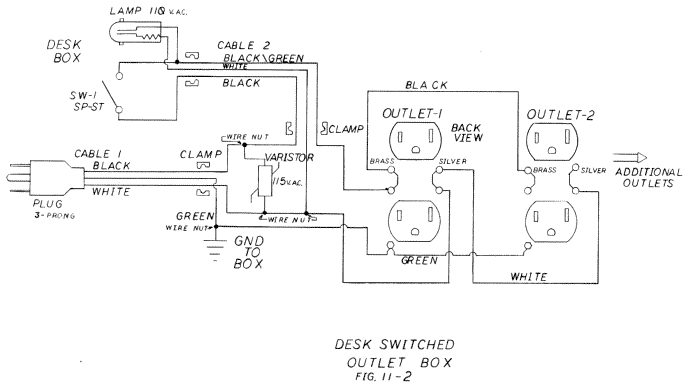
The electrical wiring is shown in figure 11-2. Note that
wire colors are indicated. These colors are an important part of the National
Electrical Code and must be followed scrupulously. The Electronics Tutorial
in chapter 14 contains a detailed explanation of the correct procedures for
wiring this unit and other AC appliances. You should review the section on
AC Codes and Wiring Practices before starting this project. As before, coloring
in two photocopies of the wiring diagram (figure 11-2) is the best way to
keep track of and check your work.
The easiest way to obtain the cable is to purchase an
extension cord long enough to make both cables. A 12-foot cord is usually
sufficient. Cut off the outlet end and about four feet of cable to make cable
#2. Number 143-conductor cable is best for almost all home and office computer
systems.
You will have to join several wires together in four
places, as shown in figure 11-2. This is most easily done with wire nuts;
yellow ones are the correct size for this project if you use #14 wire. The
proper installation of wire nuts is covered in the discussion of AC Codes
in the Electronics Tutorial.
The varistor shown in figure 11-2 removes voltage spikes
from the incoming line. It has two bare solid-wire leads. You should cover
all but the last 1/2-inch of each of these leads with insulation stripped
from scrap wire to insure that the leads don't touch the metal box.
You can attach green wire pigtails about six inches long
to the green screws on the two outlets. Attach another pigtail to the box
with either a green screw or a green metal clip. You can group these pigtails
and the green wires from cable #1 together with a yellow wire nut.
Make the connections between the outlets with scrap wire
of the correct color and size. Alternatively, you can purchase a short piece
of 3-wire #12 Rolex cable (used for the wiring in houses) and remove the
outer cover to provide three separate wires of the correct size and insulation
color.
Choose a switch that looks good on the desk box. A simple
ON/OFF switch, single-pole single-throw (SPST), with 10-amp current capacity
will be suitable for all but the largest computer systems. If the switch
you purchase has more sections (double-pole single-throw or double-pole double-throw),
you can parallel the SPST sections to increase the current capacity. Some
of the better switches have a 110-volt AC light built into the switch.
TESTING
When you have completed all the connections and checked your work, screw
the box together and tighten the cable clamps. Plug the unit into a 3-wire
house outlet with nothing plugged into the new outlet box. If the circuit
breaker doesn't blow, throw the desk switch. The lamp on the switch box should
turn on and off with the switch. If it stays lighted all the time, it is
connected to the wrong side of the switch.
Now plug a light load like a reading lamp into the outlet
box and try the switch again. If you encounter any problem (a blown circuit
breaker or a switch that works backwards), unplug the unit, recheck all the
wiring, and make corrections. When the unit works properly with a household
lamp you can plug your computer into the outlet.
FINISHING TOUCHES
There are several other features you may want to add to your unit. If you
are concerned about lightning strikes or other severe electrical surges,
you can add two additional varistors. One should be installed from the black
wire to the green and the other from the white wire to the green wire beside
the first varistor.
If electrical interference is affecting your television
set or your neighbor's when your computer is on, you might add an EMI filter
like Radio Shack's #273-100. This will prevent electrical noise from leaving
the computer by way of the AC line. Since most such noise is radiated directly
into the air, this probably won't help your television reception much. If
you add the filter you will also need a larger box.
If you decide you want a fuse and fuse holder you will,
again, need a slightly larger outlet box. Alternatively, small pushbutton-style
circuit breakers can be purchased through large mail-order electronics houses.
A rating of 10 amps at 110 volts would be suitable for most personal computer
systems.
If unauthorized people have been using your system or
turning off the computer when you have intentionally left it on to run a
long program you may want to add a key switch to the desk box. Mount the
key switch (for example, Radio Shack #49-523) in the switch box either in
series (lock OFF) or parallel (lock ON) with the main switch. Since the key
switch usually has a lower amp rating, use the main switch routinely and
key only when you need the lock feature.
We are confident that you will use the Desk Switched
Outlet Box more than any other device in this series of designs. We have
built at least a half dozen of them. They make great gifts for anyone who
uses a computer, either at home or at work.
| Parts List Desk Switched Outlet Box |
||||||||||||||||||||||||||||||||||||||||||||||||||||||||||||
|
||||||||||||||||||||||||||||||||||||||||||||||||||||||||||||
|
Return to Table of Contents | Previous Chapter | Next Chapter
