12 AC Outlet Controller
The control of household devices that run on alternating current (AC) is
one of the most often discussed applications for the home computer.
Most people assume that this type of control requires complicated electronic
circuits. In fact, it is not difficult to design or build a computer controlled
AC outlet and, thanks to the availability of solid state relays, it is only
moderately expensive to add this capability to your home computer. These
relays use solid state components, usually triacs, to control normal AC current
with a low-power digital signal. The Computer Controlled AC Outlet is little
more than a normal outlet box with the addition of a solid state relay and
two cables connecting it to the computer and the AC power supply.
The Apple has four annunciator outputs that can directly
drive these relays. Other computers, like the Commodore VIC-20, have pushbutton
inputs that can be converted to digital outputs by setting soft switches
in the computer's memory. Solid state relays will work well with these systems,
too.
THE AC RELAY
The input of a 5-volt solid state relay requires little current and can be
driven by outputs rated at 1 TTL (transistor-transistor logic), which is
approximately 5 milliamps at 5 volts. The 74LS chips referred to in these
projects are TTL chips. By comparison, a single LED requires about 20 milliamps
for normal light levels and may overload annunciator outputs.
The output of a solid state relay is rated by the maximum
current (measured in amps) it can carry and the maximum RMS AC voltage it
can control. Inexpensive relays are usually rated between 4 and 10 amps of
110 volts AC. More expensive ones (up to 40 amps of 440 volts) can be purchased
for controlling higher-powered equipment.
Solid state relays handle only alternating current.
They can turn on direct current but they can't turn it off. These relays
have no internal moving parts or contacts to wear out. They should last for
many years if they aren't cooked to death by extensive overheating or shorted
out by a voltage spike.
The current ratings given in manufacturers' data sheets
are for resistive loads, like incandescent lamps or resistance heaters. To
use the relays on inductive loads (e.g., motors and heavy transformer devices),
you must purchase relays that have about twice the rating of the device's
normal operating current. To protect the relay from voltage spikes, particularly
those caused by suddenly turning.off an inductive load, you must add a varistor,
as shown in figure 12-2.
To protect the relay from overheating, make certain that
its metal bottom is in good thermal contact with a metal heat sink. If the
relay is mounted in a heavy metal box and the back of the box is exposed
to free air, a small relay will be cooled adequately. For higher powered
and multiple relays you may have to install an aluminum heat sink in the
back of the box and space the relays an inch or more apart. Use a heat conductive
compound like Radio Shack #276-1372 on the metal backs of the relays to improve
heat transfer. Since the relay backs are insulated from the AC, you don't
need a layer of electrical insulation between the relay and the box.
Good news: There has been a recent breakthrough in the
manufacture of solid state relays. The new technology, called S3X, lets the
relays function with fewer parts than the present design. The new units exhibit
markedly better performance with inductive loads and will generally run cooler.
These relays should be available soon, and perhaps we'll be able to purchase
the old style units at cheaper prices from the surplus houses.
MECHANICAL CONSTRUCTION
The solid state relays for the prototype conduit box were purchased from
PolyPaks (see the parts list for their address). They are smaller than most
other solid state relays and have solder terminals instead of the usual screw
terminals. You may be able to get them from PolyPaks or from another surplus
electronics company. If not, the standard commercial relays are a stock item
at Newark and other large houses. If you can't obtain the small relays, you
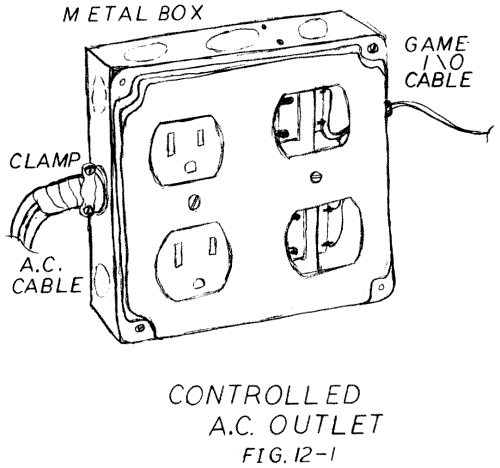
will need a box larger than the 4-inch square indicated in the parts list.
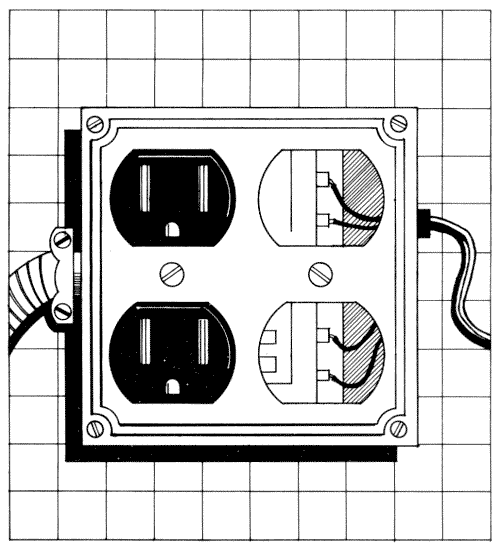
The prototype box has a cover for two duplex outlets
and two cable clamps. One or even two of the smallest AC relays can be mounted
in this box, taking the place of one of the outlets.
To be absolutely certain that the AC wires will not make
contact with the wires running to the computer, you should fashion a sheet
metal partition to divide the relays into two sections. First make a cardboard
pattern and then cut the partition out with tin snips. Attach the partition
to the box with bolts or pop rivets. You can also make a sheet metal hanger
for the back of the box, or devise some other mounting arrangement. You should
also cover two of the outlet holes with a piece of sheet metal.
For larger or more powerful systems (more than two outlets
or more than 10 amps total) you will need a bigger electrical box. Called
NEMA boxes (National Electrical Manufacturers Association), these can be
either #4 (vented) or #12 (sealed). For extremely high-powered systems (4
kilowatt or greater) you will have to cut the back out of the box and replace
it with a large aluminum heat sink. You could make your own box out of sheet
metal or other non-flammable material. On a large system the loads should
probably be cabled directly to the relays without the use of sockets and
plugs.
The cable that runs from the box to the computer will
be too small for normal electrical cable clamps. You can use a strain relief
(Radio Shack #278-1636) instead, or enclose the cable in tape and heat shrinkable
tubing.
ELECTRICAL WIRING
The wiring in this project is similar to that of the Desk Switched Outlet
Box in chapter 11. Once again, it is necessary to follow the electrical code
guidelines, so review them before starting to wire this unit (see the section
on AC codes in the Electronics Tutorial).
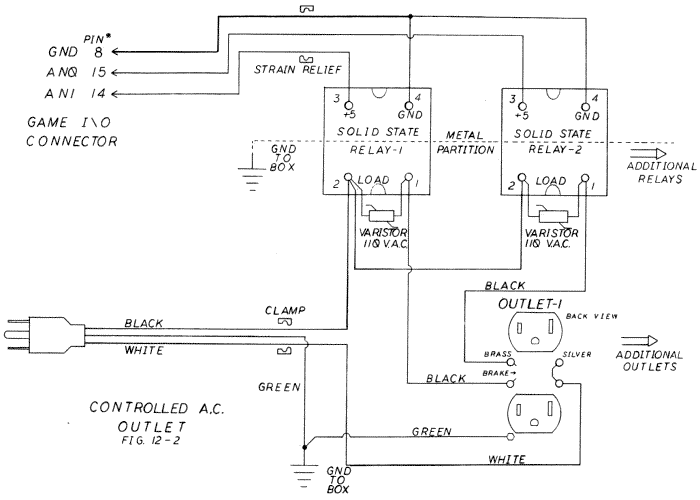
Figure 12-2 is the schematic for a two-relay system.
The power cable is a 3-wire #14 extension cord with the outlet end cut off.
If you are using two relays on the same outlet you must separate the two
sockets electrically. Break off the small metal bridge between the two brass
screws on the black wire side only. For currents of up to 10 amps, #14 wire
will be adequate. For high-current systems you will need #12 or larger wire.
The two varistors shown in figure 12-2 provide protection
from voltage spikes. These are necessary to control inductive loads like
motors or flourescent lights.
The current in the control lines to the computer is so
inconsequential that extremely small wire in this cable will meet the electrical
requirements. You will, however, need a cable that is strong enough to withstand
a reasonable amount of wear. If you have extra wires in the cable it is a
good idea to double up the ground wire.
The best plug for the AC outlet box is a stacked plug
similar to the one described in chapter 3. All the pins of this one, however,
should pass straight through, with no tricky crossovers. A stacked plug lets
you plug in the AC outlet box and still use conventional controllers, providing
they do not require the annunciator outputs.
The outlet box must only be used with 3-prong grounded
systems. You must clip or screw the green wire of the power cord to the metal
box and connect the green screws on the outlets to the box with green wires.
If you like, you can add a fuse and fuse holder or circuit
breaker for each circuit. As noted for other special features, this may necessitate
using a larger box.
TESTING
Check your wiring using the procedures we have described for coloring in
two copies of the schematic. After you have finished the connections, assemble
the box and tighten the cable clamps. Before testing the unit on your computer,
you should plug it into a household outlet. With a multimeter, measure the
AC voltage between each of the computer connector leads and the metal box
to be sure that no AC is read on any of the pins. Plug an incandescent lamp
into the AC outlet box; the lamp should not come on.
Now unplug the outlet box from the wall. Make sure your
computer is turned off. Install the plug into the computer's game control
socket, plug the outlet box into house current, and turn on the computer.
If the computer doesn't start up in a completely normal fashion, turn it
off immediately, unplug everything, and recheck all your work.
Run the Annunciator Checkout program in the software
chapter. A lamp plugged into this controlled socket should turn on and off
as the checkout program runs.
How large an AC control system could an Apple handle?
Each of the four annunciator outputs could control a relay, and the relays
are available with ratings up to 40 amps at 440 volts. If you want to get
serious, however, you will have to add a simple multiplexing card (four 74LS
chips). The four annunciator inputs and the strobe line could then drive
32 relays, for a total of 560 kilowatts. That should be enough power to provide
the mind-boggling light show for a "Who" concert.
| Parts List AC Outlet Controller |
||||||||||||||||||||||||||||||||||||||||||||||||||||||||
|
||||||||||||||||||||||||||||||||||||||||||||||||||||||||
|
Return to Table of Contents | Previous Chapter | Next Chapter
