Greater Graphics Control
Marni Tapscott
|
|
|
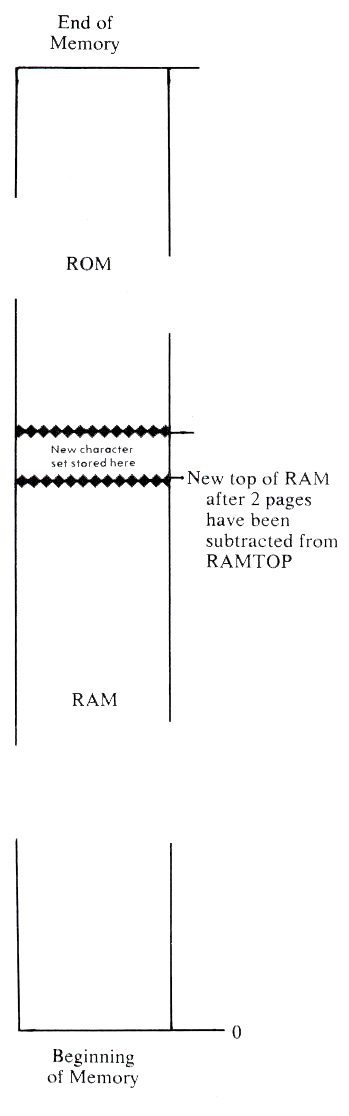
Figure 1. |
The Atari has nine graphics modes. Modes 1 through 8 have a split screen, however, the split screen may be overridden by adding 16 to the mode number. Modes 1 and 2 are text modes with five colors. Characters in graphics mode 1 are twice as high and twice as wide as those in mode 0. Characters in mode 2 are twice as high and twice as wide as those in mode 0.
If you have ever tried to use the Atari graphics characters in mode 1 or 2 only to be dismayed by a screen full of hearts, or have had difficulty using all five colors available in those modes, read on. Solutions to some of the problems encountered in both areas will be discussed.
The character set in graphics mode 0 has 128 characters, upper and lower case letters, punctuation, numbers and Atari graphics characters. However, in graphics modes 1 and 2, only 64 characters are available at a time. There are three choices: numbers, upper case letters and punctuation including a blank space; the Atari graphics characters and lower case letters with no blank space; or your own character set.
Creating Blank Spaces
Frequently, you will want to use blank spaces as well as the graphics characters. There are two ways of creating blank spaces. One is to give up one of the five colors available; simply make color register 0 the same color as the background and proceed to plot other characters using only color registers 1, 2 and 3. This is the straightforward solution. The short program in Listing 1 illustrates this alternative.
The second method of creating blank spaces requires more work; one character must be redefined. Novice programmers may be put off by the imposing sound of "redefining a character set," but I have discovered that it is not difficult and that it can open the door to greater graphics control and creativity.
It is important to point out that one or several characters can be redefined without redefining the whole character set. There are four basic steps.
First, we must allocate space in RAM for the character set and protect it from Basic. The top of RAM is the end of the section of memory accessible to the user. The physical top of RAM is stored in a location called RAMTOP. The area above the value stored in RAMTOP is Read Only Memory or ROM which contains permanent storage of programs and data that may never be changed. The operating system, for example, is stored here.
If we store a lower value in RAMTOP. we effectively reserve a section of RAM. The operating system will be fooled into thinking less RAM memory is available, and we can keep our new character set from being changed or erased by storing it in this area.
When I refer to "up" in memory, I am referring to those memory locations with higher numbers; "down" refers to memory locations with lower numbers. The diagram in Figure 1 may help.
Step one: Reserve memory for the new character set. Graphics modes 1 and 2 require 512 bytes or two pages for redefining a character set. In mode 0. we need 1024 bytes or four pages to redefine the 128 characters available. We PEEK at what is stored in RAMTOP (location 106), subtract the appropriate number of pages (each page=256 bytes) from that value and POKE it back into 106.
Step two: Move the present character set from ROM into the reserved section of memory. This is easily accomplished with a FOR/NEXT loop PEEKing the character set in the ROM location and POKEing it into the new location. The character set containing upper case letters, numbers and punctuation is located at 57344 in ROM and the alternate set containing the graphics characters is located at 57856 in ROM.
Step three: Inform the operating system where the new character set is located with a POKE 756,X where X equals the address of the new character set. Every time a graphics statement or reset is executed, the value in location 756 is reset to 224, the starting page address of the old character set in ROM, so it is best to include this POKE statement after any graphics mode statement.
Step four: Redefining the characters. The definition of a character uses 8 bytes in memory. Eight 0's must be poked into memory to take the place of an existing character. Since the heart is the first character in this set, I found it easiest to replace. The first 8 bytes or locations 0 through 7 in the section of memory we have set aside contains the heart. If we POKE 0's into these locations we will finally have a blank space. Incidentally, the reason the screen fills with hearts in modes 1 and 2 when you are trying to use the graphics characters is that the heart is stored in the same relative position as the blank space in the other character set.
Listing 1.
110 GRAPHICS 1:POKE 756,226
120 ? "THIS IS WHAT HAPPENS WHEN 756 IS POKED WITH 226 IN GR. 1"
130 FOR WAIT=1 TO 2000:NEXT WAIT
140 SETCOLOR 0,0,0:REM SET COLOR REGISTER 0 TO SAME COLOR AS BACKGROUND
150 ? "THIS IS WHAT HAPPENS WHEN A COLOR REGISTER IS MADE SAME COLOR AS BACKGROUND."
160 FOR WAIT=1 TO 2000:NEXT WAIT
Listing 2.
100 REM CHARACTER REDEFINITION
110 REM STEP ONE: SET ASIDE MEMORY FOR CHARACTER SET
120 POKE 106,PEEK(106)-2
130 GRAPHICS 2+16:REM GR.STMT.HERE PREVENTS OVERLAP OF DISPLAY LIST & CHARACTER SET
140 REM STEP TWO MOVE: CHARACTER SET INTO NEW LOCATION
150 A=PEEK(106)*256
160 FOR B=0 TO 511
170 POKE A+B,PEEK(57856+B)
180 NEXT B
190 REM STEP THREE: POKE NEW ADDRESS OF CHARACTER SET
200 POKE 756,PEEK(106)
210 REM STEP FOUR: CHANGE HEART TO BLANK SPACE
220 FOR C=0 TO 7
230 POKE A+C,0
240 NEXT C
250 REM
310 REM SET UP COLOR REGISTERS
330 SETCOLOR 0,13,8:REM GREEN
340 SETCOLOR 1,4,8:REM PINK
350 SETCOLOR 2,10,8:REM TURQUOISE
360 SETCOLOR 3,2,8:REM GOLD
365 SETCOLOR 4,12,4:REM BACKGROUND COLOR TO GREEN
370 REM
390 COLOR 60:PLOT 5,5:REM GREEN ARROW
400 COLOR 28:PLOT 6,5:REM PINK ARROW
410 COLOR 188:PLOT 7,5:REM TURQUOISE ARROW
420 COLOR 156:PLOT 8,5:REM GOLD ARROW
450 GOTO 450:REM KEEPS DISPLAY ON SCREEN
|
|
|
Figure 2. |
|
|
|
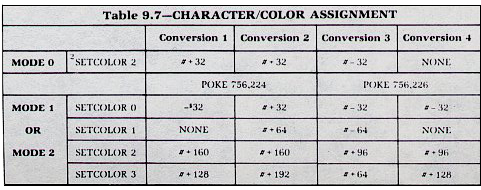
Figure 3. |
Charts provided courtesy Atari Inc. @1980.
These four steps eliminate the heart and define a blank space. Now we are ready to assign colors and positions to characters.
Assigning Color and Position
There are two methods; we may use either the POSITION and PRINT #6 statements or the COLOR and PLOT statements. Color manipulation is less obvious when using POSITION and PRINT #6 statements.
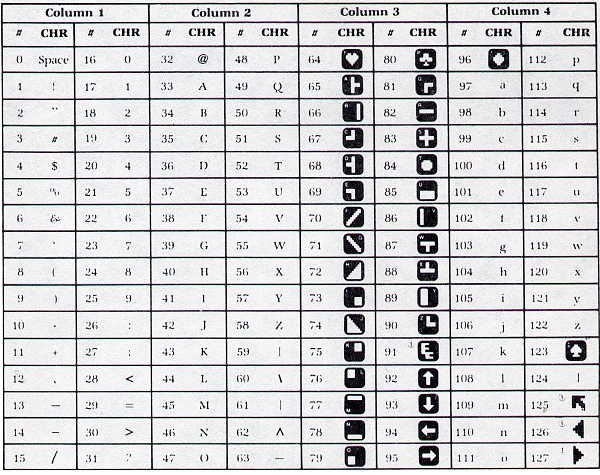
The ATASCII number that corresponds to both the character and the color desired must be obtained through some experimentation.
Since the other method employs charts already available in the Atari Basic Reference Manual, this method will be described in greater detail. For convenience the charts from pages 55 and 56 in the Atari Basic Manual have been reproduced here.
First, the four colors desired are established in the color registers using SETCOLOR statements. SETCOLOR 0,1,8 establishes gold in register 0. Next, find the character you wish to use in the chart in Figure 2. Make note of both the number next to the character and the column in which it is located. Looking at the second chart in Figure 3, add or subtract the number listed here according to the color desired. The "columns" on the first chart correspond to the "conversions" on the second chart.
For example, I want a gold up arrow to appear at Row 5, Column 5. The up arrow is 92 in Column 3 in Figure 2. Looking at Figure 3, we subtract 32 from 92 since gold is in color register 0. The statement below accomplishes our goal:
COLOR 60:PLOT 5,5
Listing 2 is a short program which illustrates both the redefinition of the heart character to a zero and the use of SETCOLOR, COLOR and PLOT statements for full use of all five colors. (The fifth color is the background color.) One word of caution regarding running the program: always press the system reset button before re-running because the system continues to subtract pages in memory until it interferes with the display memory.
Suggestions for further experimentation are:
- Redefine more characters for greater graphics variety.
- Combine two or four or more characters for a larger, more complex shape.
- Animate shapes through color rotation.
- Animate shapes through redefinition of a figure (animal, person) in several positions and rotation of positions.
Marni Taspscott, 297 Missouri St., San Francisco. CA 94107.
Table of Contents
Previous Section: Animath
Next Section: The Atari Graphics Composer
