Hooking Up With CompuServe
Using Atari's Telelink Cartridge to Access CompuServe
Joining a club? Learn the ropes before-hand and it goes a great deal smoother. If you visit someone who has a computer, play a few games under your friend's supervision, and learn such simple tricks as the location of the ON/OFF switch and the use of the RETURN key, you are far ahead of the person who wins a computer as a doorprize at a convention, then takes it home and tries to use it with only the manual as a guide.
|
For the personal computer owner who has never used a large computer or a terminal before, seeking to connect to a timesharing service may seem to be an overwhelming task. All of a sudden you have to cope with learning how to use a new program, an RS-232 interface, a modem, and a telephone in cooperation with your computer. It can be quite frustrating, for if you overlook one switch setting or miss plugging in a single cable, the system won't work, and you might not be able to tell whether you made a mistake or whether one of the pieces of equipment is defective.
Failure-prone equipment in this type of situation is a disaster. For example, the Radio Shack TRS-80 Model I RS-232 board is notoriously hard to use, primarily because Tandy used a cheap connector to attach it. Some owners actually disconnect the board, clean the contacts, and reinstall it every time they use it. A new user with a bad connection might become so frustrated as to give up all hope of timesharing.
With the Atari Telelink cartridge, it took me several hours of work, accompanied by much frustration, to successfully hook up to CompuServe. I never did discover what I was doing wrong at first, but have come to the conclusion that the real problem was probably in our company telephone switchboard, not in the Atari equipment.
I hope that by a detailed sharing of the process that led to successful connection for me, I can make the same operation smoother for those of you who are considering timesharing.
Equipment Required
The equipment I used was an Atari 800 Computer (the Atari 400 should work just as well), the Atari 850 Interface Module, the Atari 830 Acoustic Modem, the Atari Telelink I program cartridge, a telephone, and a Texas Instruments 99/4 Color Monitor. The only difference in my unsuccessful attempts was that I used a Leedex Video 100 black and white monitor instead of the color monitor. The difference was significant, not for the color, but because the TI monitor has a speaker, and you need the speaker to hear whether the cartridge loads properly. An ordinary television set should work as well, but I do not recommend any monitor or TV set without a working speaker. I did not have a printer, but it would have helped significantly.
|
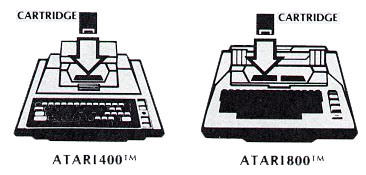
The Atari Telelink I (The I probably implies that a II is coming!) program cartridge is a typical Atari cartridge. You load it by simply plugging it into the slot on the computer, a task that my six-year old son has mastered with the Star Raiders and Basketball cartridges. The Telelink I cartridge comes with a six-page foldout instruction brochure, a registration card, an application for an account with CompuServe, an instruction card for hooking up to CompuServe Information Service, and a sealed envelope containing a CompuServe user identification number and a secret password allowing you one hour of free access to the network.
The Atari 850 Interface includes a 102-page instruction manual that also covers the Atari 830 Modem. However, who is willing to read 102 pages of heavily technical material just to learn how to use an add on device on a computer system? Fortunately, you can use the manual strictly for reference, finding what you want in the table of contents.
Before you can use Telelink I to connect to CompuServe, you must have a local access telephone number. The card telling you how to access the timesharing service gives you Atari's toll free customer service number and tells you to call them for the access number closest to you. The customer service toll free number is very busy, and it took me about 20 calls over two days to get through. Once I did get connected, the representative gave me the names of cities in my area code with access numbers, and the telephone numbers.
Setting Up Your System
I will assume that you already know how to connect your Atari computer to a monitor or TV set, and only discuss the rest of the system. If you have a disk drive, disconnect it, as the cartridge is not set up to work with the disk operating system, and the two conflict.
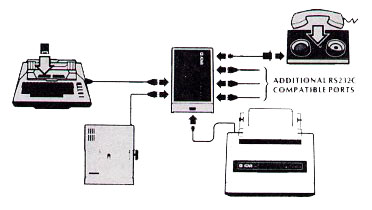
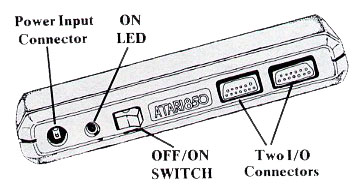
If you place the Atari 850 Interface on the table in front of you so that the label faces you, you will see the following:
Plug the power supply into the connector on the left and connect it to a wall outlet. Connect the I/O cable from the computer to the left-most one of the two I/O connectors. If you have the printer that uses the I/O connectors, connect the printer to the right front connector. If you have the Atari 825 printer, there is a connector for this on the right end of the interface module.
On the back of the interface module are four identical serial connectors, labeled from one to four. Plug the small connector on the cable that comes with the Atari 830 modem into connector one on the interface, directly behind the power connector. Your interface is now connected.
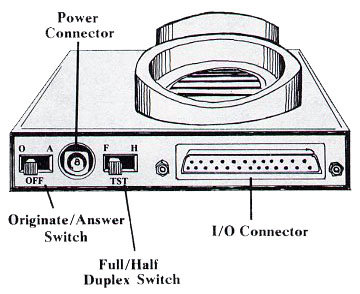
The connectors and switches on the Atari 830 modem are all on the same end, as follows:
Connect the other end of the modem cable from the expansion interface to the large connector on the modem. Then plug the power supply for the modem into the connector on the modem and into a wall outlet. If the power LED in the center of the modem should come on, set the originate answer switch to OFF.
|
Bring your telephone over to the computer. Place the handset so that the cord hangs over the end of the modem that contains the connectors and switches. This is also plainly marked on the label in the top center of the modem. Your system is now connected and ready to go.
Making the Connection
Plug in your cartridge, and close the cartridge door. Turn on the television set or monitor. Then set the left switch on the modem to 0 (for originate) and the right switch to F (for full duplex). Both switches should be all the way to the left. The power LED on the modem should glow red. Next turn on the Atari 850 interface module using the switch on the front. The power LED next to this switch should come on.
After the rest of these connections are made, turn on the computer. If you turn on the computer before the interface, or have the disk drive connected, the program to operate the interface will not load properly. You should now hear a series of beeps from the television speaker to indicate that the program is loading. After the program has initialized, the words Telelink I will appear on the screen.
Now, dial the telephone access number for CompuServe that you obtained from Atari Customer Service. Unless the number is busy, it should ring a couple of times, then answer with a steady tone. When you get the tone, place the telephone handset in the cradle on top of the modem. Even before you finish placing the handset in the cradle, the two computers should recognize each other and the READY LED on the modem should come on.
Type CONTROL C on your keyboard. The TV screen should go blank, then CompuServe will print the message:
USER ID:
Respond by typing in the identification number in the envelope that came with your Telelink cartridge. Now CompuServe will print another prompt on your screen:
PASSWORD:
Type in your password, exactly as it is given in the envelope. The letters will not appear on the screen, so that you can keep your password secret if someone is watching. If you get it wrong, the computer will prompt you to try again.
|
CompuServe will now take a few seconds to log you in. It will recognize you as a new user and print a greeting message, plus give you instructions on using the system. It would be very helpful to have a printer turned on at this time to save the instructions for future reference. You will also be given an opportunity to open an account, either under Master Card or Visa or to be billed monthly, once your free hour is up.
Most of the time using the CompuServe network is as easy as reading the message on your screen, typing a number or a letter, and pressing RETURN. A few commands require you to type three or four letters, but these are explained.
My first time on the network, I read through the instructions for the various services, logged into the Atari Newsletter and sent a message to customer service, read several current stories from the New York Times, and looked through the other services. Then I typed EXIT and CompuServe logged me off the system and told me that I had been connected for 29 minutes.
There are literally hundreds of other computer services that you can connect to with Telelink or similar systems from other manufacturers. There are other timesharing services, including The Source and universities such as the Dartmouth Time Sharing Service. There are many free message services all over the country. While some of them emphasize a particular computer system, most welcome all comers. You may want to try some of the services listed in the table. After you dial the number and get the tone, place your handset in the cradle and press RETURN a couple of times. The various systems should take you from that point. Please note that some of these numbers may be out of date when this article appears. Once you log onto several of them, you can usually find out about many more. Some of these numbers are only in operation after normal business hours for timesharing, as they are owned by businesses that use the lines during the day.
The Telelink Program
As timesharing programs go, Telelink I is very limited, but it is also one of the easiest such programs to use. It is permanently set up for 300 baud (a rather slow rate of communication, especially when you are paying the phone bill), transmits even parity with one stop bit while receiving even parity or no parity, does not allow you to write files to disk, and has a fixed character set. If you try to access a computer system that does not accept any of these limitations, you will not be able to communicate. Actually, most timesharing systems are either set up this way or allow the user to specify his own configuration.
Telelink stores print characters in a buffer, so that you do not always have to wait for the printer to read the screen. You can turn the printer on and off from the program. It can communicate either Full Duplex (both computers sending messages at the same time) or Half Duplex (the two computers must take turns.)
Control characters that can be sent by Telelink I include TAB, ESCAPE, CONTROL A through CONTROL Z (including Linefeed, Bell, XON, and XOFF), RETURN, BACKSPACE, and RUB OUT.
The Atari 850 Interface
The 850 Interface module allows you to add four RS-232 serial ports and a parallel printer port to your Atari 800 or 400 computer. This allows you to connect printers, modems, and other standard peripherals to your computer. Although you would probably have to write the software yourself, you should be able to use it to connect lab equipment, a graphics tablet, a plotter, or other special purpose devices.
Atari does not currently offer any printer cables for use with the 850 Modem, except the one that comes with the 825 Printer. If you do not want to buy a $995 printer to get a $30 cable, you may be forced to create your own. To do that, you will need the part numbers and manufacturers of the appropriate connectors. The 25-pin parallel port uses an AMP connector, part number AMP2OS-208-1. The 15-pin parallel ports use either AMP or Cannon connectors, part number AMP 205-206-1 or Cannon DB-15-P. The RS-232 serial ports use either the AMP 17-20096-1 or the Cannon DB 9-P connectors.
The Atari 830 Modem
This modem is a standard acoustic modem, very similar to the Novation CAT. By buying it from Atari, you get the Atari name on the label, and a cable that you know will connect to your interface, and Atari service.
|
|||||||||||||||||||||||||||||||||||||||||||||||||||||
Table of Contents
Previous Section: Atari Music Composer
Next Section: Build Your Own Light Pen
