7
SOUND
The ATARI 400/800™ Home Computers have extensive hardware sound capabilities. There are four independently controllable sound channels, all able to play simultaneously. Each channel has a frequency register determining the note, and a control register regulating the volume and the noise content. Several options allow you to insert high-pass filters, choose clock bases, set alternate modes of operation, and modify polynomial counters.
DEFINITION OF TERMS AND CONVENTIONS
For the purposes of this discussion, a few terms and conventions need to be clarified:
1 Hz (Hertz) is 1 pulse per second 1 KHz (kilo-Hertz) is 1,000 pulses per second 1 MHz (mega-Hertz) is 1,000,000 pulses per second A "pulse" is a sudden voltage rise followed somewhat later by a sudden voltage drop. If a pulse is sent to the television speaker, it will be heard as a single pop.
A "wave" as used here is a continuous series of pulses. There are different types of waves, distinguished by the shape of the individual pulses. Waves created by the ATARI Computer are square waves (as in Figure 7-2). Brass instruments typically produce triangle waves, and a singer produces sine waves (depicted in Figure 7-15).
A shift register is like a memory location (in that it holds binary data) that, when so instructed, shifts all its bits to the right one position; i.e., bit 5 will get whatever was in bit 4, bit 4 will get whatever was in bit 3, etc. Thus, the rightmost bit is pushed out, and the leftmost bit assumes the value on its input wire (see Figure 7-1).
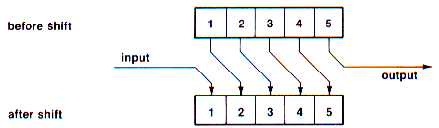
Figure 7-1 Diagram of Bit Flow of a Shift Register
AUDF1-4 is to be read, "any of the audio frequency registers, 1 through 4." Their addresses are: $D200, $D202, $D204, $D206 (53760, 53762, 53764, 53766).
AUDC1-4 is to be read, "any of the audio control registers, 1 through 4." Their addresses are: $D201, $D203, $D205, $D207 (53761, 53763, 53765, 53767).
For the purposes of this discussion, frequency is a measure of the number of pulses in a given amount of time; i.e., a note with a frequency of 100 Hz means that in one second, exactly 100 pulses will occur. The more frequent (hence the term "frequency") the pulses of a note, the higher the note. For example, a singer sings at a high frequency (perhaps 5 KHz), and a cow moos at a low frequency (perhaps 100 Hz). The words "frequency," "note," "tone," and "pitch" are used interchangeably.
"Noise" and "distortion" are used interchangeably although their meanings are not the same. "Noise" is a more accurate description of the function performed by the ATARI Computer.
The 60-Hz interrupt referred to later in this section is also called the vertical blank interrupt.
All examples are in BASIC unless otherwise stated. Type the examples exactly as they appear. If there are no line numbers, don't use any; and if several statements are on the same line, type them as such.
SOUND HARDWARE
Sound is generated in the ATARI computer by the POKEY chip, which also handles the serial I/O bus and the keyboard. The POKEY chip must be initialized before it will work properly. Initialization is required after any serial bus operation (cassette, disk drive, printer, or RS-232 read/write). To initialize POKEY in BASIC, execute a null sound statement; i.e., SOUND 0,0,0,0. In machine language, store a 0 at AUDCTL ($D208 = 53768), and a 3 at SKCTL ($D20F = 53775, shadowed at $232 = 562).
AUDF1-4
Each audio channel has a corresponding frequency register that controls the note played by the computer. The frequency register contains the number "N" used in a divide-by-N circuit. This divide is not a division in the mathematical sense, but rather something much simpler: for every N pulses coming in, 1 pulse goes out. For example, Figure 7-2 shows a divide-by-4 function:
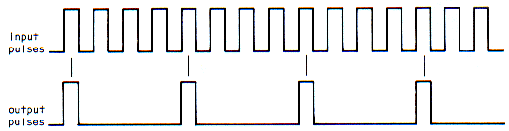
Figure 7-2 Divide-by-4 Operation
As N gets larger, output pulses will become less frequent, making a lower frequency note.
AUDC1-4
Each channel also has a corresponding control register. These registers allow the volume and distortion content of each channel to be set. The bit assignment for AUDC1-4 is as follows:
| AUDC1-4 | |||||||||||||||||
| |||||||||||||||||
Figure 7-3 AUDC1-4 Bit Assignment
Volume
The volume control for each audio channel is straightforward. The lower 4 bits of the audio control register contain a 4-bit number that specifies the volume of the sound. A zero in these bits means zero volume, and a 15 means as loud as possible. The sum of the volumes of the four channels should not exceed 32, since this forces overmodulation of the audio output. The sound produced tends to actually lose volume and assume a buzzing quality.
Distortion
Figure 7-3 shows that each channel also has three distortion control bits in its audio control register. Distortion is used to create special sound effects any time a pure tone is undesirable.
The computer's use of distortion offers great versatility and controllability. It is easy to synthesize of an almost endless variety of sounds, from rumbles, rattles, and squawks to clicks, whispers, and mood setting background tempos.
Distortion as used here is not equivalent to the standard interpretation. For example, "intermodulation distortion" and "harmonic distortion" are quality criteria specified for high-fidelity stereo systems. These types of distortion refer to waveform degeneration, where the shape of the wave is slightly changed due to error in the electronic circuitry. The computer's distortion does not alter waves (they are always square waves), but rather deletes selected pulses from the waveform. This technique is not adequately characterized by the word "distortion." A more descriptive and appropriate term for these distortion methods is "noise".
Before you can fully grasp what we mean by distortion, you must understand polynomial counters (poly-counters). Poly counters are employed in the ATARI Computer as a source of random pulses used in noise generation. The ATARI Computer's poly-counters utilize a shift register working at 1.79 MHz. The shift register's contents are shuffled and fed back into the input; this produces a semi-random sequence of bits at the output of the shift register.
For example, in the diagram below, the old value of bit 5 will be pushed out of the shift register to become the next output pulse, and bit 1 will become a function of bits 3 and 5:
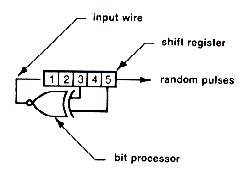
Figure 7-4 5-Bit Poly-Counter
The bit processor gets values from certain bits in the shift register (bits 3 and 5 above), and processes them in a way irrelevant to this discussion. It yields a value that becomes bit 1 of the poly-counter's shift register.
These poly-counters are not truly random because they repeat their bit sequence after a certain span of time. As you might suspect, their repetition rate depends upon the number of bits in the poly-counter; i.e., the longer ones require many cycles before they repeat, while the shorter ones repeat more often.
On the ATARI Computer, distortion is achieved by using random pulses from these poly-counters in a selection circuit. This circuit is actually a digital comparator, but "selection circuit" is more descriptive. The only pulses making it through the selection circuit to the output are those coinciding with a random pulse. Various pulses from the input are thereby eliminated in a random fashion. Figure 7-5 illustrates this selection method. A dotted line connects pulses that coincide.
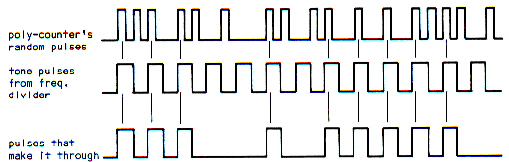
Figure 7-5 Selection Function Used To Mix In Distortion
The net effect is this: some pulses from the frequency divider circuit are deleted. Obviously, If some of the pulses are deleted, the note will sound different. This is how distortion is introduced into a sound channel.
Because poly-counters repeat their bit sequences, their output pattern of pulses is cyclic. And since the selection circuit uses this output pattern to delete pulses from the original note, the distorted note will contain the same repetitious pattern. This allows the hardware to create noises such as drones, motors, and other sounds having repetitive patterns.
The ATARI Computer is equipped with three poly-counters of different lengths, which can be combined in many ways to produce interesting sound effects. The smaller poly-counters (4 and 5 bits long) repeat often enough to create droning sounds that rise and fall quickly; while the larger poly-counter (17 bits long) takes so long to repeat that no pattern to the distortion can be readily discerned. This 17-bit poly-counter can be used to generate explosions, steam, and any sound where random crackling and popping is desired. It is even irregular enough to be used to generate white noise (an audio term meaning a hissing sound).
Each audio channel offers six distinct combinations of the three poly-counters:
AUDC1-4
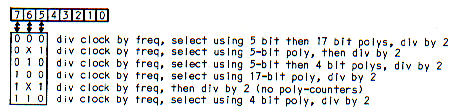
Notes: "Clock" means the input frequency.
An "X" means, "it doesn't matter if this bit is set or not."
Figure 7-6 Available Poly-Counter Combinations
These upper AUDC1-4 bits control three switches in the audio circuit as shown below. This diagram will help you understand why the table of Figure 7-6 is structured as it is:
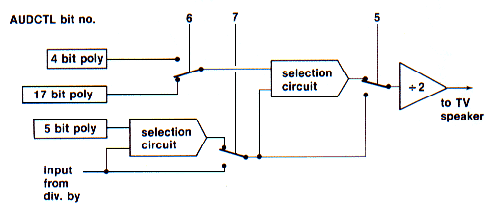
Figure 7-7 AUDC1-4 Block Diagram
Each combination of the poly-counters offers a unique sound. Furthermore, the distorted sounds can sound quite different at different frequencies. For this reason some trial and error is necessary to find a combination of distortion and frequency that produces the desired sound effect. Below is a table of guides, just to get you started:
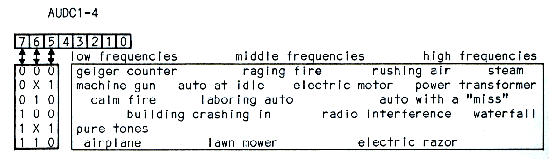
Figure 7-8 Sounds Produced by Distortion Combinations at Several Frequencies
Volume Only Sound
Bit 4 of AUDC1-4 specifies the volume only mode. When this bit is set, the volume value in AUDC1-4 bits 0-3 is sent directly to the television speaker; it is not modulated with the frequency specified in the AUDF1-4 registers.
To fully understand the use of this mode of operation, you must understand how a speaker works and what happens to the television speaker when it receives a pulse. Any speaker has a cone that moves in and out. The cone's position at any time is directly proportional to the voltage it is receiving from the computer at that time. If the voltage sent is zero, then the speaker is in the resting position. Whenever the cone changes position, it moves air that is detected by your ear as sound.
From our definition of a pulse, you know that it consists of a rising voltage followed by a falling voltage. If you were to send the speaker a pulse, it would push out with the rising voltage and pull back with the falling voltage, resulting in a wave of air that can be detected by your ear as a pop. The following statements will produce such a pop on the television speaker by sending a single pulse:
POKE 53761,31:POKE 53761,16
A stream of pulses (or wave) would set the speaker into constant motion, and a continuous buzz or note would be heard. The faster the pulses are sent, the higher the note. This is how the computer generates sound on the television speaker.
It is essential to note that in the volume only mode the volume sent does not drop back to zero automatically, but rather remains constant until the program changes it. The program should modulate the volume often enough to create a noise. Now try the following statements, listening carefully after each:
POKE 53761,31
POKE 53761,31
The first time you heard a pop, which is as expected. The speaker pushed out and moved air. But the second time you didn't. This is because the speaker cone was already in the extended position; another extension command did nothing to the speaker, moving no air, so you heard nothing. Now try this:
POKE 53761,16
POKE 53761,16
Just as before, you heard a pop the first time as the speaker moved back to its resting position, and you heard nothing the second time because the speaker was already in the resting position.
Thus, the volume only bit gives the program complete control over the position of the speaker at any time. Although the examples given above are only binary examples (either on or off), you are by no means limited to this type of speaker modulation. You may set the speaker to any of 16 distinct positions.
For example, a simple triangle wave (similar to the waveform produced by brass instruments) could be generated by sending a volume of 8 followed by 9, 10, 11, 10, 9, 8, 7, 6, 5, 6, 7, and back to 8, and repeating this sequence over and over very rapidly. By changing the volume quickly enough, virtually any waveform can be created. It is feasible, for example, to perform voice synthesis using this technique. It requires the use of assembly language. There is more discussion of this bit in a later section.
AUDCTL
In addition to the independent channel control bytes (AUDC1-4), there is an option byte (AUDCTL) affecting all four channels. Each bit in AUDCTL is assigned a specific function:
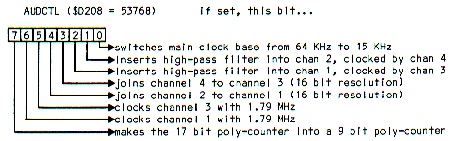
Figure 7-9 AUDCTL Bit Assignment
Clocking
Before proceeding with the explanations of the AUDCTL options, a new concept must be explained: clocking. In general, a clock is a train of pulses used to synchronize the millions of internal operations occurring every second in any computer. The central clock pulses continuously, each pulse telling the circuitry to perform another step in its operations. You may remember that a divide-by-N frequency divider outputs one pulse for every Nth input pulse. You may have wondered where the input pulses come from. There is one main input clock running at 1.79 MHZ; it can provide the input pulses. There are also several secondary clocks that can be used as input clocks. The AUDCTL register allows you to select which clock is used as the input to the divide-by-N circuit. If you select a different input clock, the output from the frequency divider will change drastically.
For example, imagine that you are using the 15 KHz clock, and the frequency register is set to divide by 8. The rate of output pulses from the divide-by-N circuit would be about 2 KHz. But if you changed the selection of clocks to get the 64 KHz clock and did not change the frequency register, then what would happen? The divide-by-N would still be putting out one pulse for every 8th input pulse, but the input rate would be 64 KHz. The result is an output frequency (from the divide-by-N) of 8 KHz.
The formula for the output frequency (from the divide-by-N) is quite simple:
| clock | |
| output frequency = | -------------- |
| N |
Setting bit 1 of the AUDCTL register switches from the 64-KHz clock to the 15 KHz clock. It is important to note that if this bit is set, every sound channel clocked with the 64 KHz clock will instead use the 15 KHz clock. Similarly, by setting bits 5 or 6, you can clock channels 3 or 1, respectively, with 1.79 MHz. This will produce a much higher note, as demonstrated with the following example:
SOUND 0,255,10,8      Turn on channel 1, low tone
POKE 53768,64         Set AUDCTL bit 6
16-Bit Frequency Options
The eight bits of resolution in the frequency control registers seems to provide more than adequate resolution for the task of selecting any desired frequency. There are, however, situations in which eight bits are inadequate. Consider for example what happens when we execute the following statements:
FOR I=255 TO 0 STEP -1:SOUND 0,I,10,8:NEXT I
The sound initially rises smoothly, but as it approaches the end of its range the frequency takes larger and larger steps which are noticeably clumsy. This is because we are dividing the clock by smaller and smaller numbers. 15 KHz divided by 255 is almost the same as 15 KHz divided by 254; but 15 KHz divided by 2 is very far from 15 KHz divided by 1. The only way to solve this problem is to use a larger number that allows us to specify our frequency with greater precision. The means to do this is built into POKEY.
AUDCTL bits 3 and 4 allow two channels to be joined, creating a single channel with an extended dynamic frequency range. Normally, each channel's frequency divider number can range from 0 to 255 (8 bits of divide-by-N capability). Joining two channels allows a frequency range of 0 to 65535 (16 bits of divide-by-N capability). In this mode, it is possible to reduce the output frequency to less than one Hertz. The following program uses two channels in the 16-bit mode, and two paddles as the frequency inputs. Insert a set of paddles into port 1, type in and run the following program:
10 SOUND 0,0,0,0                   Initialize sound
20 POKE 53768,80                   Clock ch1 w 1.79 MHz, clock ch2 w ch1
30 POKE 53761,160:POKE 53763,168   Turn off ch1, turn on ch2 (pure tones)
40 POKE 53760,PADDLE(0):POKE 53762,PADDLE(1)
50 GOTO 40                         set paddles to put freqs in freq regs
Download CH7PRG1.BAS (Saved BASIC)
The right paddle tunes the sound coarsely, and the left paddle finely tunes the sound between the coarse increments.
This program first sets bits 4 and 6 of AUDCTL which means, "clock channel 1 with 1.79 MHz, and join channel 2 to channel 1." Once this happens, the 8-bit frequency registers of both channels are assumed to represent a single 16-bit number N, used to divide the input clock. Next, channel 1's volume is set to zero. Since channel 1 no longer has its own direct output, its volume setting is meaningless to us and we zero it. Channel 1's frequency register is used as the fine or low byte in the sound generation, and channel 2's frequency register is the coarse or high byte. For example, pokeing a 1 into channel 1's frequency register makes the pair divide by 1. Pokeing a 1 into channel 2's frequency register makes the pair divide by 256. And pokeing a 1 into both frequency registers makes the pair divide by 257.
Bit 3 of AUDCTL can be used to join channel 4 to channel 3 in precisely the same way.
The following instructions demonstrate some interesting aspects of 16-bit sound.
SOUND 0,0,0,0
POKE 53768,24
POKE 53761,168
POKE 53763,168
POKE 53765,168
POKE 53767,168
POKE 53760,240:REM try pokeing other numbers into these next 4 locations
POKE 53764,252
POKE 53762,28
POKE 53766,49
High-Pass Filters
AUDCTL bits 1 and 2 control high-pass filters in channels 2 and 1 respectively. A high-pass filter allows only higher frequencies to pass through. In the case of these high-pass filters, high frequencies are defined to be anything higher than the output of another channel selected by the AUDCTL bit combination. For example, if channel 3 Is playing a cow's moo, and AUDCTL bit 2 is set, then only sounds with frequencies higher than the moo will be heard on channel 1 (anything lower than the "moooo" will be filtered out):
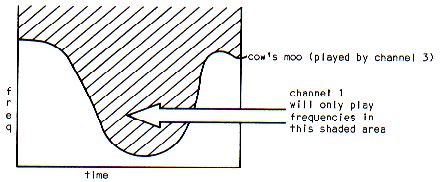
Figure 7-10 The Effect of a High-Pass Filter Inserted in Channel 1 and Clocked by Channel 3
The filter is programmable in real time since the filtering channel can be changed on the fly. This opens a large field of possibilities to the programmer. The filters are used mostly to create special effects. Try the following statements:
SOUND 0,0,10,0
POKE 53768,4
POKE 53761,168:POKE 53765,168
POKE 53760,254:POKE 53764,127
9-Bit Polynomial Conversion
Bit 7 of AUDCTL turns the 17-bit poly-counter into a 9-bit poly-counter. The shorter the poly-counter, the more often its distortion pattern repeats, or the more discernible the pattern in the distortion. Therefore, changing the 17-bit poly counter into a 9-bit poly counter will make the noise pattern more repetitious and more discernible. Try the following demonstration of the 9-bit poly counter option, listening carefully when the POKE is executed:
SOUND 0,80,8,8       Use the 17-bit poly
POKE 53768,128       Change to the 9-bit poly
SOUND GENERATION SOFTWARE TECHNIQUES
There are two basic ways to use the ATARI Computer sound system: static and dynamic. Static sound generation is the simpler of the two; the program sets a few sound generators, turns to other activities for a while, and then turns them off. Dynamic sound generation is more difficult; the computer must continuously update the sound generators during program execution. For example:
| Static Sound | Dynamic Sound |
SOUND 0,120,8,8 |
FOR X=0 TO 255 |
Static Sound
Static sound is normally limited to beeps, clicks, and buzzes. There are exceptions. Two examples are the programs given as special effects in the sections on high-pass filters and 16 bit sound. Another way to obtain interesting effects is to use interference, as in this example:
SOUND 0,255,10,8
SOUND 1,254,10,8
The strange effect is a result of closely phased peaks and valleys. Examine Figure 7-11. It shows two channels independently running sine waves at slightly different frequencies, and their sum. The sum curve shows the strange interference pattern created when these two channels are added.
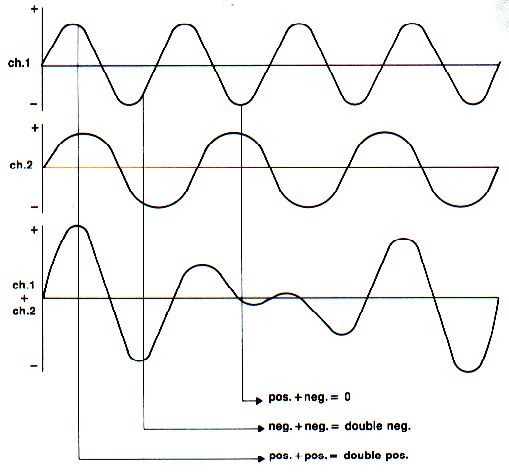
Figure 7-11 Two Sine Waves at Different Frequencies and Their Sum
Figure 7-11 shows that at some points in time the waves are assisting each other, and at other points, they interfere with each other. Adding the volumes of two waves whose peaks coincide will yield a wave with twice the strength or volume. Similarly adding the volumes of two waves while one is at maximum and the other is at minimum will result in a cancellation of both of them. On the graph of the sum curve, we can see this effect. Toward the ends of the graph, volume increases since both channels' peaks and valleys are close together, almost doubling the sound. Toward the middle of the graph, the waves oppose each other and the resulting wave is flat. An interesting project might be writing a program to plot interaction patterns of 2, 3, and 4 channels as in Figure 7-11. You might discover some unique sounds.
The slighter the difference in frequency between the two channels, the longer the pattern of repetition. To understand this, draw some graphs similar to Figure 7-11 and study the interaction. As an example, try the following statements:
SOUND 0,255,10,8
SOUND 1,254,10,8
SOUND 1,253,10,8
SOUND 1,252,10,8
As the difference in frequency grows, the period of repetition decreases.
Dynamic sound
More complex sound effects normally require the use of dynamic sound techniques. Three methods of dynamic sound generation are available to the ATARI 400/800 programmer: sound in BASIC, 60-Hz interrupt sound, and sound in machine code.
BASIC Sound
BASIC is somewhat limited in its handling of sound generation. As you may have noticed, the SOUND statement kills any special AUDCTL setting. This problem can be avoided by poking values directly into the sound registers rather than using the SOUND statement.
In addition, BASIC is limited on account of its speed. If the program is not completely dedicated to sound generation, there is seldom enough processor time to do more than static sound or choppy dynamic sound. The only alternative is to temporarily halt all other processing while generating sound.
Another problem can occur when using the computer to play music on more than one channel. If all four channels are used, the time separation between the first sound statement and the fourth can be substantial enough to make a noticeable delay between the different channels.
The following program presents a solution to this problem:
10 SOUND 0,0,0,0:DIM SIMUL$(16)
20 RESTORE 9999:X=1
25 READ Q:IF Q<>-1 THEN SIMUL$(X)=CHR$(Q):X=X+1:GOTO 25
27 RESTORE 100
30 READ F1,C1,F2,C2,F3,C3,F4,C4
40 IF F1=-1 THEN END
50 X=USR(ADR(SIMUL$),F1,C1,F2,C2,F3,C3,F4,C4)
55 FOR X=0 TO 150:NEXT X
60 GOTO 30
100 DATA 182,168,0,0,0,0,0,0
110 DATA 162,168,182,166,0,0,0,0
120 DATA 144,168,162,166,35,166,0,0
130 DATA 128,168,144,166,40,166,35,166
140 DATA 121,168,128,166,45,166,40,166
150 DATA 108,168,121,166,47,166,45,166
160 DATA 96,168,108,166,53,166,47,166
170 DATA 91,168,96,166,60,166,53,166
999 DATA -1,0,0,0,0,0,0,0
9000 REM
9010 REM
9020 REM this data contains the machine lang. program,
9030 REM and is read into SIMUL$
9999 DATA 104,133,203,162,0,104,104,157,0,210,232,228,203,208,246,96,-1
Download CH7PRG2.BAS (Saved BASIC)
In this program, SIMUL$ is a tiny machine language program that pokes all four sound channels very quickly. A BASIC program using SIMUL$ can rapidly manipulate all four channels. Any program can call SIMUL$ by putting the sound register values inside the USR function in line 50 of the demonstration program. The parameters should be ordered as shown, with the control register value following the frequency register value, and repeating this ordering one to four times, once for each sound channel to be set.
As a speed consideration as well as a convenience, SIMUL$ allows you to specify sound for less than four channels; i.e., 1, 2, and 3 or 1 and 2, or just channel 1. Simply don't put the unused parameters inside the USR function.
SIMUL$ offers another distinct advantage to the BASIC programmer. As mentioned earlier, the AUDCTL register is reset upon execution of any SOUND statement in BASIC. However, using SIMUL$, no SOUND statements are executed, and thus the AUDCTL setting is retained.
There is another, but impractical, method of sound generation in BASIC. This method uses the volume-only bit of any of the four audio control registers. Type in and run the following program:
SOUND 0,0,0,0
10 POKE 53761,16:POKE 53761,31:GOTO 10
This program sets the volume-only bit in channel 1 and modulates the volume from 0 to 15 as fast as BASIC can. This program uses all of the processing time available to BASIC, yet it produces only a low buzz.
60-Hz Interrupt
This technique is probably the most versatile and practical of all methods available to the ATARI Computer programmer.
Precisely every 60th of a second, the computer hardware automatically generates an interrupt. When this happens, the computer temporarily leaves the mainline program, (the program running on the system; i.e., BASIC, STAR RAIDERS™). It then executes an interrupt service routine, which is a small routine designed specifically for servicing these interrupts. When the interrupt service routine finishes, it executes a special machine language instruction that restores the computer to the interrupted program. This all occurs in such a way (if done properly) that the program executing is not affected, and in fact has no idea that it ever stopped!
The interrupt service routine currently resident on the ATARI 400/800 Computer simply maintains timers, translates controller information, and performs miscellaneous other chores requiring regular attention.
Before the interrupt service routine returns to the mainline program, it can be made to execute any user routine; i.e., your sound generation routine. This is ideal for sound generation since the timing is precisely controlled, and especially since another program can be executing without paying heed to the sound generator. Even more impressive is its versatility. Because it is a machine language program, the interrupt sound program will lend itself equally well to a mainline program written in any language – BASIC, assembler, FORTH, PASCAL. In fact, the sound generator will require few, if any, modifications to work with another program or even another language.
A table-driven routine offers maximum flexibility and simplicity for such a purpose. "Table-driven" refers to a type of program that accesses data tables in memory for its information. In the case of the sound generator, the data tables would contain the frequency values and possibly the audio control register values. The routine would simply read the next entries in the data table, and put them into their respective audio registers. Using this method, notes could change as often as 60 times per second, fast enough for most applications.
Once such a program has been written and placed in memory (say, at location $600), you need to install it as a part of the 60-Hz interrupt service routine. This is accomplished by a method known as vector stealing.
Memory locations $224,$225 contain the address of a small routine called XITVBL (eXIT Vertical BLank Interrupt service routine). XITVBL is designed to be executed after all 60-Hz interrupt processing is complete, restoring the computer to the mainline program as previously discussed.
The procedure to install your sound routine is as follows:
- Place your program in memory.
- Verify that the last instruction executed is a JMP $E462 ($E462 is XITVBL, so this will make the main-line program continue).
- Load the x register with the high byte of your routine's address (a 6 in this case).
- Load the y register with the low byte of your routine's address (a 0 in this case).
- Load the accumulator with a 7.
- Do a JSR $E45C (to set locations $224,$225).
Steps 3-6 are all required to change the value of $224,$225 without error. The routine called is SETVBV (SET Vertical Blank Vectors), which will simply put the address of your routine into locations $224,$225. Once installed, the system will work as follows when an interrupt occurs:
- The computer's interrupt routine is executed.
- It jumps to the program whose address is in $224,$225, which is now your routine.
- Your routine executes.
- Your routine then jumps to XITVBL.
- XITVBL restores the computer and makes it resume normal operation.
If you do not wish to implement such a program yourself, there is one available from the Atari Program Exchange. The package is called INSOMNIA (Interrupt Sound Initializer/Alterer). It allows creation and modification of sound data while you listen. It is accompanied by an interrupt sound generator that is table driven and compatible with any language.
Machine-Code Sound Generation
Direct control of sound registers with mainline machine language opens new doors in sound generation. The technique is as follows: write a program similar to the 60-Hz interrupt routine in that it is table-driven, but now the mainline routine is dedicated to sound generation. By expending much more processor time on sound generation, you can produce higher quality sounds. Consider, for example, the output of a typical 60 Hz music routine:
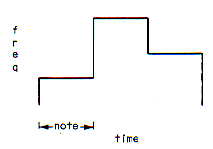
Figure 7-12 Example of 3 Music Notes Played With a 60 Hz Interrupt Music Routine
Since much more processing time is available with mainline machine language, we can change the frequency at very high speed during the note's playing time so that it simulates an instrument. For example, suppose we discovered that whenever any piano key is struck it produces a characteristic sequence of frequencies, as shown in Figure 7-13.
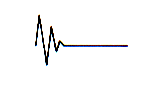
Figure 7-13 Graph of Frequency Sequence for a Piano Note
Let's call the above graph the "piano envelope". To simulate a piano, the idea would be to very quickly apply the piano envelope to the plain vanilla beep. The note is thus slightly modified during its playing time. For example, a piano simulation of the 3 notes in Figure 7-12 would look like this:
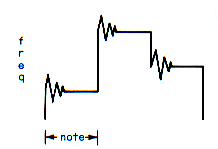
Figure 7-14 Example of the 3 Notes of Figure 7.10 Played With a Piano Envelope
We have essentially the same sound produced by the standard music routine of Figure 7-12, only the notes now have a piano tone, and sound much prettier than just the flat beeps. Unfortunately, we had to sacrifice all other processing to get that piano tone. The sound channel is no longer updated only once every note, but perhaps 100 times within the note's duration.
Volume only sound
Earlier we experimented with the AUDC1-4 volume only bits, but discovered that they weren't of much use in BASIC. This was due entirely to the fact that BASIC Is too slow to effectively use them. This is not the case with machine language.
As mentioned earlier, this bit offers a tremendous capacity for accurate sound reproduction. True waveform generation (to the time and volume resolution limits of the computer) is made possible with this bit. Instead of just putting a piano flavor into the music, you can now make it closely replicate a piano sound. Unfortunately, it can never precisely duplicate an instrument. 4 bits (16 values) is not enough volume resolution for truly high-quality work. Nevertheless, the technique does generate surprisingly good sounds. The following program demonstrates the use of one of the volume only bits. If you have an assembler, type it in and try it:
            0100 ;
            0110 ; VONLY          Bob Fraser  7-23-81
            0120 ;
            0130 ;
            0140 ; volume-only AUDC1-4 bit test routine
            0150 ;
            0160 ;
            0170 ;
            0180 ;
D208        0190 AUDCTL =    $D208
D200        0200 AUDF1  =    $D200
D201        0210 AUDC1  =    $D201
D20F        0220 SKCTL  =    $D20F
            0230 ;
            0240 ;
0000        0250        *=    $BO
00B0 01     0260 TEMPO  .BYTE 1
00B1 00     0270 MSC    .BYTE 0
            0280 ;
            0290 ;
            0300 ;
00B2        0310        *=    $4000
4000 A900   0320        LDA  #0
4002 8D08D2 0330        STA  AUDCTL
4005 A903   0340        LDA  #3
4007 8D0FD2 0350        STA  SKCTL
400A A200   0360        LDX  #0
            0370 ;
400C A900   0380        LDA  #0
400E 8D0ED4 0390        STA  $D40E      kill vbi's
4011 800ED2 0400        STA  $D20E      kill irq's
4014 8B00D4 0410        STA  $D400      kill dma
            0420 ;
            0430 ;
            0440 ;
4017 BD5240 0450 L00    LDA  DTAB,X
401A 85B1   0460        STA  MSC
            0470 ;
401C BD3640 0480        LDA  VTAB,X
401F A4B0   0490 L0     LDY  TEMPO
4021 8D01D2 0500        STA  AUDC1
4024 88     0510 L1     DEY
4025 D0FD   0520        BNE  L1
            0530 ;
            0540 ; dec most sig ctr
4027 C6B1   0550        DEC  MSC
4029 D0F4   0560        BNE  L0
            0570 ;
            0580 ;
            0590 ; new  note
            0600 ;
402B E8     0610        INX
402C EC3540 0620        CPX  NC
402F D0E6   0630        BNE  L00
            0640 ;
            0650 ; wrap note pointer
4031 A200   0660        LDX  #0
4033 F0E2   0670        BEQ  L00
            0680 ;
            0690 ;
4035 1C     0700 NC     .BYTE 28       note count
            0710 ;
            0720 ; table of volumes to be played in succession
            0730 VTAB
4036 18     0740        .BYTE 24,25,26,27,28,29,30,31
4037 19
4038 1A
4039 1B
403A 1C
403B 1D
403C 1E
403D 1F
403E 1E     0750        .BYTE 30,29,28,27,26,25,24
403F 1D
4040 1C
4041 1B
4042 1A
4043 19
4044 18
4045 17     0760        .BYTE 23,22,21,20,19,18,17
4046 16
4047 15
4048 14
4049 13
404A 12
404B 11
404C 12     0770        .BYTE 18,19,20,21,22,23
404D 13
404E 14
404F 15
4050 16
4051 17
            0780  ;
            0790  ; this table contains the duration of each entry above
            0800  DTAB
4052 01     0810        .BYTE  1,1,1,2,2,2,3,6
4053 01
4054 01
4055 02
4056 02
4057 02
4058 03
4059 06
405A 03     0820        .BYTE  3,2,2,2,1,1,1
405B 02
405C 02
405D 02
405E 01
405F 01
4060 01
4061 01     0830        .BYTE  1,1,2,2,2,3,6
4062 01
4063 02
4064 02
4065 02
4066 03
4067 06
4068 03     0840        .BYTE  3,2,2,2,1,1
4069 02
406A 02
406B 02
406C 01
406D 01
Surprisingly, speed is not really a problem here. The wave has almost 60 steps, and the program can still be made to play the wave at up to 10 Khz.
Remove lines 400-410, and try the program once more. It will sound quite broken up. The cause is the 60 Hz interrupt discussed in the previous section. You can actually hear the interrupts taking pace since all sound stops during that time.
Line 420 disables screen DMA. This is why the screen goes to solid background color when the program is executed. It serves two purposes: to speed up the processor, and to make the timing consistent, since DMA steals cycles at odd intervals.
In this demonstration program, the sound created is a sine wave. The wave is remarkably pure, and does indeed sound like a sine wave. If graphed, the data looks like this:
15-I            ------
14-I         ---      ---
13-I       --            --
12-I     --                --
11-I   --                    --
10-I  -                        -
 9-I -                          -
 8=I-----------------------------------------------------------
 7-I                              -                          -
 6-I                               -                        -
 5-I                                --                    --
 4-I                                  --                --
 3-I                                    --            --
 2-I                                      ---      ---
 1-I                                         ------
Figure 7-15 Graph of Sine Wave Data for Volume Only Program
This section has discussed the technical aspects of sound generation with the ATARI Computer. The programmer must also understand the broader role of sound in the complete software package.
Movie makers have long understood the importance of mood setting background music. The recent space adventure movies by George Lucas are excellent examples. When the villain enters the room you know immediately to fear and hate him from the menacing background rhythms accompanying his entry. You gleefully clap your hands when the hero saves the princess while gallant music plays in the background. Likewise, horror films can frighten you by merely playing eerie music, even though the action may be completely ordinary.
SPACE INVADERS (trademark of Taito America Corp) issues a personal threat to its player and victim with its echoing stomp. As the tempo increases, knuckles whiten and teeth grind. When a Zylon from STAR RAIDERS™ fires a photon torpedo you push frantically on the control to avoid impact. As it bores straight for your forehead, time slows and you hear it hissing louder and louder as it approaches. Just before impact, you duck and dislodge yourself from your armchair.
Impressionistic sounds affect our subconscious and our state of mind. This is due possibly to the fact that sounds, if present, are continuously entering our mind whether or not we are actively listening. Visual inputs, on the other hand, require the user's attention. If we are distracted from the TV set, we cease to concentrate on the picture and the image leaves our mind. Sound therefore offers the programmer a direct path to the user's mind – bypassing his thought processes and zeroing in on his emotions.
Return to Table of Contents | Previous Chapter | Next Chapter