Until now, whenever a digital output signal was required, you took it directly from one of the computer's control port I/O lines. Similarly, all the sensors sent their digital output signals directly to a control port pin. Every digital signal, whether input or output to the computer, needed its own I/O line.
Advanced projects cannot be interfaced to your computer like this-there simply are not enough 1/O lines available. The control port gives you access to five 1/O lines. But what if you need to control 12 electronic switches or monitor 15 sensors? Or even do both at the same time? The solution to this predicament is to use digital circuitry to manipulate the signals the computer sends and receives.
Digital circuitry is the same type of circuitry your computer uses. The uses of these types of circuits include performing calculations, storing information, and controlling the flow of digital signals. The behavior of digital circuits is described by what is known as Boolean algebra.
Even the most complex digital circuits, like the microprocessor of your computer, are created from basic building blocks. These building blocks are called gates. A gate has one or more input lines and only a single output line. The input lines are used to input binary data in the form of on/off signals. A gate combines these signals to produce an output. The output signal is either logic high (on) or logic low (off). The relationship between the input signals and the output signal of a gate is given by its truth table.
In the following descriptions, you'll see H and L listed. They represent:
H = Logic high On 1 signal
L = Logic low Off 0 signal
The main types of gates, along with their truth tables, follow.
Noninverting Buffer
This is the simplest of all gates. The signal that appears at its input is the same as the signal on its output.
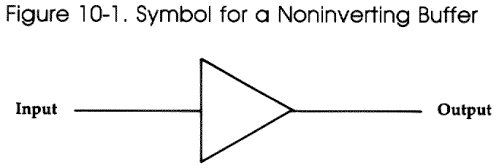
Input Output
L L
H H
NOT Gate
NOT gates are often called inverters. A NOT gate's output signal is the opposite
of its input signal. Note that the symbol of the NOT gate is the same as
that of the buffer, except for the small circle near its output. Small circles
at input or output lines of a gate's schematic symbol denote the fact that
the signal is inverted.
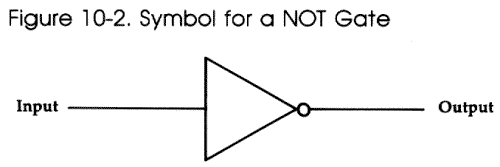
Input Output
L H
H L
AND Gate
This gate has two or more inputs. Its output goes logic high only if all
the inputs are logic high.
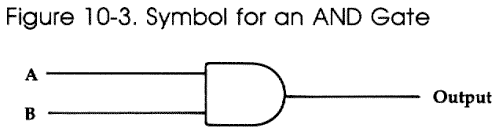
Input Output
A B
L L L
L H L
H L L
H H H
NAND Gate
This gate has two or more inputs and only one output. Its output goes logic
low only if all the inputs are logic high. For all other input conditions,
the output is logic high. Note that the output of the NAND gate is the opposite
of that of the AND gate for indentical input signals.
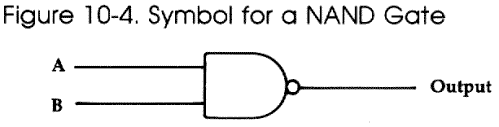
Input Output
A B
L L H
L H H
H L H
H H L
OR Gate
The output of an OR gate goes high if any of its two or more input lines
are set high.
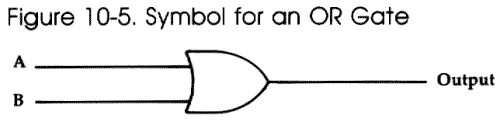
Input Output
A B
L L L
L H H
H L H
H H H
NOR Gate
A NOR gate is identical to an OR gate with its output inverted. The output
of a NOR gate is logic high only if all the inputs to the gate are logic
low.
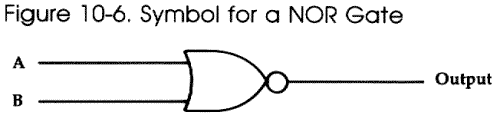
Input Output
A B
L L H
L H L
H L L
H H L
Exclusive OR Gate
The output of this gate goes high if one input (but not more) goes logic
high.
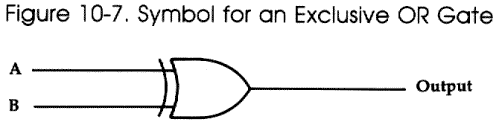
Input Output
A B
L L L
L H H
H L H
H H L
Exclusive NOR Gate
The exclusive NOR gate has a logic low output when one (but not more) of
the input lines is logic high. Its output is the same as that of an exclusive
OR gate with its output inverted.
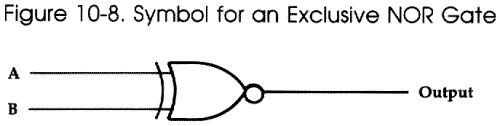
Input Output
A B
L L H
L H L
H L L
H H H
Combining Gates
Logic gates can be combined in various ways. Two input gates can be combined
to make three (or more) input gates. Figure 10-9 shows how three two-input
AND gates can be used to produce a four-input AND gate.
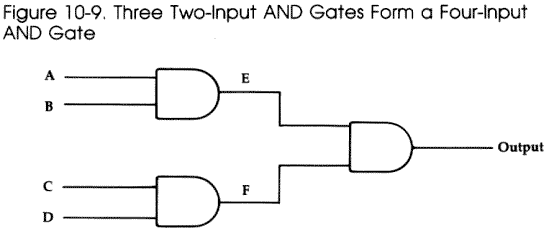
Its function can be verified by using the following truth table:
Input Intermediate Output
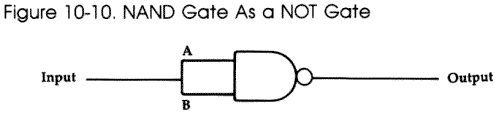
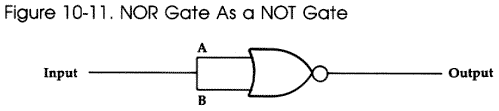
A B C D   E F
L L L L   L L          L
L L L H   L L          L
L L H L   L L          L
L L H H   L L          L
L H L L   L L          L
L H L H   L L          L
L H H L   L L          L
L H H H   L H          L
H L L L   L L          L
H L L H   L L          L
H L H L   L L          L
H L H H   L H          L
H H L L   H L          L
H H L H   H L          L
H H H L   H L          L
H H H H   H H          H
Logic gates can even be combined to form other logic gates. A NAND gate or a NOR gate acts as an inverter (NOT) if both the input lines are joined together.
Three two-input NAND gates can be hooked up to form an OR gate.
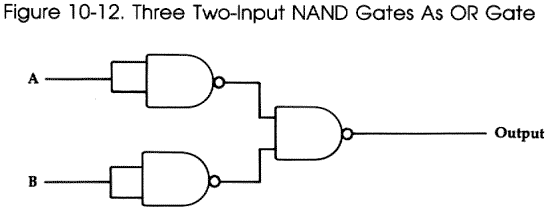
NAND and NOR gates are extremely useful since they can
be wired to operate as any type of gate.
These gates can be combined in an unlimited number of
ways. Once you understand the basic functions of the gates, putting together
a digital circuit to meet specific requirements is fairly easy.
Decoders and Encoders
Also referred to as demultiplexers and multiplexers, decoders and encoders
can be used by your computer to send or receive digital signals on many different
lines using fewer pins of the control port. These circuits can help you solve
the problem of controlling and sensing several different devices using a
limited number of I/O lines. Like all digital circuits, decoders and encoders
are constructed from the basic gates discussed earlier.
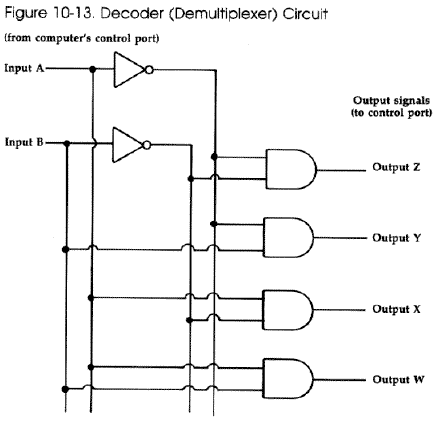
The decoder circuit in Figure 10-13 lets your computer
output digital signals on four lines using only two lines of the control
port. The two control port lines can output the binary numbers 00 (0 decimal)
to 11 (3 decimal) in the form of high and low signals. One of the four output
lines of the demultiplexer outputs a logic high signal depending on the input
combination received from the control port. The other three outputs remain
logic low. While the decoder allows you to turn on four electronic switches
(or whatever) using two control port lines, there is a catch-you can switch
on only one device at a time. In many applications this tradeoff between
control port lines and flexibility will work to your advantage.
Try tracing the logic of the demultiplexer in Figure
10-13. You'll see that the inputs of the AND gates are wired to the input
lines and inverted input lines from the control port in a way that always
produces the expected output.
The number of outputs you can design in a decoder depends
upon the number of control port lines you have available. If you have X control
lines, you can make a demultiplexer with 2^X outputs. Of course, you would
also need X inverters (NOT gates) and 2^X AND gates to build it.
Multiplexers, or encoders, perform the opposite function
of decoders. They let you input digital signals from several lines to a single
control port pin. As you can see from Figure 10-14, the circuitry for an
encoder is similar to a decoder, with some additions. Each output of the
demultiplexer section (the part on the left in Figure 10-14) is connected
to an AND gate. The other lead of the AND gate is connected to one of the
four lines carrying information from the sensors to the computer.
Truth Table
Input Output
A B Z Y X W
L L H L L L
L H L H L L
H L L L H L
H H L L L H
The demultiplexer part of this circuit is used to select
which of the four sensor lines is effectively connected to the control port
pin. The line connected to the AND gate whose other input is logic high (from
the demultiplexer part) has its signal passed to the OR gate and through
to the control port. The signals from the lines connected to AND gates whose
other inputs (from the demultiplexer section) are low are in essence blocked
from the inputs of the OR gate.
The only data line signal therefore "seen" by the control
port is the one selected by the demultiplexer circuit. A multiplexer with
X control port pins available can be designed to allow 2^(X-1) digital input
lines to be connected to the computer. The value X-1 comes from the fact
that one pin must be used to input the actual data, while the remaining pins
are used to select the data line.
These encoder and decoder circuits may seem too large
to set up on a solderless breadboard. Using individual chips, they would
be. Fortunately entire multiplexers and demultiplexers are available on integrated
circuit "chips." All you need to do is properly connect their pins to the
control port. In fact, this procedure is described in Chapter 12, "More Ideas."
ERROR: IMAGE NOT FOUND: figure10-14.gif
Experimenting with Digital
Logic
The best way to learn and understand how digital circuitry works is to do
some hands-on experimenting. All the different types of gates are available
on integrated circuit (IC) chips. All you need are a few chips, a solderless
breadboard, a power supply, some wire, and a logic probe to get started.
The integrated circuits you should use are TTL or LS
types. These chips usually contain one or more gates. The 7400, for instance,
is four two-input NAND gates in one IC package. It's a TTL (Transistor-Transistor
Logic) IC. The 74LS00 is identical to the 7400 IC, except it uses less power
(LS stands for Low-power Schotkey). In fact, most TTL ICs have LS versions.
TTL IC names start with the digits 74. Lowpower Schotkey
ICs follow this identifier with the letters LS. The remaining part of the
names are the same for TTL and LS ICs which are functionally identical.
The pin layouts for the integrated circuits used in this
book, as well as some additional basic ICs, appear in Appendix B.
Simply connect the ground and Vcc pins of the chip to
a power supply. Be careful wiring the ICs to the power. If you reverse the
connections, you could destroy the IC.
If you're using only a couple of chips, you can tap your
computer's control port for power. Pin 7 can supply +5 volts with up to 50
mA (milliamperes) of current. Pin 8 is attached to the ground terminals of
the computer's power supply.
If you're using several ICs, you'll need an external
5-volt power supply. When you use a separate external power supply for a
digital circuit and interface it with your computer, remember to provide
a common ground line by connecting the external power supply ground terminal
to pin 8 of the control port.
Return to Table of Contents | Previous Chapter | Next Chapter