Chapter
7
Home
Finances on the
Epson Printer
One of the most frequently used justifications for buying a home computer system is to manage family finances. Big businesses use computers for managing payroll and cash flow, why not use it for keeping track of the weekly paycheck and its various channels of distribution?
Why not, indeed. Your Atari computer and Epson printer can be programmed to handle your home accounts like a regular CPA firm. They can separate your debits from your credits and your income from your out-go. The potential for your computer team is almost endless.
Sounds like the answer to all financial woes, doesn't it? It's only fair to warn you that a computer system won't necessarily straighten-up your unbalanced checkbook. If you're unorganized with your finances now, the computer won't fix it. It might even make things worse. Think of how much it cost in the first place.
What your computer can do, however, is make you concentrate on your organization techniques. If you're like many people, you would like to straighten up your financial situation but you just can't seem to get a handle on it. A financial computer program can give you the structure you need to start on the way to financial recovery.
When the financial program comes from the store, it doesn't already contain your financial specifics. You have to enter them. This means that you must find all of those pay stubs, receipts, and bank statements. You must organize them and enter them into the proper categories. Your computer system can work as your financial organizer by simply asking the necessary questions and leaving the rest up to you.
This chapter includes some BASIC programs that will print checks and figure mortgage payments. You will also be introduced to using a spreadsheet with a couple of applications that will tally your checkbook and run your monthly budget. There are full accounting packages available to run on the Atari computer but they are much more complicated than can be covered in these few pages.
THE CHECKWRITER
Many people like to type their monthly checks because of the professional appearance it gives them. The CheckWriter produces checks with that "finished" appearance but also provides the advantage of word processing when it comes to correcting mistakes.
Upon booting-up the program, you will be asked for the date of the check. Enter the month, date, and year on separate lines next to the prompts. This will be the only time you'll be asked for the date since all of the checks you write at one sitting will have the same date.
Enter the check recipient, check amount (no dollar signs) and the check classification. The check classification will be printed in the lower-left corner of your check and makes tracking your flow of out-going money easier.
Now it's time to print your check. If your Epson printer is equipped with friction feed capability, you won't have to use checks designed for computers. You can print single checks or three-check sheets directly out of your desktop checkbook. If your printer doesn't have a platen or you'll be printing lots of checks, you might want to investigate continuous form-feed checks that are sprocketed to help them feed through your printer smoothly.
Align the top of the check with your print head. There's nothing magic about the print head position, but it gives a constant frame of reference to ensure that each check starts from the same position.
Press RETURN and your Epson printer will start clattering. The date, recipient, and check amount are printed on the first couple of lines. The next line is where the cash amount must be written out in words. You'll recall that you didn't type this in. The program names each of the digits in the amount to produce a written number. Finally, the check classification is printed in the lower-left corner.
Sorry, you have to sign your own checks.
Your check is then ejected from the printer or advanced to the top of the next check, depending upon the format of checks you're using. This makes it easier to move from one check to the next.
10 REM SAVE "D1:CHECKWRT"
30 DIM A$(1),D$(2),CA$(9),CC$(14),CR$(25)
40 DIM M$(10),Y$(4),CD$(I),CN$(6)
100 PRINT CHR$(125)
110 POSITION 11,1:PRINT "YOUR CHECKWRITER""
130 POSITION 1,4:PRINT "PLEASE ANSWER THESE QUESTIONS:"
140 PRINT " (USE NO COMMAS)"
150 POSITION 1,7:PRINT "MONTH (I.E., JULY): ";:INPUT M$
160 PRINT "DATE (I.E., 14): ";:INPUT D$
170 PRINT "YEAR (I.E., 1985): ";:INPUT Y3
180 PRINT :PRINT "CHECK RECIPIENT: ";:INPUT CR$
190 PRINT :PRINT "CHECK AMOUNT (I.E., 127.14): ";:INPUT CA$
200 PRINT :PRINT "CHECK CLASSIFICATION: ";:INPUT CC$
210 PRINT :PRINT " PLEASE PREPARE YOUR PRINTER"
220 PRINT " ALIGN TOP OF CHECK WITH PRINTHEAD"
230 PRINT :PRINT " PRESS RETURN TO CONTINUE";
240 INPUT A$
250 OPEN #1,8,0,"P:"
260 FOR Q=1 TO 3:PRINT #1;:NEXT Q
270 DD=LEN(M$)+LEN(D$)+1
280 FOR Q=1 TO 45-DD:PRINT #1;" ",:NEXT Q:PRINT #1;M$;" ";D$;
290 PRINT #1;" ";Y$(3,4)
300 FOR Q=1 TO 1:LPRINT :NEXT Q
305 M=45-LEN(CR$)
310 PRINT #1,CR$;:FOR Q=1 TO M:PRINT #1;" ";:NEXT Q:PRINT #1;CA$
320 FOR Q=1 TO 1:LPRINT :NEXT Q
330 PRINT #1;" ";:GOSUB 430
340 FOR Q=1 TO 3:LPRINT :NEXT Q
350 FOR Q=1 TO 5:PRINT #1;" ".:NEXT Q:PRINT #1;CC$
360 CLOSE #1
370 FOR Q=1 TO 2:LPRINT :NEXT Q
390 PRINT :PRINT "WRITE ANOTHER CHECK (Y/N)";:INPUT A$
410 IF A$="Y" THEN 100
420 PRINT CHRS(125):POSITION 4,7:PRINT "IT'S BEEN NICE PRINTING WITH YOU"
427 END
430 FOR D=1 TO LEN(CA$)-3
440 CD$=CA$(D,D)
450 IF CD$="O" THEN CN$="ZERO"
460 IF CD$="1" THEN CN$="ONE"
470 IF CD$="2" THEN CN$="TWO"
480 IF CD$="3" THEN CN$="THREE"
490 IF CD$-"4" THEN CN$="FOUR"
500 IF CD$="S" THEN CN$="FIVE"
510 IF CD$="6" THEN CN$="SIX"
520 IF CD$="7" THEN CN$="SEVEN"
530 IF CD$="8" THEN CN$="EIGHT"
540 IF CD$="9" THEN CN$="NINE"
550 PRINT #1;CN$;
560 IF D<LEN(CA$)-3 THEN PRINT #1;"-";
570 NEXT D
580 PRINT #1;" DOLLARS & "
590 PRINT #1;CA$(LEN(CA$)-1,LEN(CA$));"/CENTS"
600 RETURN
Figure 7.1 Program Listing of The CheckWriter
HOW TO MODIFY THE CHECKWRITER
The styles of checks vary as much as the banks who print them. Because of this, the CheckWriter may not exactly fit the format of your checks. This potential problem made it necessary for me to write the CheckWriter program so as to make modification quick and easy.
The first place you might want to modify is the vertical location of the lines on the check.
340 FOR Q = 1 TO 3 : PRINT#1, : NEXT Q
Line 340 advances the check three lines between writing the check amount and the check classification. If your checks require more or less lines between printings, simply change the value of 3. This is the same with lines 260, 300, 320, 340 and 370 which also control the advances of the printer.
You can also change the horizontal placement of numbers or words by altering the number of spaces the printhead moves to the right before printing. Lines 280, 310, and 350 use a FOR - NEXT loop to move the head horizontally. Alter the numbers on these lines to customize the program to print on your specific checks.
The CheckWriter can be a very useful program. It is lacking a way to monitor your checks, however. This is easily remedied by the check tally on a spreadsheet which follows.
USING A SPREADSHEET
One of the greatest boons to business was the advent of the electronic spreadsheet. It is an electronic form of the spreadsheet that has been used by accountants for centuries. Using formulas to automatically calculate the relationships between columns of numbers, the electronic spreadsheet can enable a single person to do a business forecast in a couple days that which used to take a team of accountants months to complete.
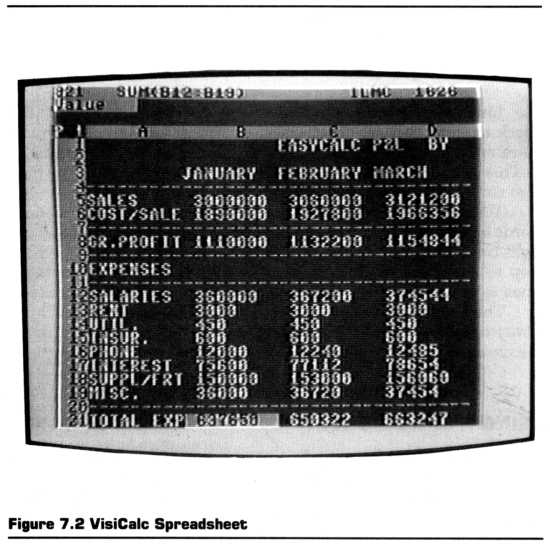
There are a number of spreadsheets available for the Atari computer. For the sake of explanation here, I will be using VisiCalc by VisiCorp. This program is the Grandaddy of spreadsheets and has been well adapted for the Atari computer line.
I can't expect to teach you how to use a spreadsheet in these few pages; whole books are devoted to doing that. I will, however, try to cover enough to help you input the applications covered in this chapter and Chapter 12.
When you boot your disk, the spreadsheet will appear on the screen. VisiCalc extends 63 columns across and 254 rows down. There are letters at the top of each of the columns and numbers running down the side to label the rows. Not all of it will fit on the screen at once. Think of your screen as a "window" which displays a small portion of the spreadsheet.
The spreadsheet is composed of a number of squares. Each square is called a "cell." It is named as the intersection of a column and a row. The cell in the upper-left corner is named A1. This indicates that it is in column A and row 1. The cell that is down two rows and over three columns is D3. That's the D column and number 3 row.
You can move between these cells in a couple of ways. Using the cursor control keys you can move the black cursor from cell to cell. Put down the book and try this a couple of times.
You can also move by pressing the > key. The words GOTO will display in the upper-right corner of your screen. Here you type the coordinates of your destination cell. Upon pressing RETURN, your cursor block will immediately jump to the desired cell. Let's jump to cell D3.
Once you reach D3, there are three types of entries that can be made:
1) Value,
2) Label, and
3) Formula.
A Value is a number. It is entered by just typing in the number and hitting RETURN. It has value and can be used for calculations. As you're entering your value, the word "Value" will appear on the Status Line in the upper-left corner.
A Label is a string of words. It cannot be used for calculations. To enter a Label, just start typing. The alphabetical nature of the first letter will cause "Label" to appear in the upper left corner. If your first character is a space or some other non-alphabetical symbol, you must indicate to your computer that it is a Label by preceeding your line with a set of quotation marks or you forgot to press the space bar before entering your Label. Check the status line and correct if necessary.
The last type of entry is the Formula. This is a kissing cousin of the Value. In fact, as you enter a Formula, VisiCalc will actually show it to be a Value on the status line. A simple Formula might read "+B3 + C3." This tells VisiCalc to add the values in cells B3 and C3 and place the sum in the cell where this formula is entered. The + sign at the beginning of the Formula tells VisiCalc that the string of characters is a Formula.
Although this is only giving you a glimpse of how a spreadsheet works, it should be enough to help you enter the Check Tally application. I will explain more information as more skills are needed along the way.
THE CHECK TALLY
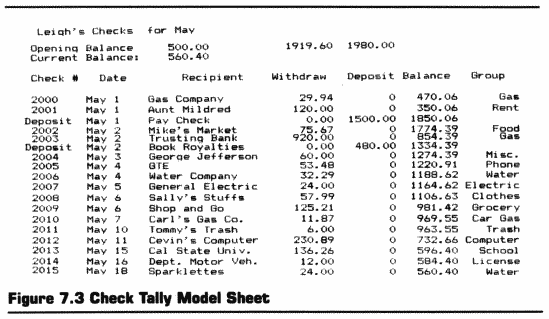
You'll have to keep track of the checks you write with the Check Writer program. To do this, I am including a spreadsheet application called "The Check Tally." This is both an effective way to keep track of your checks and an easy introduction to the workings of a spreadsheet.
This Check Tally application is also known as a "template." It's called a template because it's laid over your spreadsheet program to make the spreadsheet fit your needs.
I will be using conventional spreadsheet notations to explain what to enter in the cells of your spreadsheet. Each entry will be preceded by a ">", a letter-number combination indicating the cell location, and a colon. The data following the colon is the data which needs to be entered into the cell.
You must move the cursor to a cell before you can enter a Value, Formula, or Label into that cell. You can move the cursor around your spreadsheet by either using the cursor-control keys or the GOTO command. The GOTO command is entered through the use of the > sign. After pressing >, the words "GOTO" appear on the status line at the top of the screen and you can input the coordinates of the cell to which you wish to move.
When you have input the coordinates for the destination cell, press RETURN and your cursor will jump to that cell. In this notation, I will use the colon (:) to indicate pressing the RETURN key.
Once you have reached your desired cell, type the entry listed to the right of the colon. Some of the formulas will extend beyond the eight spaces in the cell. That's O.K. A VisiCalc cell will accept a formula up to 35 characters long.
Once your information is entered into the cell, it can be registered with the computer by either moving the cursor to another cell or pressing RETURN. Moving the cursor is usually a faster way to do it because you're going to move to another cell anyway after you press RETURN. Moving the cursor in the first place saves keystrokes.
If you make a mistake, you can use the DELete key to remove incorrect characters. If you wish to clear the whole cell, press / and then B, RETURN. This will blank the cell and prepare it for correct input.
I realize that you will want to modify this template to fit your own needs, but I would suggest you follow it exactly to ensure the proper input of the cells and then make your modifications.
VisiCalc uses a standard format for displaying values and labels. It displays labels in a left justified manner and values in a right justified format. If either of these styles doesn't fit your needs, you can select one of VisiCalc's other formats through which your information can be displayed. Begin by pressing the / key to show the System Menu across the top of the screen. Next press "F" to display the Format Menu. Select one of the letters in the Format Menu. VisiCalc uses $ for currency format, L for left justified, and R for right justified.
>A1:" Leigh's
>B1:" Checks f
>C1:" for May
>A3:" Opening
>B3:Balance:
>C3:/F$
>E3:/F$ @Sum(E8.E39)
>F3:/F$ @ Sum(F8.F39)
>A4:" Current
>B4:Balance:
>C4:/F$ + C3 - @SUM(E&E39) + @SUM(F8.F39)
>A6:" Check #
>B6:" Date
>C6:" Reci
>D6:pient
>E6:Withdraw
>F6:" Deposit
>G6:" Balance
>H6:" Group
>A8:/FL
>E8:/F$
>F8:/F$
>G8:+C3-E8+F8
>H8:/F$
>A9:/FL + A8 + 1
>G9:+G8-E9+F9
DOIN' IT AGAIN
Now it's time to replicate. You will prepare your Check Tally for 32 checks. This allows you one a day and one or two for foolishness. (Just think, February can be an extremely foolish month.) The only problem is that each check number must be entered separately.
T'aint necessarily so. You'll remember that you typed in a formula, + A8 + 1, in cell A9. This says to add one to the number in cell A8. If your first check is numbered 2000 and you enter it in A8, A9 will immediately display 2001 in preparation for the second check.
This same formula can be used all the way down column A to compute sequential check numbers. What's that you say? Typing in the formula is more work than the number? Fortunately your VisiCalc spreadsheet includes a Replicate command to duplicate the formula throughout column A.
The replicate command enables you to designate a source cell or block of cells from which you wish to copy information. You then designate a target cell or block of cells to which you wish the information copied. This procedure is a grand time saver when there is repetitive information to be entered as you will see.
Begin the replication process by moving the cursor to A9. This is the cell from which you want to copy the formula. Now press /. The System Menu will display across the top of the screen. Press R to enter the Replicate mode.
The top of your screen now shows A9 at the beginning of the line. This is the beginning of the Source Range. Press RETURN to accept this value and enter the end of the Source Range as A9 also. Next type A10 as the first cell of the Target Range. Press the Period key (.) and a series of three dots will follow the A10 on your screen. Enter A40 and you should see
A9 ... A9: A10...A40
Press RETURN and the formula in A9 will begin the replication process down column A. If you've been paying careful attention, you may be wondering why you would want the formula A8 + 1 in each of the cells in column A. This would mean that they would all display a number that is one greater than the quantity in A8. You don't want all of the cells to add one to A8, but you do want each of them to add one to the cell above them. You want each cell to exhibit a similar formula which is relative to its position.
After pressing RETURN this last time, the top of the screen changed to display a question, "REPLICATE: N =NO CHANGE, R =RELATIVE". Doesn't appear to be much of a question, but it's asking whether you want the variable A8 (displayed on the next line) to be copied in an absolute (no change) or relative form. An absolute form would mean that A8 would be inserted into each of the cells. Relative form means the variable A8 would be adjusted to indicate cells in the same relative position as A8 is to A9.
Press R for relative.
VisiCalc will now enter those formulas in each of the cells. When it is completed, a series of red ERROR statements will appear down the left side of your worksheet. These ERROR messages indicate that these equations do not have enough information to work. Move to cell A8 and enter 2000. Press RETURN and watch what happens.
Hopefully, you now have a set of sequential check numbers running down the left side of your spreadsheet. If not, review the instructions to see if you forgot anything.
You'll now use the replicate command in columns F, G, and H. Column F needs to have 0 (zero) entered in each of its cells to provide enough information for the equations in Column G. Column G needs the equation for computing the balance copied in all of its cells. Columns E and H will use the replicate command to copy the format into each of the cells.
| Column F: | Enter 0 (zero) in F8 /R:F9.F40: |
| Column G: | >G9: /R:G10.G40: Relative (G8) Relative (E9) Relative (F9) |
| Column E: | >E8: /R:E9.E40: |
| Column H: | >E8: /R:H9.H40: |
Your Check Tally is now ready to manipulate information. Using the model sheet in Figure 7.3, enter the Opening Balance. Do this by moving to cell C3 and then entering 500. Now continue to use the model sheet to enter the Date, Recipient, and Amount (Withdraw), and Group of each check.
Don't enter the deposits. As you enter your withdrawals, you'll notice your account will start showing a negative balance. Don't worry about it. You'll soon be making some deposits to offset your scarcity of resources.
Let me take a moment here to mention something about saving your work to disk or tape. You've completed a great amount of work and if the power were to accidently fail right now, it would all be lost. Before continuing, save your spreadsheet. Begin by pressing /. Then S for Storage. Select S again for Save. Type in the title of the file in which you wish to save your spreadsheet. Remember, your title must not exceed eight characters. You might name it CHECKBOK.
Now it's time to make some deposits into your account.
MAKING DEPOSITS
You'll notice deposits have a column but no rows. Each of the rows is preceded by a check number. Deposits tend to be sporadic. They need to be interjected wherever needed. To answer this need, use the Insert command to create an empty row for a deposit.
Move your cursor to row 10. You will insert your $1500.00 paycheck on this line. Begin by pressing /. Press I for Insert. You will be asked whether you would like to insert a Row or Column. Select Row with the letter R.
Your Atari will spend about 20 seconds moving all of the entries down one row. A blank row will then appear on Row 10. This row is really blank. It contains no numbers, no letters, and, regretably, no formulas or formats. This means that you will have to enter the formats and formulas where needed on this line.
Enter this information for your deposit:
| A10 |
C10 |
E10 |
F10 |
| Deposit | Paycheck | f7,F,$ | f7,F,$ |
| 0.00 |
1500.00 |
The formula for the Balance column can either be entered manually as /F$ G9 - E 10 + F10 or the replication process may be used to copy it as a relational formula from cell G9.
You may have noticed a new balance appear after you entered the formula into G10, but none of the other numbers changed. This is because of a slight problem with the formula in G11. Move the cursor down to G11 and inspect the formula. It reads G9 - E11 + F11. Notice that it totally disregards the deposit on line 10. The line was inserted but none of the formulas were adjusted accordingly. Correct this by using the replicate command to copy the formula from G10 into G11 as a relational formula.
Add a deposit of your own creation on your Check Tally. Remember to enter the formats and formulas and readjust the formula in G column below the deposit line.
POSSIBLE PROBLEMS
Spreadsheets are quick and easy. Unfortunately, these attributes can sometimes lull the user into a false sense of security. As you saw with some formulas is column G, problems with formulas aren't always easy to detect. To catch these problems you must include crosschecks on your spreadsheet.
You'll notice in row 3 there are numbers above the Withdraw and Deposit columns. These are the sums of those columns. These sums are located at the top of the columns instead of bottom for easy access.
Along with the sums at the top of the spreadsheet are places for the Opening Balance and Current Balance. There is no calculation done with the Opening Balance. It is typed in from last month's statement. The Current Balance, however, is a checking system for the accuracy of the spreadsheet. Whereas the check-tocheck balance is calculated by the formulas in each row, the Current Balance is calculated by subtracting the sum of the withdraws from the opening balance and then adding the sum of the deposits. It may not always agree with the running balance in column G. If they don't agree, start looking for a problem in one of your formulas in column G.
PRINTING YOUR CHECKBOOK TALLY
Printing your Checkbook Tally is really quite easy. Begin by moving the cursor to Cell A1 by typing >A1: (Remember : indicates RETURN.) Select /. Then P for Print. You will now be given the choice to print the spreadsheet to a File or your Printer. Select I? Your Status Line now displays "Print: Lower right, "Setup, -, &". Begin by telling VisiCalc you want it to send a carriage return and Line Feed at the end of each line. This is accomplished by typing &. & may not appear on the screen, but it's there just the same. Now type H40 to tell VisiCalc the lower right corner of your spreadsheet. Press RETURN and your printer should come to life.
If your Epson printer is equipped with SelecType, you should experiment with the various combinations available for printing your spreadsheet. Printing in Near-Letter Quality will give it a professional appearance. Printing in Compressed Mode should allow you to print up to 130 columns on one page. Experiment and have fun.
You can see how your Atari computer and Epson printer can make your home finances easier to manage. You might even be able to save enough money to buy all of the computer equipment and software you've been dreaming about.
The next section discusses using your computer system for doing better in school. It explains how you can use your Atari computer and Epson printer to produce better assignments and achieve greater mastery over the subject material.
Return to Table of Contents | Previous Chapter | Next Chapter