6

Making Your Player
Dance
Next you will learn how to add life to your player by making his or her legs move. You'll also be able to create other kinds of movements as desired. In addition, you'll learn how to take care of those troublesome errors that occur when you move a player too far off the screen.
Let's start by animating those legs.
DEFINING IMAGES
To make our player's legs move, we need to define three player images, which we will call "LEGS1$, LEGS2$, and LEGS3$."
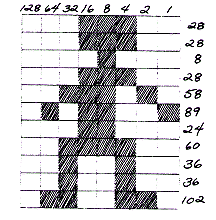
Here's the first image for our player along with the data needed to create her. (Notice that we have omitted the leading and trailing zeros.)
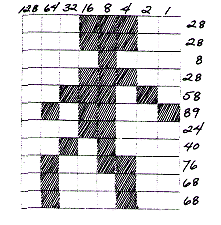
And here's the second image with accompanying data.
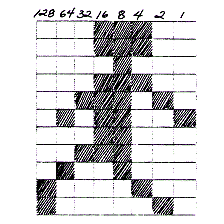
- Now it's your turn. As a review, see if you can calculate the data for this third image:
|
||||||
INITIALIZING THE IMAGE STRINGS
Now that we've designed the images, we need to initialize our player image strings. Remember how we do it? To initialize our first image, we use a line like this:
11060 FOR I=1 TO 17:READ A:LEGS1$(I,I)=CHR$(A):NEXT I
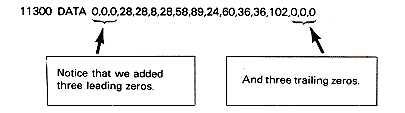
- The data for this will appear online 11300 like this:
- Why did we do that?
|
||||||
Now to initialize our second image we simply insert line 11065, which is almost identical to line 11060:
11065 FOR I=1 TO 17:READ A:LEGS2$(I,I)=CHR$(A):NEXT I
Of course we also need to add the data for LEGS2$. We do that on line 11310:
11310 DATA 0,0,0,28,28,8,28,58,89,24,40,76,68,68,0,0,0
- Your turn again. Write the lines needed to initialize the third player image. I'll supply the line numbers.
11067
11320
|
||||||
Oh yes, another thing. We need to dimension our new strings. We can easily do this on line 11050:
11050 DIM LEGS1$(17),LEGS2$(17),LEGS3$(17)
- That takes care of setting up the image strings. Next we need to set up a routine to move these images into the PM memory area. Specifically, we will want to move them into which string?
|
||||||
AN EXPERIMENT
First, enter the last program from the previous chapter into memory. Then make these changes:
1. Delete lines 4000 through 4020 and remove GOSUB 4000 from line 1.
2. Change line 11050 so it reads:
11050 DIM LEGS1$(17),LEGS2$(17),LEGS3$ (17)3. Add lines 11060, 11065, and 11067:
11060 FOR I=1 to 17:READ A:LEGS1$(I,I)=CHR$(A):NEXT I
11065 FOR I=1 to 17:READ A:LEGS2$(I,I)=CHR$(A):NEXT I
11067 FOR I=1 to 17:READ A:LEGS3$(I,I)=CHR$(A):NEXT I
4. Add these data lines:
11300 DATA 0,0,0,28,28,8,28,58,89,24,60,36,36,102,0,0,0
11310 DATA 0,0,0,28,28,8,28,58,89,24,40,76,68,68,0,0,0
11320 DATA 0,0,0,28,28,8,28,58,89,24,56,72,132,130,0,0,0
5. Change line 200 so it reads like this:
GOSUB PEEK(JOYSTICK):GOSUB MOVELEGS:GOTO 200
6. Insert at line 10050:
MOVELEGS=30:SP=1:PR=8
7. Add a subroutine at line 30 as follows:
30 POKE HPOSP0,X0:PLAYERO$(Y0)=LEGS1$:PLAYERO$(Y0)=LEGS2$:
31 PLAYER0$(Y0)=LEGS3$:RETURN
8. Change line 13040 so it reads:
PLAYER0$(Y0)=LEGS1$
Notice that we are now moving each of the three images, in turn, into the PM memory area.
- Before you run the revised program, write down a prediction as to how it will turn out. Then try it. What's the result?
|
||||||
One way is to set up a counter. We'll use the variable Z for this. To increment the counter we simply put the statement "Z=Z+1" at the beginning of line 30.
Remember that our animation routine is based on a loop. Each time we pass through the loop, variable Z will be increased by one. Also, our player will be moved to a new position based on the new horizontal and vertical coordinates. Suppose we want the first image to be displayed during the first three times through the animation loop. Then we might use an IF-statement at the end of line 30. Line 30 would then look like this:
Z=Z+1:POKE HPOSP0,X0:IF Z<4 THEN PLAYER0$(Y0)=LEGS1$:RETURN
Notice the "RETURN" statement that sends control back to the main loop at line 200.
- Suppose we want image two to be displayed during loop passes 4 through 6. Code the two statements needed to make that happen. Use line 31.
|
||||||
Following the same pattern, we might want to display image three during loops 7 through 9. We don't need an IF-statement this time. If Z is 7 or greater, control will simply pass to line 32. At line 32 we simply set PLAYER0$ to the third image. However, when X=9. we will want to reset Z to 0 so that next time image one will be displayed.
- See if you can code the statements for line 32.
|
||||||
- We need to add a statement online 33 before this routine will work. See if you can figure out what it is. Here's a hint. What happens if X=7? Control will pass to line 32, and the third image will be moved into PLAYER0$. But since Z is not equal to 9 . . . what will happen?
|
||||||
Try it. Make sure lines 30 through 33 read like this:
30 Z=Z+1:POKE HPOSP0,X0:IF Z<4 THEN PLAYER0$(Y0)=LEGS1$:RETURN
31 IF Z<7 THEN PLAYER0$(Y0)=LEGS2$:RETURN
32 PLAYER0$(Y0)=LEGS3$:IF X=9 THEN X=0:RETURN
33 RETURN
- Try this out. What additional problem is there?
|
||||||
Control is passed to line 15 when the joystick is not moved--when the player is stationary. So we can use this line to display a single image and then jump back to line 200. The POP command serves to cancel the GOSUB that passed control to line 15. By using "POP" we make it "legal" to use the "GOTO 200" statement. Without the POP statement, you would eventually end up with an error message as a result of "GOTO 200." That's because BASIC is set up to expect a RETURN statement at the end of a subroutine.
Try adding line 15. If everything goes well, you will find that the player's legs move only when you move the joystick! If you want, you can experiment with a different "standing still" image of the player. For example, you might code line 15 like this:
15 POP:PLAYER0$(Y0)=LEGS2$:GOTO 200
With this statement, image 2 will be displayed when you leave the joystick in the upright position. The program will now work fine. If yours doesn't, you may wish to compare it with the listing at the end of this chapter.
TRAPPING ERRORS
I promised you I'd explain how to handle those error messages that pop up when you move the player too far off the screen. Here's one simple way:
1. Change line 1 so it reads like this:
1 TRAP 3000:GOSUB 2000:GOTO 200
2. Add line 3000:
3000 PLAYER0$=BUFFER$:Y0=128:X0=80:Z=0:TRAP 3000:GOTO 200
The TRAP at line 1 says. "Trap any error you find. Don't print an error message. Instead, just GOTO line 3000.
- What do you think line 3000 says?
|
||||||
After that, the variables Y0 and X0 are set to some specific values. The value of 128 for Y0 hides the player off the bottom of the screen. The value 80 for X0 puts the PLAYER$ at the left of the center of the screen. The result is that if you move the player too far off the screen in any direction, she will be automatically repositioned off the bottom of the screen on the left side. To bring her back,just push forward on the joystick and she will scoot up onto the screen.
The idea here is that the error condition is caused by a bad value in either X0 or Y0. To fix that, we simply trap the error and reset X0 and Y0 to any desired "legal" values. In addition, we reset the leg movement counter (Z) to zero.
Also, notice that we repeat the TRAP command at line 3000, so that if another error occurs, we will again branch to line 3000. (A TRAP statement must be reset after an error occurs.)
If you haven't yet got your player's legs to move, now's the time. You may wish to refer to the following program, which is a complete listing of all the lines needed to make your player dance!
Once you have it working, you may wish to animate your player in other ways. For example, you might want to add some additional images to make the legs move more smoothly--or you may wish to have the player move her arms or other body parts. Have fun!
LEGS.BAS
Download (Saved BASIC)
Download / View (Listed BASIC)
Return to Table of Contents | Previous Chapter | Next Chapter