Chapter 4
Assembly Language Applied To Game Design
The words, Machine language and/or Assembly language, evoke visions of indecipherable code to the novice BASIC programmer. The code looks unfamiliar. But so was BASIC when you were first learning it. While BASIC has its roots in the English Language and algebraic expressions, Assembly language appears to consist of unfamiliar op codes or mnemonics that are used in conjunction with an unfamiliar base 16 number system called hexadecimal.
It is our intent in this chapter to teach you the fundamentals of Assembly language programming by comparing it to similar code written in BASIC. Rather than teach you all aspects of the language, we will concentrate only on the operations needed to do simple game graphics.
A good Assembler is needed to write Assembly language programs. An assembler merely translates mnemonics like JMP, which is equivalent to a GOTO, into hexadecimal opcodes that the computer understands. Most Assemblers have an editor, an Assembler, and a debugger. The editor allows you to enter Assembly language code usually by line number and later edit, delete, or insert particular lines. The Assembler portion converts your source listing into Machine Code in a two-pass operation. Since any line of code can have a label in its first field, the Assembler will automatically calculate the branches or GOTOs to lines referenced with these labels. Also, if you want to store a variable called ZAP, the Assembler which assigns a memory storage location for the variable will automatically furnish the correct memory address for any subsequent store or load operations using that variable. Last, there is a Machine language monitor or debugger that helps locate errors. It allows you to examine and change both memory and internal registers. It also includes step and trace features that allow you to step through your code one instruction at a time.
Readers who already own assemblers may use the one they have. We have provided a translation table in the Appendix in the back of this book to aid you in converting our SYNASSEMBLER source code to that used in your assembler. We chose SYNASSEMBLER when we began this book in the Spring of 1983 because it was co-resident (screen editor, assembler, and debugger are in memory simultaneously) and was available in cartridge form.
For those of you who are new programmers, or are unhappy with their present assembler, we recommend either the F-S Macro Assembler 40/80 from Stanton Products (See coupon in back of book), an enhanced disk version of the now discontinued SYNASSEMBLER, or MAC 65 from Optimized Systems Software. Both of these assemblers are fast (2000 lines/minute), are co-resident assemblers, allow source files to be chained, and offer a choice of assembling to either disk or memory. Both of these are professional packages and are used as development tools in various software houses. The F-S Macro Assembler 40/80 and the discontinued SYNASSEMBLER are both derived from the S-C family of assemblers on the Apple II computer. Whereas the new F-S Macro Assembler 40/80 is compatible with the new XL series of computers, unpatched versions of SYNASSEMBLER are not. The F-S Macro Assembler 40/80 is completely compatible with SYNASSEMBLER source files with the exception of the way it handles ATASCII string data. A simple global replace will suffice. (see note in Appendix on assemblers differences.)
Our readers will certainly want to know why we don't use the more popular Atari Editor Assembler cartridge. First, it is very, very slow, often taking ten minutes to assemble a 1000 line program. Second, it doesn't allow chaining of files, nor assembly to the disk. Third, it is full of bugs. It remains popular mostly to beginner programmers who want to try to write a very short Assembly language subroutine that will interface to their BASIC programs.
Basic Assembly Language
The Atari computers contain a central processing unit (CPU), a 6502A microprocessor that operates at 1. 8 Mhz. It accepts instructions to perform various operations, like taking a value and storing it somewhere in memory, adding a number to another number located in one of its internal registers, or comparing two values. What makes programming in Assembly language rather difficult (or at least tedious) is that the computer can only execute one tiny instruction at a time, and only perform its operations in three internal registers. These three addressable registers are known as the X register, Y register, and Accumulator. Each can hold eight binary digits called bits, which are individually valued at 0 or 1. The eight bits, collectively called a byte, have values ranging from 0 to 255 decimal or ($00 to $FF in hexadecimal notation).
Essentially, the computer, which is an eight-bit microprocessor, can manipulate data whose values range from all eight bits off (00000000) to all eight bits on (11111111). The average person has great difficulty in thinking of values represented by 0's and 1's. Fortunately, someone invented a number system called hexadecimal, which is base 16 instead of binary or base 2.
Hexadecimal Numbers
Since 16 is 2x2x2x2, we can divide our eight bits into two four-bit groups. If you determine each of the decimal equivalents of all the combinations of base two representations, you obtain the following table. These values range from 0 to 15 decimal. In the hexadecimal numbering system, values above 9 are represented by the letters A-F. In order to prevent confusion between decimal and hexadecimal numbers, hexadecimal numbers are preceded by a "$".
 	BINARY	  DECIMAL  HEXADECIMAL
	 0000	     0	       $0
	 0001	     1         $1
	 0010	     2	       $2
	 0011	     3	       $3
	 0100	     4	       $4
	 0101	     5	       $5
	 0110	     6	       $6
         0111	     7	       $7
         1000        8         $8
         1001        9         $9
         1010       10         $A
	 1011	    11	       $B
	 1100	    12	       $C
	 1101	    13	       $D
	 1110	    14	       $E
	 1111	    15         $F
Hexadecimal numbers are very much like decimal numbers. They can be added and subtracted in like manner. The only difference is that instead of having units, tens, hundreds, etc, the hexadecimal numbers have units, sixteens, 256's, and so forth. Each successive digit is sixteen times the position to the right instead of ten times as in our decimal system.
      DECIMAL        HEXADECIMAL
      1 6 5          $ 1 3 A

      1 HUNDRED        1-256
        6 TENS           3 SIXTEENS
           5 ONES           A ONES

	1 x (100) = 100     1 x (256) = 256
      + 6 x (10) = 60      +3 x ( 16) = 48
      + 5 x( 1) = 5        +A x (  1) = 10

               165 DECIMAL             $13A = 312 DECIMAL
Hexadecimal numbers are used to address the Atari's 48000+ memory locations. Each group of 256 bytes ($00 - $FF) is called a page, starting with page zero. In 48K Atari computers, memory is directly addressable from locations $0000 to $BFFF (0 -49151). Locations above $BFFF are also addressable, but these locations don't contain RAM. The area from $D000 to $D7FF contain custom hardware chips such as the GTIA, POKEY, PIA, and ANTIC microprocessor. Some of these hardware locations can be read and some written to. The area above that, $D800 to $FFFF, contain the 10K operating system ROMS.
Memory Considerations in Assembly Language
The bottom of RAM, pages 0 thru 5 ($0000 - $05FF) are generally off limits for program storage. Zero page ($00 - $FF) is a very special area. There are a number of zero page addressing instructions that execute faster because they require only two instructions instead of the usual three. This is because they only need to address a memory location from $00 to $FF instead of $0000 to $FFFF. These locations are used extensively by the Operating System.
Only the last few bytes of zero page are available to the user. In fact, if you are using Synassembler only locations $F0 - $FF are totally free. You can also use $D6 - $EF, if you don't mind if your data is altered by the floating point package each time arithmetic operations are performed by BASIC. And if you are writing a subroutine to be accessed from BASIC, only locations $CB - $D1 (203-209) are available. $D4 and $D5 can be used to send variables back to BASIC via the USR function.
Page one of memory ($100 - $1FF) is reserved for the stack. It is used by a special purpose register in the 6502A microprocessor for keeping track of return addresses when calling subroutines. This scratch area for the Stack Pointer is sometimes used for temporary register Storage.
Pages two and three are used for various I/0 operations, and operating system shadow registers, page four for the cassette buffer, page five for the keyboard buffer, and pages seven through twenty-eight for DOS 2.0's file management system. Essentially the area below 7420 ($1CFC), with the exception of page six, is off limits to programmers using DOS. However, if DOS isn't resident, you can begin storing at 1792 ($700) safely. A pointer to the low end of memory, MEMLO, can be read at locations 743,744 ($2F7,2F8).
Program Counter & Program Status Word
When a microprocessor processes a Machine language program, it keeps track of which instruction it is executing with an internal 16-bit register called the program counter. The program counter contains the current address of the instruction that is being processed. When the computer finishes with an instruction, it sets a flag or condition in a 7-bit, Program Status Word, which is another register. For example, if you want to test if a value in the Accumulator is equal to zero, you compare the value in the Accumulator to zero. If this value is equal to zero, the zero flag will be set and the next instruction, Branch Equal to Zero (BEQ), will be executed. Other flags that can be set are the carry flag, and the negative flag. A diagram of the Program Status Word is shown below.

OP Codes
The 6502A microprocessor accepts only Machine language instructions. These are called opcodes. When the computer encounters a $4C, it performs an equivalent to a GOTO in BASIC. The Machine language instruction $4C 00 08 tells the computer to jump to memory location $800. (Remember, addresses require two bytes. The low order byte in this case contains $00 and the high order byte, $08--in effect, the reverse order of the actual values.) Unfortunately, Machine language is difficult to remember, so programmers invented a substitute called Assembly language, wherein each opcode is assigned a mnemonic such as JMP, BRK, or LDA. The above example looks like this: JMP $0800.
If you were to type the following Machine Code into the monitor in your Assembler, you would see how the monitor disassambler interprets the code, as in the following example:
4000: A9 30 8D 00 41 CE 00 41 AD 00 41 C9 00 D0 F6 60 [CR]
If you enter a 4000L from the Synassembler monitor you will see the following:
4000: A9 30    00030	  LDA #$30
4002: 8D 00 41 00040	  STA $4100
4005: CE 00 41 00050	  DEC $4100
4008: AD 00 41 00060	  LDA $4100
400B: C9 00    00070	  CMP #$00
400D: DO F6    00080	  BNE $4005
400F: 60       00090	  RTS
The disassembler translates the Machine Code to more easily understood mnemonics. In the first line of code, LDA is the mnemonic for Load Accumulator. It is the instruction for the 6502 to load the Accumulator with an immediate value--in this case, $30. The # sign signifies that it is an "immediate" instruction; the ($30) is the data portion of the instruction. The STA in line two is an "absolute" instruction. It specifies the address in memory for storing the byte of data that is in the Accumulator.
The difference between "immediate" and "absolute" instructions is an important point. Let us take the example LDA #$30. In this "immediate" instruction, the computer takes the operand ($30) as a value and places it in the Accumulator. However, LDA $30 is an "absolute" instruction, so the computer takes the operand as an address from which to load data into the Accumulator. In both cases, we get a value in the Accumulator. You can tell the modes apart because "immediate" instructions have a # sign before the operand.
You might wonder, what does this code do? It is a time delay subroutine. It puts a decimal 48 in memory location $4100. Line two stores it there, then the value stored at that memory location is decremented by one in line three. It is then reloaded into the Accumulator to be compared against the value zero. If it is zero it falls through to the return-from-subroutine instruction and ends; but if it isn't zero it branches back to memory location $4005. That location tells the computer to decrement the value in $4100 once again. The code will perform this small loop until the value in $4100 becomes zero. At that time, the test for a zero becomes true and the program returns to the line after the JSR in the program that called it.
Does it work? First type 400E:00 This program has a direct analogy to the following BASIC program:
The major differences between the two programs is that in Assembly language there are no line numbers used within the code (line numbers are used only by the editor to place your text in order, and you have to take care of every minute detail. BASIC automatically assigns the storage locations of all variables and the location of each instruction in memory. In Assembly language programming, we have to assign the X variable to memory location $4100, and have to calculate the relative branch or GOTO so that it references the memory location $4005. This is done by branching back $F6 bytes or -8 bytes to the proper address. Yet many of these details can be greatly simplified if we use an Assembler to do our programming.
The same program using an Assembler looks like the following:
The Assembler generates identical Machine Code, but many of the tedious details are simplified. Once X is equated to the memory location in line 2, references to that variable in lines 4 through 6 are handled automatically. If X were assigned to a different memory location because we lengthened our program, you would only have to change line 2. Also, labels act like line numbers in BASIC. Since the Assembler assigns the line of code labeled LOOP to a particular memory location, it can calculate the correct branch automatically when it encounters line 8 during assembly. The .OR in line 1 is a pseudo-op, understood only by the Assembler. This does not generate code but tells the Assembler where the code is to be run and stored. The pseudo-op .TF causes the generated code to be stored to the disk rather than to memory.
Now that you have had a taste of Assembly language programming and have seen that it isn't as bad as you thought, there are a number of fundamental operations that must be learned. The most important operation is to move numbers from one memory location to another. This can be accomplished by loading a value into any one of three internal 6502 registers--the Accumulator, X, or Y registers--and storing that number somewhere in memory. A LDA (Load Accumulator) instruction can be carried out in several different ways depending on its addressing mode. First we can load the Accumulator with a real hexadecimal value (LDA #$05). This is called Immediate Mode Addressing. Sometimes we need to be able to load the Accumulator with a variable stored in a memory location (LDA $4100). This is called Absolute Addressing.
The only other addressing method that we will discuss for the time being is the Indexed Addressing mode. It takes the form of LDA $4100,X or LDA $4100,Y depending on whether the X or Y register is used as an index. If, for example, the X register contains a #$05, then the instruction above loads the value from location $4100 + $05 or $4105. This addressing mode is used primarily for indexing into tables stored at particular memory locations. There is no problem with the tables crossing page bounderies. For example, if your table began at $4080 and the X-register contained a $90, then the instruction LDA $4080,X would fetch the value in memory location $4080 + $90 or $4110.
EFFECTIVE ADDRESS = ABSOLUTE ADDRESS + X
EFFECTIVE ADDRESS = ABSOLUTE ADDRESS + Y
Store operations are similar to load operations. You can store a value into an "absolute" memory location, or you can store indirectly into a memory location, offset by the value contained in either the X or Y register.
In summary, the table below shows the various load and store operations.
*Both indirect operations involve zero page addressing only.
Sometimes it is necessary when counting cycles, or looping through code to increment or decrement a value directly similar to a FOR-NEXT loop in BASIC. In Assembly language, either the X and Y registers or any memory location can be incremented or decremented. If the X register contained a $FE, then it would contain $FF when incremented. But if it contained a $FF, it would wrap around to become $00. The computer informs you by setting a zero flag in its Program Status Register.
There is a special area in the computer ($100 - $1FF) that is used quite frequently by an internal register called the Stack Pointer. The computer uses this area to save return addresses when handling either interrupts or subroutines. The stack is like a dish dispenser. Bytes are pushed on the stack in order, and pulled off in reverse order. The first byte stored is the last byte to be pulled off. The Stack Pointer always points to the next free byte in the stack. Since the stack is only 256 bytes long, only 128 address pairs can be stored at any one time.
Normally the stack would be of little interest to programmers except that it can also be used to temporarily store data. If you were worried about your three registers being altered in a subroutine, you could push all three values onto the stack before calling the subroutine, and then pull them back off when you return from the subroutine. BASIC also uses the stack to transfer data in the USR function when calling a Machine language subroutine. The top byte in the stack contains the number of variables being passed. The values follow in two byte pairs in hi byte low byte order.
Two basic Machine language instructions provide key tools for using the stack. PHA pushes the value in the Accumulator on the Stack. PLA pulls the top value of the stack and places it in the Accumulator. Since these instructions only involve the Accumulator, you would need to transfer the value in the X register to the Accumulator (TXA) in order to save the X register on the stack. Similarly you would transfer the Y register to the Accumulator (TYA) first before a PHA to the stack. Be careful when working with the stack. For instance, if you push data onto the stack while in a subroutine and don't pull it back off, when the subroutine reaches the RTS instruction it will return to the main program at the wrong address.
Program flow can be altered, as in BASIC, with instructions that resemble GOTO, GOSUB, and IF ... THEN statements. The JMP instruction is equivalent to a GOTO statement; it can transfer control to any location in the machine to continue executing code. JMP $8D6C instructs the computer to continue executing code beginning at address $8D6C. The GOSUB statement is identical to a JSR (jump Subroutine) in Machine language. When the computer reaches the instruction $5A83, it pushes the two-byte memory address of the instruction onto the stack, so that when it returns from the subroutine via an RTS (ReTurn from Subroutine), it will know the address where it will continue the program. When it returns, it pulls the return address off the stack and increments it by one so that it points to the next executable instruction.
The IF ... THEN statement is analogous to a number of branch instructions which test the Program Status Register to see which flags are set. Usually, you use compare operations to set flags. You can compare a value against the value stored in either the Accumulator, the X or the Y Registers. The mnemonics are CMP, CPX and CPY, respectively. For example,
Different flags are set depending on the result.
Branch instructions are very similar to a JMP instruction (which is an unconditional branch), except that only under certain circumstances will they cause program flow to continue at a different location. For example, if we were to test for that wraparound case when we incremented the X-register that contained $FF, we would want to test the Zero Flag with a Branch Equal Zero (BEQ) instruction, and go to some label if the condition is true.
This short example loads a value from the memory location into the X register, then increments it. If wraparound occurs, the test for a zero flag causes the program to jump to a label called SKIP, and the code does not return to the program that called it via the RTS. There are numerous tests on each of the flags in the Program Status Register. A summary is shown below.
Most Assemblers offer alternative mnemonics for BCC and BCS. Since, during comparisons, the carry flag is set when the value in the appropriate register is equal or greater than the value compared, BCS might be called BGE (Branch Greater or Equal). Likewise, BCC is equivalent to BLT (Branch Less Than). Why use these alternatives? Because they are easier to remember and visualize, and they make it clear that you are doing logical comparisons, rather than testing the results of an addition or subtraction. There is one other important concept that should be understood when doing comparisons. I implied that the subsequent branch was like a GOTO in BASIC or like a JMP in Assembly language. This is not entirely true, since the range of the branch cannot exceed -126 to +129 bytes. This is because the branch instruction is only two bytes long. The first byte is the instruction code and the second the relative address. It takes a two byte address to branch to any place in memory (Except Page Zero). The JMP instruction has the advantage that it is three bytes long. In most cases, this limitation will not cause problems. But if a "branch out of range error" occurs, you must reverse the test so that it will reach the required destination via a JMP instruction.
Example: If BEQ SKIP is out of range then substitute the following:
This change causes the program to drop through the JMP instruction if the zero flag was set, and then jump to location SKIP. However, if the zero flag is not set, it will advance ahead five bytes to the instruction following the JMP. All other branch instructions work in a similar manner. This gives the equivalent of a Long Branch.
Simple addition and subtraction of unsigned numbers is easily accomplished in Machine language. All additions and subtractions must be performed one byte at a time. Thus, large numbers or multi-byte numbers (those that exceed $FF), must be added or subtracted one byte at a time, and the carry flag must be accounted for. It's actually not much different from addition of two multi-digit decimal numbers. Those numbers have a digit in the ones column, another in the tens, etc. If you add 65 to 78, you add the ones column first. Five plus eight equals 13. The value in the ones column is 3; you then carry the one "ten" into the tens digit column before you add the two numbers in the tens column. Hexadecimal addition is similar. You clear the carry before you add. If the sum of the two values exceeds $FF, the carry is set. Since you don't clear the carry when adding the next higher byte, the resultant answer will be the sum plus the previously computed carry, as in the following example:
The code for addition and subtractions is as follows:
ADDITIONS
SUBTRACTIONS
You should be aware that the rules for subtraction are different from the ones for addition. The carry must be set first. This is equivalent to a borrow in subtraction. After the subtraction operation, the carry will be clear if an underflow (borrow) occurred. The carry will be set otherwise. Setting the carry is very important, a step that many beginners forget. The results are invariably incorrect if this step is skipped--and possibly even "random," since the status of the carry flag can be on or off when the subtraction operation is performed. This can make debugging difficult.
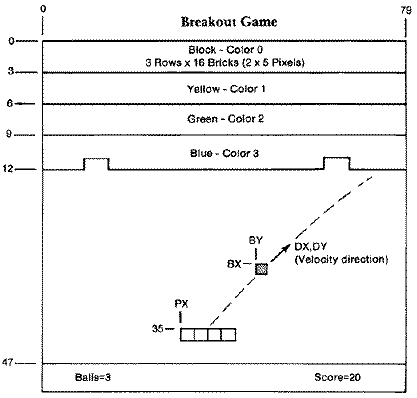
The "Breakout" game involves the simplest animation technique available on the Atari, moving individual pixels from one position to a new position. We have a Graphics 5 pixel-sized ball that bounces around the screen. It will ricochet off a movable paddle, the walls, or any of the 2 pixel-high by 5 pixel-wide colored bricks. Movement is accomplished by erasing the ball at its old position and redrawing it at its new position. The ball is very predictable. It changes direction only upon collision, and in all cases (except contact with the paddle) simply reverses direction. The point of contact with the joystick-controlled paddle determines the ball's direction. Balls striking the left end travel upwards and to the left at a 45 degree angle, while balls striking the inside left travel in the same direction but at a 60 degree angle. Balls striking the paddle's right side travel at similar angles, but to the right.
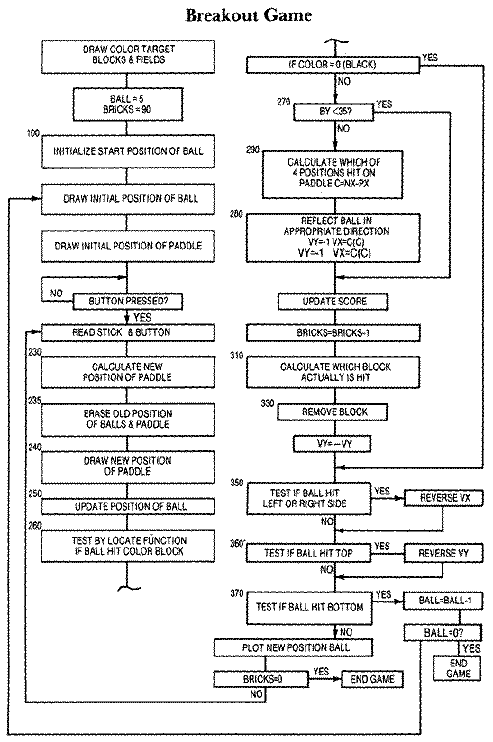
Once you have the design description, in this case a game that is an old classic, the next step is to translate it into a logical sequence of events and their consequences. This can best be accomplished by drawing a flow chart that shows the possible pathways for each module in the program. Each of these modules can be as small as a single statement, or can consist of entire subroutines. No matter how detailed or general you make it, the flowchart must accurately represent the game's logic. While it is a good tool for learning to think logically, a flowchart isn't necessary or required in all cases. Many good programmers have never drawn one. They obviously have the ability to flowchart unconsciously in their minds.
The game should be programmed in small steps rather than as a complete entity. This way you get to see results early. Besides, it is easier to debug a small section, such as the ball bouncing off the paddle and moving around the screen, than to attempt to debug a complete program that is full of errors. The most successful programmer will be one who can debug by watching what goes wrong on the screen.
Determining where the ball strikes the paddle is easy in our "Breakout" game. The paddle is always drawn two-pixels wide at row 36 decimal or $24, and the first pixel begins at PX, a variable controlled indirectly by the joystick. Actually the new paddle position is P = P + D where D depends on the direction of movement and whether the button is being pressed. If the joystick is pushed to the left, D=-1, while if it is pushed to the right, D=1. When the button is pushed, D=D*3, and the paddle moves at triple speed. The Boolean logic in line 230, ((P+D)>0 AND P+D<76) gives a value of true=1 or false=0 depending on whether the paddle has exceeded the screen bounds after movement. If it hasn't, the result is P=P+D*(1), and there is a new paddle position. If it has, the result is P=P+D(0) and the paddle remains stationary.
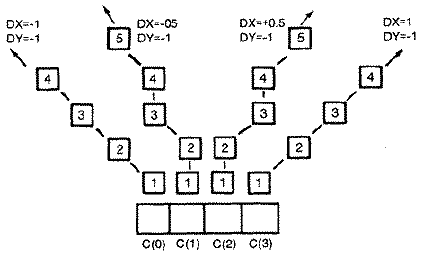
It is easy to compare the ball's new vertical position NX to that of the paddle's leftmost position PX. The difference NX-CX is C. You can use this value to index into a table to obtain the new horizontal velocity; DX = C(C). These values vary with position. The two outside blocks give a DX of + 1 or 1, and the two inside blocks give a DX of +1/2 or -1/2. The vertical velocity, DY is equal to -1 since the ball is always travelling upwards after striking the paddle.
In order to update the ball's position, we take the old ball's position and add the change in position or its directional velocity. The format is:
NEW POSITION = OLD POSITION + CHANGE IN POSITION
NX = BX + DX Incrementing or decrementing the ball's position by 1/2 in the X direction is not physically possible since screen positions are whole numbers. The ball's position is truncated to the nearest integer value with the INT function. The result is that the ball remains stationary in the X direction during one frame, then moves one whole pixel position during the next frame or cycle.
As the ball bounces around the screen it will soon collide with one of the colored 2 by 5 pixel-sized bricks at the top of the screen. It is possible to test for a collision by using the LOCATE function. This function, which returns the color register at the ball's position, works only in BASIC Graphics modes 3-8. Non-zero values in this
example indicate a collision with one of the three colored bricks (Playfields #1-3).
If there is a collision, the correct block needs to be removed. This is quite simple to calculate for the X direction:
C INT(NX/5)*5 You still need to determine if the ball hit the brick in an even or odd pixel row. It might appear that the ball would always collide with the bottom or odd row of pixels first, but if there are gaps between bricks as occurs later in the game, the ball can approach from the side and strike the brick along the top or even row of pixels. If the ball strikes the bottom row, you will need to adjust the position to the brick's top row in order to erase one complete brick. The test is a very simple Boolean function in line 320. For example if the ball's new vertical position, NY=9, then NY/2 <> INT(NY/2) would reduce to 9/2 <> 4 which is true. We would then decrement NY to an even number in order to erase the complete block. The top left corner of the 2 pixel by 5 pixel brick is C,NY. Five pixels are erased from C,NY to C+4,NY in each of its two rows.
The brick's score depends on its playfield color. SCORE = SCORE + SCORE(C), where C is the value returned by the locate function. The yellow (playfield #1) bricks at the top are worth ten points, the green (playfield #2) bricks in the middle are worth five points, and the blue (playfield #3) bricks at the bottom are worth only three points.
The ball's vertical direction of travel reverses upon collision with a brick. It continues in the horizontal direction until it reaches either the left or right playfield boundary at BX=0 or BX=79. It reverses direction there so that DX = -DX. If the ball reaches the top of the playfield at BY = 0, it will reverse its vertical direction. But if the ball reaches the bottom it is lost and we begin again with a new ball. The game will end when we have run out of either bricks or balls.
Download BREAKOUT.BAS (Saved BASIC) The "Breakout" game is quite easy to translate into Assembly language once you understand how BASIC handles its graphics commands. The Operating System (OS) implements each of these commands through the CIO (Central Input/Output) subroutine located at $E456. When a program calls the OS through this location, the OS expects to be given the address of a properly formatted IOCB (Input Output Control Block). There are eight of these, each sixteen bytes long. These are located from $340 to $3BF. The appropriate IOCB number times 16 is passed to the subroutine in the X-register. The full details of how the internals actually work are really not important, especially to the beginning Assembly language programmer. Let's just say that we developed a set of graphics subroutines that mirror their BASIC language counterpart. We have commented on each of these in the listing for anyone who would like to study them.
The five graphics commands that we need for our game are: GRAPHICS #, POSITION H,V; PLOT H,V; DRAWTO H,V; and LOCATE H,V,Color. We set up
each by inputting certain parameters into the Accumulator, X-register, and Yregister. Once you've set up the registers you need only JSR to that subroutine. The table below shows what you need to input into each of the registers.
For example, if we wish to set up a Graphics 5 screen and draw a blue (playfield #3 default color) line from 10, 15 to 30,15 our program would be as follows:
Once you understand the simplicity of duplicating the BASIC graphics statements in Assembly language you can proceed with developing the game.
The "Breakout" game is a very close translation of the BASIC version with a few subtle differences. One of the problems in working with Assembly language is that all numbers are whole integer numbers. In the BASIC version the ball's horizontal direction (DX) became +1/2 or -1/2 when it hit the inner portion of the paddle. Since incrementing the ball's position by +1/2 would be impossible in Assembly language, DX and BALLX, a temporary value for the ball's horizontal position, are doubled in value. If we then divide BALLX by two before plotting the ball's true position, TX, the fractional part, will vanish. In essence the ball will move horizontally every other frame.
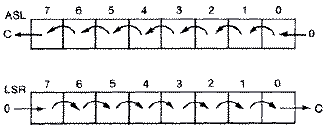
BALLX = BALLX + DX (doubled values) Multiplication and division by powers of two is easy in Machine language. The mnemonic ASL is used for multiplication by two. The Arithmetic Shift Left (ASL) instruction shifts all of the bits in the Accumulator one position to the left. Thus, bit 0 is shifted into bit 1, bit 1 into bit 2, etc. Bit 7 is shifted into the carry bit so that you can use the BCC and BCS instructions to test for overflows. For example, if only bit 2 was on (4 decimal) and we did an ASL, the bit would be shifted to bit 3 (8 decimal). Thus, it is easy to multiply by powers of two by performing repeated ASL instructions.
Conversely, division is performed by the Logical Shift Right (LSR) instruction. Bits are shifted to the right and the bit 0 is shifted into the carry. This is equivalent to dividing by two with loss of the fractional part.
The table of directional values for the four possible collision positions with the paddle are stored in VX. The two negative values in the table are stored in their two's complement form because it is easier to add two positive numbers rather than to test for a negative number and subtract.
For example, #$FE (-2)+ #$03 = #$01. The offset position from the paddle's left edge is placed in the X register to get the new horizontal velocity.
We calculate the ball's new position as follows;
The scorekeeping routine also deserves an explanation. It differs substantially from the routines used in the other Machine language games in this book. It takes advantage of the 6502's ability to work in a numbering system called Binary Coded Decimal, or BCD. This system uses the lower four bits or low-order nibble to represent the low-order decimal digit, and the high-order nibble to represent the high-order decimal digit. The advantage is that the numbering system resembles decimal. The disadvantage is that it requires some advanced programming technique to isolate the digits in order to print them to the screen.
To get to this mode you must set the decimal flag with a SED (Set Decimal Mode) command. It remains in effect until it is cleared by a CLD (Clear Decimal Mode) command.
A pair of bytes, SCORE and SCORE+ 1 are used to store the four score digits. These are updated by adding POINTS,X to SCORE+ 1 each time a brick is removed. The X-register contains the color value of the block hit so that we need only index into a table of point values. We didn't clear the carry when we added #$00 to SCORE (highbyte). However, if there was an overflow in SCORE+1 (low byte) during the first addition, the carry would be included in the resulting value in SCORE. Each of the four nibbles must be separated, translated into an internal character #, and finally placed into the appropriate position in the text window. The byte's high nibble is first shifted to the low nibble by four successive LSR instructions and then translated into an internal character number. Digits in the internal character set begin at #$10. Internal character #16 decimal = 0, 17 decimal = 1, etc. The ORA #$10 instruction, which combines the individual bits in its operand with those in the Accumulator, is just a fancy way of adding $10 to the value of our digit. The value of the low nibble is isolated by ANDing it with #$0F. It is then ORed with #$10 to obtain the internal character and stored in the next screen position. We have effectively stored the thousands and hundreds digits in the screen window. The code loops back again to obtain the value for the two nibbles in SCORE+ 1. These contain the tens and units digits. All of the store operations are done using indirect indexed addressing of the form STA(WINDOW),Y. We will discuss this at greater length in later chapters. Meanwhile, it allows us to index rapidly into a memory area whose two-byte address is stored in zero page.
If you're confused or lost at this point, don't worry. Just read on. Our
intention was merely to show how a simple game like "Breakout" could be
translated into Assembly language using graphics subroutines. It is not
necessary to understand all of the details but to be able to roughly follow
the code as it pertains to the game's flow chart. Many of the subtle tricks
we mentioned in the previous discussion we will discuss in much greater detail in subsequent chapters.
Download BREAKOT.EXE (Executable program)
10 X=48
20 X=X-1
30 IF X<>0 THEN 20
40 RETURN
LINE LABEL INSTRUCTION COMMENT
         FIELD FIELD	FIELD

00010	      .OR $4000	 ;ASSEMBLE CODE AT $4000
00020 X	      .EQ $4100	 ;X IS STORED AT $4100
00030	      LDA #$30
00040	      STA X
00050 LOOP    DEC X	 ;X=X-l
00060	      LDA X
00070	      CMP #$00	 ;DONE?
00080	      BNE LOOP
00090	      RTS
Addressing Modes
        ACCUMULATOR     X REGISTER 	Y REGISTER

LOAD	LDA #$05	LDX #$05	LDY #305
        LDA $4100       LDX $4100       LDY $4100
	LDA $4100,X     LDY $4100,X
	LDA $4100,Y	LDX $4100,Y

STORE	STA $4100	STX $4100	STY $4100
	STA $4100,X                     STY $4100,X *
	STA $4100,Y	STX $4100,Y *
Incrementing & Decrementing
                ACCUMULATOR	X-REG   Y-REG   MEMORY LOCATION

INC BY 1	NOT AVAILABLE	INX	INY	INC $4100
DEC BY 1	NOT AVAILABLE	DEX	DEY 	DEC $4100
Stack Instructions
Altering Program Flow
        LDA $4100 ;LOAD ACCUMULATOR WITH VALUE AT $4100
        CMP #$05
           LDX $4100    ;LOAD X REGISTER WITH VALUE IN MEMORY
	   INX	        ;INCREMENT X - REGISTER
	   BEQ SKIP	;TEST IF 0, AND IF TRUE GOTO SKIP
	   RTS	        ;RETURN TO MAIN PROGRAM
SKIP	   LDA #$04
            .   .
            .   .
BCS	-	Branch if the carry flag is set.	      C = 1
BCC	-	Branch if the carry flag is clear.	      C = 0
BEQ	-	Branch if the zero flag is set.	              Z = 1
BNE	-	Branch if the zero flag is clear.	      Z = 0
BMI	-	Branch if minus.	                      N = 1
BPL	-	Branch if plus.	                              N = 0
BVS	-	Branch if overflow is set.	              V = 1
BVC	-	Branch if overflow is clear.	              V = 0
BNE *+$5     or	    BNE B
JMP SKIP	    JMP SKIP
.		    B NOP
.                   .
Addition & Subtraction
EXAMPLE:	+CARRY
	            63    F4
	           +02   +16
	           ---   ---
                    66    0A ;SETS CARRY
CLC	         ;CLEAR CARRY
LDA #$F4	 ;LOAD LOW ORDER BYTE
ADC #$16	 ;ADD WITH CARRY
STA LOW	         ;STORE LOW BYTE
LDA #$63	 ;LOAD HIGH ORDER BYTE
ADC #$02	 ;ADD WITH CARRY (NOTE DON'T CLEAR CARRY)
STA HIGH	 ;STORE HIGH BYTE
SEC	         ;SET CARRY FLAG
LDA #$F4	 ;LOAD VALUE
SBC #$16	 ;SUBTRACT WITH CARRY
STA VALUE        ;STORE RESULT
Breakout Game (BASIC)
Paddle Position
Ball's Position & Velocity
NY = BY + DYCollisions with Bricks
Download / View BREAKOUT.LST (Listed BASIC)
Breakout Game (Assembly Language)
Graphics Commands
Function	Accumulator	X-register 	Y-register

GRAPHICS        Mode #          -------         -------
POSITION        Vertical        Horizontal      Horizontal
                                High byte       Low byte
PLOT            Vertical        Horizontal      Horizontal
                                High byte       Low byte
DRAWTO          Vertical        Horizontal      Horizontal
                                High byte       Low byte
LOCATE          Vertical        Horizontal      Horizontal
                                High byte       Low byte
                Has color
                value on
                return.
LDA #$05	;GRAPHICS 5 SCREEN
JSR GRAPHICS
LDA #$03	;PLAYFIELD #3
STA COLOR
LDA #$0F	;VERTICAL=15
LDX #$00	;HORIZONTAL HIGH BYTE
LDY #$0A	;HORIZONTAL LOW BYTE
JSR PLOT	;PLOT PIXEL
LDA #$0F	;VERTICAL=15
LDX 000         ;HORIZONTAL HIGH BYTE
LDY #$IE	;HORIZONTAL LOW BYTE
JSR DRAWTO 	;DRAW LINE
Breakout Game
TX = BALLX / 2
ASL and LSR Instructions
       LDA #$05    ;LOAD ACCUMULATOR WITH 5
       LSR         ;DIVIDE BY 2
       STA $4000   ;VALUE STORED IN $4000 IS 2
Ball's Direction After Paddle Collision
                                  0th   1st   2nd    3rd
                             VX   $FE   $FF   $01    $02
LDA TX       ;COMPARE PADDLE HORIZ. WITH BALL HORIZ.
SBC PX       ;DIFFERENCE
TAX
LDA VX,X     ;FETCH VELOCITY VALUE FROM TABLE
STA DX       ;THIS IS DOUBLED VALUE
CLC
LDA BALLX    ;OLD BALL POSITION (DOUBLED)
ADC DX       ;NEW HORIZ. VELOCITY DOUBLED
STA BALLX
LSR          ;DIVIDE BY 2
STA TX       ;BALL'S TRUE HORIZ. POSITION
Scorekeeping
  DECIMAL    BINARY	HEX
	               (BCD)

    07     0000 0111    $07
    10     0001 0000    $10
    16     0001 0110    $16
    42     0100 0010    $42
Download BREAKOT.OBJ (Object code)
Download / View BREAKOT.LST (Assembler listing)
Download / View BREAKOT.S (Source file)
Download / View BREAKOT.RAW (As printed in book)
Return to Table of Contents
| Previous Chapter
| Next Chapter