Chapter 5
Player-Missile Graphics
Player-missile graphics differ from playfield graphics in two distinct ways. First, the players, which appear as semi- transparent overlays against the background, are memory independent of the playfield graphics. Thus, these sprites, as playermissiles are sometimes called, don't overwrite playfield memory and don't destroy the background graphics as they move around the screen. Second, since they are directly mapped to the screen by the CTIA/GTIA and the ANTIC hardware chips, positioning a sprite on the screen is extremely fast and accurate. They were designed with fast smooth motion in mind.
As we learned from character graphics, the screen is a two-dimensional image; the screen RAM is organized one-dimensionally as one long string of bytes. Animating a character requires erasing the old character image, calculating a new position, then writing a new character image at the new position. Unfortunately, if the motion is vertical, the new position must be some multiple of twenty or forty bytes apart from the original in memory. The necessary calculations are time consuming. Moreover, character graphics animation with 8 x 8 pixel sized characters isn't smooth unless you use numerous transitional shapes. Also the background needs to be restored after each move.
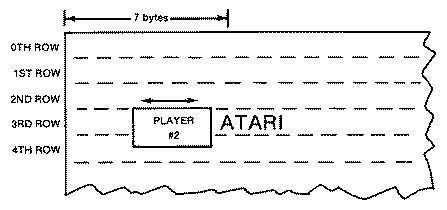
Atari engineers thought of a simpler and better method to achieve smooth animation. They created a graphics image that was both one-dimensional on the screen and one-dimensional in memory. This image appears as a vertical stripe one byte or eight pixels wide extending from the very top of the screen to the very bottom. The image or player appears in RAM as a table of bytes that is either 128 or 256 bytes long. Each byte, depending on the programmer's choice of resolution, is mapped into either one or two horizontal scan lines.
The two hardware chips, the CTIA/GTIA and ANTIC, automatically place a sprite on the screen. While the GTIA is busy putting color pixels on the screen based on graphics information furnished by ANTIC, it simultaneously keeps track of its current horizontal position on the screen. If it finds that the current horizontal position equals the value of the horizontal position register for the player, it asks ANTIC to give it a byte from the player-missile area of memory corresponding to the current scan line. It then interprets that byte as a series of on-off pixels or points, starting with the high bit on the left, and plots them in the selected player color. If the bit in the byte is on, it illuminates or plots a pixel, and if it is off it skips plotting the pixel. Areas of the player stripe that contains zeros or no player data are transparent to the background or playfield graphics. Scan lines that contain data form a solid image that overlays but does not affect the background image.
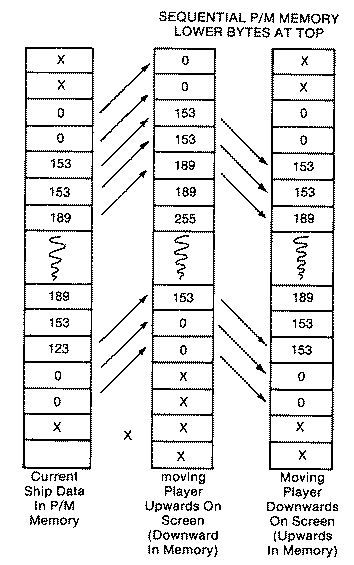
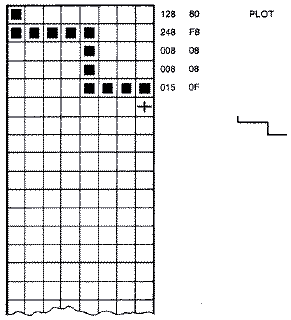
Player data is mapped in much the same way as character data is mapped in a character set. Where a character is limited to eight rows of data, a player stripe, depending on player resolution, consists of either 128 or 256 rows. Each byte corresponds to a row, and each of its eight-bit positions corresponds to the eight pixels that collectively form part of the player image. A bit that is on or has a one in it lights the corresponding pixel which maps from left to right, high bit to low bit. For example
The vertical starting position depends on the position in player memory. However, the 0th or first byte is mapped automatically by hardware to an area offscreen past where ANTIC is generating display list scan lines. Therefore, the first twenty or so bytes and the last thirty or so bytes are beyond the normal raster scan of a television set. A player that begins in the thirty-fourth position in player-missile memory will map to the screen starting at the second scan line. Players move vertically by moving the player data through the 256-byte page of player memory. The higher a player image is stored in memory, the lower it appears on the screen.
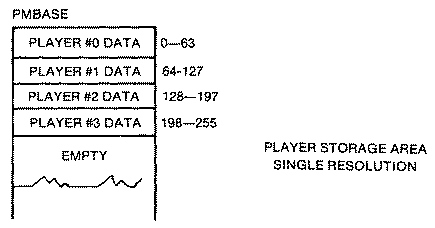
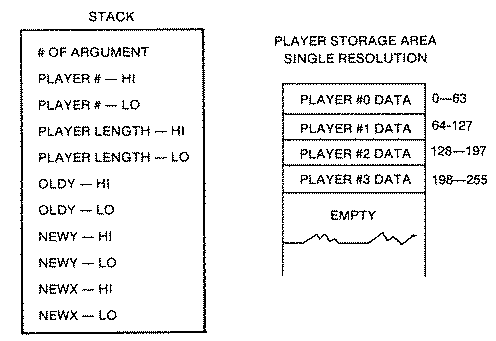
Atari's player-missile system consists of four players and four missiles that reside in a 2K block of memory known as the player-missile memory area. Think of
Player priority can be set so that all or half of the players are in front of the playfield graphics, all are behind the playfield graphics, or some of the playfield colors are in front of the players with the rest behind. Any overlaps in position are of course returned in a series of read-only hardware locations called collision registers.
These are quite useful in game design. You can also enable bit 5 in the priority register (POKE 623,32) so that you obtain a third color when players 0 and 1 or 2 and 3 overlap. If you don't set the overlap option, the area of overlap will be black.
NOTE: If missile sizes are set Individually, then add the four different values. The combination is poked into ($D00C).
Enabling Player-Missile Graphics
There are numerous steps involved to enable player-missile graphics from both BASIC and Machine language. Beginners see it as a long list of mysterious POKEs, but there is a logical and explainable reason for each. First there are two electrical switches between Antic, GTIA, memory and the world, which tell them whether to do DMA (Direct Memory Access) automatically. The first, called DMACTL (Direct Memory Access Control), is shadowed at location 559 decimal ($22F). It enables ANTIC to fetch bytes automatically and plot them to the screen. When it is turned off with a zero, the screen is turned off because ANTIC can no longer fetch bytes from memory. It defaults normally to standard playfield graphics with double-line resolution for player-missiles turned off. This value is 34 decimal. The table below, which depends on which bit positions are set in DMACTL, summarizes the various modes.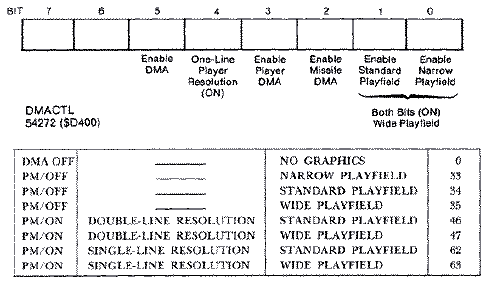
Next we need to reserve space for our 2K player-missile area in memory assuming we are using single-resolution P/M graphics. Since it needs to be on a 2K memory boundary, it is best to reserve space and put it above the screen and display list areas beginning at eight pages (2K) below the top of memory. This is accomplished by simply adjusting the top of memory pointer at location 106 decimal with a new value that is eight less than the original value. The computer now thinks top of memory is 2K lower than it actually is, and assigns screen memory and its accompanying display list below that when any graphics mode is set up.
The 2K player-missile area (single-line resolution) begins at the new top of memory which we just POKEd into location 106. Since ANTIC needs to know where we have put our P/M storage area, we need to POKE this value into location 54279 ($13407) known as PMBASE. This is the high byte value of the location. The low byte value is assumed to be zero since it is on a 2K page boundary.
The memory area assigned to player-missile graphics may or may not contain miscellaneous data which will appear as garbage in the P/M stripes. The 2K area should be cleared to zeros. However, since a long series of POKEs in BASIC is rather slow, it is faster to clear only the P/M memory that you will actually use. In the example below, only player #0 is used. Therefore, only the area from PMBASE+ 1024 to PMBASE+ 1280 is set to zero. In the worst case where you were using the missiles and all the players, the unused first 768 bytes in singleline resolution or the first 384 bytes in double-line resolution need not be cleared.
Space Ship Example
Player #0 is a spaceship originally five scan lines high. To make it appear larger each scan line is plotted twice and the width is doubled. In addition, a pair of zeros has been placed at both the top and bottom of the player image for a total of fourteen bytes. The reason for this will shortly be clear. The fourteen player-missile data bytes are then POKEd into the proper P/M memory area for player #0. By POKEing the data starting at SPOT = PMBASE+1024+100 the player will begin 100 scan lines from the top. Since the first thirty-two scan lines are above the top line of text on the screen, our image begins sixty-eight lines from the top. Accounting for the two blank or zero lines of our image, our ship actually begins at the seventieth scan line.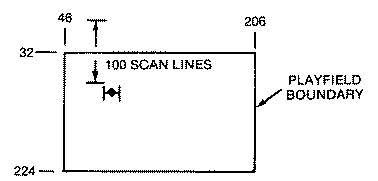
Download PMEXAMP1.BAS (Saved BASIC)
Download / View PMEXAMP1.LST (Listed BASIC)
A Player-Missile Machine Language Move Subroutine
It becomes apparent from this simple example that moving a player vertically using POKEs in BASIC is very slow. However, moving a player horizontally is fast because a horizontal position register was built into the hardware.One clever approach to moving players fast vertically is to take advantage of BASIC's fast string-handling capabilities. These routines are just high speed Assembly language copy routines. The trick to using these routines is to fool the Atari into assigning the player-missile string data to the memory area assigned to player-missile graphics. Then player-missile graphics data can be moved simply with P$ = S$ type statements. While this technique allows the programmer to avoid Machine language subroutines, it is not the easiest method to learn or understand. Since the example and explanation would be intimidating to beginners, we will delay it until much later in this chapter.
Player-missile graphics can be speeded up tremendously if Machine language subroutines are used. There have been numerous vertical blank player-missile subroutines published in the magazines. While most are effective in rapidly moving players vertically by one of several techniques, nearly all have neglected missile movement. This is unfortunate since moving one missile without disturbing the others requires using AND and ORA machine instructions on a bit level to mask off the other missiles during vertical movement. This is something that is beyond the capabilities of BASIC.
We have developed an easy-to-use Machine language subroutine that can handle both players and missiles simultaneously. The subroutine resides in page six of memory but is relocatable to virtually any free area of memory.
There has been much controversy on whether page six of memory is actually a safe area for placing user subroutines for BASIC programs. While it is true that inputting more than 128 characters into the text buffer will overwrite the beginning of page six, any program-especially a game that remains in control throughout-has no problem. In any case, the second half of page six $680-$6FF is always safe.
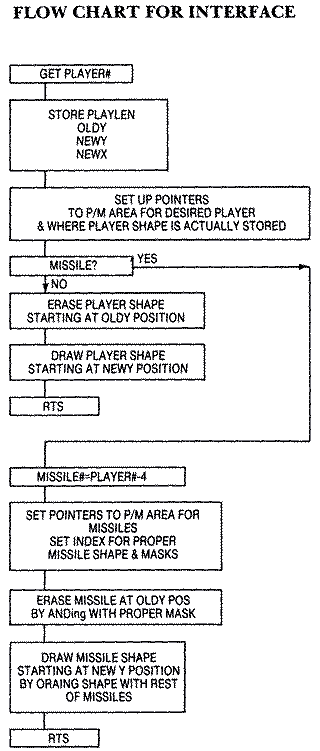
Our subroutine was designed for single-line resolution player-missile graphics. It requires the input of five variables: player number, player length, the old Y (vertical) position, the new Y position, and the new X (horizontal) position. The format is:
A = USR (1536, PLAYER #, PLAYER LENGTH, OLD Y, NEW Y, NEW X)
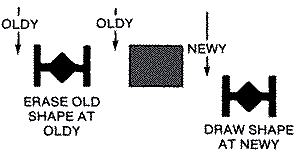
The number 1536 ($600) is the starting location of our subroutine. The players are numbered 0-3 and the missiles 4-7. Player #4 in our subroutine is actually missile #0, etc. The player length can only be as large as sixtyfour lines. This limitation will become clear when we explain how the subroutine works. The values for both the X and Y positions can be anything from 0-255. However, you should be aware that only X values in the range of 48-207 and Y values in the range 32-223 are within the bounds of the 40 by 24 text screen or playfield graphics area. The range is actually slightly larger, but visibility depends on the overscan of your television set. While the OLDY value is the programmer's choice upon initialization, it must be set equal to the NEWY position after each USR call. If OLDY isn't set to NEWY immediately after the subroutine call, unpredictable graphics will begin to appear in the player stripe when the subroutine is used again. The reason is that the subroutine zeros out the shape at its previous position OLDY before drawing the shape again at its new position NEWY. If OLDY isn't set to the player's last vertical position, the subroutine will miss zeroing the shape at the old position. Most likely, you will get two shapes or, worse yet, a sliver left at the previous position.
A Player-Missile Example
The next example is a simple demonstration of the speed, versatility and ease of use of our player-missile subroutine. This two-part example is instructive in several regards. First, it shows how a simple spaceship capable of firing missiles can be joystick controlled. Even its simple inline code, which allows either the ship to move or the missile to move, but not both simultaneously, gives some insight into the difficulty in designing even the simplest games. Second, the concept of priority, or which player or playfield is to be drawn in front of another is demonstrated. But first I think a discussion of how objects move might be helpful, especially to beginners.Dynamics of Objects in Motion
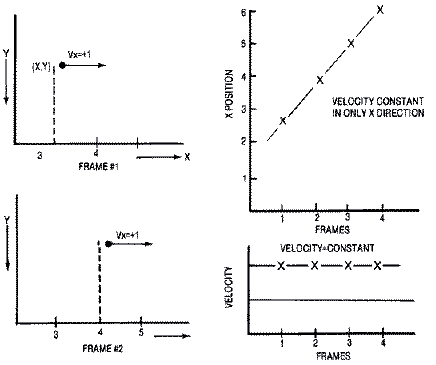
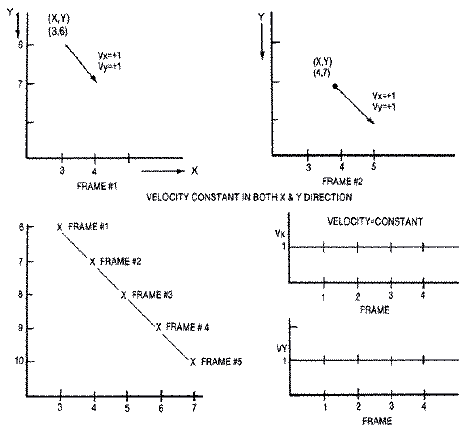
Any object in motion, whether it is simulated on a video screen or moves in the real world, is subject to the laws of physics. Readers will immediately cringe at the thought of advanced mathematics, mainly calculus. But calculus is merely a method of calculation that involves the summation of many small bits and pieces of a body's velocity and acceleration to determine the actual distance an object travels. Fortunately, the computer automatically divides our time frame into analogously small units, or animation frames.Let's examine an object in simple linear motion. The object is initially at rest. It is then given a horizontal velocity of one unit to the right. Thus the velocity is +1 unit/time frame. During each animation frame, the object moves +1 units to the right.
An object's direction of travel and its magnitude is represented by a line segment called a vector. An object's velocity always points in the direction of travel. Our object shown below has a velocity of +1 units/time frame, so that the velocity is pointing to the right. Since the velocity vector is to the right, the object moves to the right +1 unit/frame.
This can be formalized into equations for each of the two screen directions X and Y.
VX = +1 Velocity is constant in X direction.
X = X + VX New position is the old position plus the change in position (velocity).
Likewise:
VY = +1 Velocity is constant in Y direction.
Y = Y + VY New position is the old position plus the change in position (velocity).
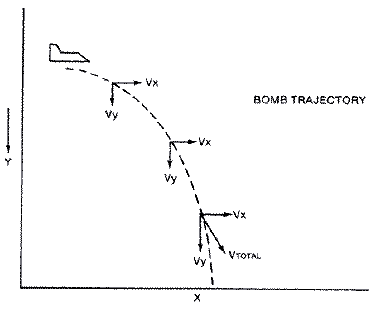
The driving force that speeds up our car is called acceleration ( V = V + A ). Acceleration can be constant as in a rocket's thrust, or like gravity which pulls a falling object to Earth. For a screen object's motion to appear realistic, especially in the case of a falling bomb, acceleration must be taken into account. When a bomb drops, its vertical velocity increases with time. If there were no wind resistance, the bomb's vertical velocity would increase until its impact on the target.
If a constant force was suddenly applied to a stationary object such that it accelerated downward with an increase in velocity of one unit/ frame, the distances moved would grow substantially.
TIME    VELOCITY  POSITION (distance)
 0       0         0
 1       1         1
 2       2         3        VX = VX + 1
 3       3         6         X = X + VX
 4       4        10
 5       5        15
 6       6        21
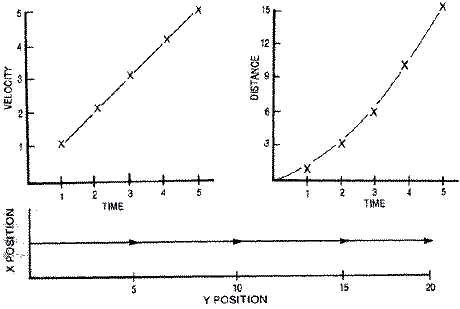
VX=CONST X=X+VX
VY=VY + GRAVITY Y = Y + VY
Program Initialization
Our first example, a joystick-controlled single ship capable of firing missiles in eight directions, takes advantage of our player-missile Machine language subroutine. As in the first example in this chapter, a 2K block of memory needs to be reserved for player-missile graphics. The top of memory pointers are moved down eight pages, and the player-missile base PMBASE is set equal to the top of memory. BASIC then sets up the screen area and its display list just below. Graphics I was chosen because it uses little screen memory and because we will need to write some large characters to the screen for the second part of our example.Next, our two Machine language subroutines need to be POKEd or placed into memory. The first subroutine is the player-missile subroutine. It is 151 bytes long. Since it begins at the start of page six ($600) or 1536 decimal, a simple FOR ... NEXT loop that reads the data statements and POKEs memory, will do the job. The second Machine language subroutine is a clear memory routine. It will automatically clear player-missile memory to zero in a fraction of a second. It replaces a slow thirty second long FOR ... NEXT loop which would POKE a zero into each sequential memory location from PMBASE+0 to PMBASE+2047. It also resides in page six of memory, beginning at $6A0 or 1696 decimal. It is twenty-six bytes long.
We must activate player-missile graphics next. We will set DMACTL for singleline resolution and GRACTL for both players and missiles. Player #0 is set to double width by writing a zero to location 53256, and player #2, which will be used in the second part of this example, is set to double width by writing a one to location 53258. The missiles are set to regular width, and the color of each of the players is selected. The priority GPRIOR shadowed at location 623 decimal is set so that player #0 is in front of the playfield graphics and player #2 is behind. We will talk more about this location during the discussion of the second half of this example. Last, we tell ANTIC our player-missile address by writing it to PMBASE at decimal location 54279. Since our subroutine also needs the location of PMBASE, its high byte is. POKEd into location 1686 which is the last memory location of our subroutine. We could have passed it to the subroutine via the USR function, but then you would have had to type the value in each time you used the subroutine.
Player Shapes Using the P/M Subroutine
We then store the two player shapes in our player shape storage area. You will recognize the first shape from the first example. It is our spaceship. The second shape is a solid block ten bytes high. Normally, you would want to POKE your shapes into the proper place in the player-missile memory area. However, when we designed the subroutine, we felt that the best and fastest approach would be to erase the shape at its old location before redrawing it at the new location. The traditional approach was to do a memory move of the entire shape including leading and trailing zero bytes, to insure pieces aren't left behind. If a shape were moved vertically more than one or two scan lines, a series of small memory moves had to be done sequentially.In order to use our faster subroutine, we had to find a safe place to store our shapes in memory, no matter where you put our subroutine, the player-missile area, and screen memory. Fortunately, the first 768 bytes of the playermissile memory area are unused. We decided to use the first page or 256 bytes for the player storage area. This limits the size of each of the four players to sixty-four bytes. Since sixty-four bytes or scan lines make up nearly one-third of the screen, this limitation really doesn't cause any problems.
Joystick Controlled Ship Movement
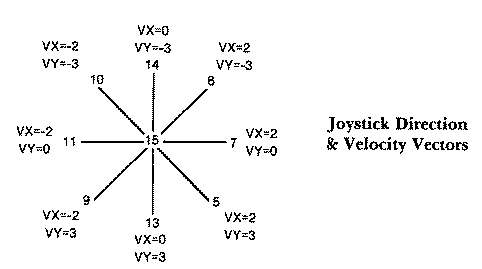
The spaceship's velocity is joystick-controlled. Pushing the stick in any direction instantaneously changes the ship's velocity. If the stick is pushed to the right, the ship is given a horizontal velocity of 2 units/frame. Since there is no vertical component to the ship's velocity, the ship will move to the right 2 units/frame. It will continue in that direction until either it collides with the screen's boundary, or a new joystick input gives the ship a new velocity vector. The equations that control the ship's X and Y position are as follows.X0 = X0 + VX0
Y0 = Y0 + VY0
There is a separate pair of velocity vectors for each of the eight possible joystick directions. The absolute values on each of the axis are not the same because pixel size is rectangular rather than square. Objects with equal velocities along both axis tend to move faster along the horizontal axis than along the vertical axis. To compensate for this, we set VX = 2 and VY = 3. Diagonal velocities, which are the vector sum of the two velocity components, are faster than anticipated. While it appears that you could correct this by using fractional values for both velocity vectors on the diagonals, you can't move part of a pixel position in either axis. However, if the velocity vectors were much larger you could correct the diagonal velocity by using smaller whole numbers. The diagram below shows the velocity component values for each of the joystick directions.
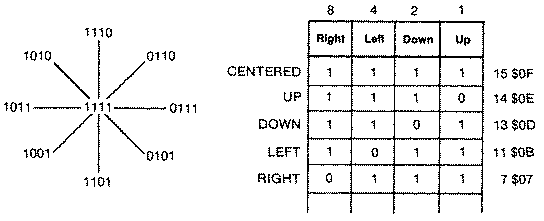
I'm sure many readers wonder why Atari BASIC returns such a strange and illogical set of values for joystick directions. STICK(0) through STICK(3) reflect values returned in the PIA chips locations 54016 and 54017 ($D300,$D301). When the joysticks are centered, each of the four bit locations for each joystick are on (set to one). When the joystick is pushed in any direction, its appropriate bit position is turned off (set to zero). For example, if the joystick is pushed to the right, the fourth bit from the right is turned off. The remaining three on bits add up to seven. Diagonal joystick movements have some combination of two bits turned off. The diagram below shows all of the possible bit patterns.
Missile Movement
Pressing the joystick button fires a missile. STRIG (0) is normally set to a one value when the button isn't pressed. But when the button is pressed it becomes zero and the program branches to a second joystick read routine at line 185. It is nearly identical to the first, with the exception that the velocity vectors are nearly double in value; VXM0=5 and VYM0=6. This ratio produces nearly identical apparent speeds in both the horizontal and vertical axis. Since the missile needs to be given a direction to fire, it branches past the missile routine if the joystick is centered.The missile's initial starting position is at the center of our ship. Since X0, Y0 are the coordinates of the ship's missile at the center of the ship, the missile's initial position equals the current ship's position plus the correction. Thus, XM0=X0+3 and YM0=Y0+4. The missile's position is updated each frame the same way the
XM0 = XM0 + VXM0
YM0 = YM0 + VYM0
Unlike the ship, however, the missile's velocity vector can't be changed once the missile is fired. Missile movement is in a closed loop that exits only when the missile reaches the boundaries of the screen. This closed loop not only prevents you from firing a second missile before the first has reached the end of its travel, it also prevents the ship from moving while the missile is in motion. This is a good example of how simplistic code that branches to either one event or the other creates an unrealistic effect. The solution, which will be explained in the next example, requires the ship's movement code to be placed in line with the missile's movement code, and conversely the missile's movement code to be placed in line with the player's movement code. This apparent overkill, in fact, allows the ship to be steered once the missile is launched.
The missile is plotted via the USR call to our player-missile subroutine. Missile #0, which is two pixels wide, is player #4 and its height is set to two scan lines to make it square shaped. Its OLDY position is YM0OLD, and its new position NEWX, NEWY is XM0, YM0. Again, once the subroutine is called via the USR call, it is important to immediately set the missile's old position equal to its present position.
Finally, if the missile does reach the screen boundaries, it is necessary to place it out of view beyond the scan of the television set. Since the missiles can't be simply shut off, you should set the horizontal register to either a small number or a large number. Since XM0=10 is offscreen, it will suffice.
Priority Demonstration
The second part of the example is a demonstration of player versus playfield priority. Whenever two independent objects such as two players or a player and a playfield object appear at the same spot on the screen, the GTIA must decide who gets displayed first and who second. This is known as priority. There is a register called GPRIOR shadowed at location 623 decimal ($26F) that selects which screen object is in front of the others. There are actually only four possible selections. Either all of the players are in front of the playfield, all of the playflelds are in front of the players, players #0 and #1 are in front of the playfields with players #2 and #3 behind, or playfields #0 and #1 are in front of all the players with playfields #2 and #3 behind.Lower number players take precedence over higher number players and, likewise, lower number playfields take precedence over higher number playfields. Actually, there is no way for two playfields to occupy the same space, since each color pixel is assigned to a specific color register. In fact, only the on bits, or those portions that show in the player-missile stripe, actually are involved in the priority conflict. The off bits are ignored by the system. Obviously, if a player has the shape of a donut, the background or another higher numbered player set behind it will show through the hole.
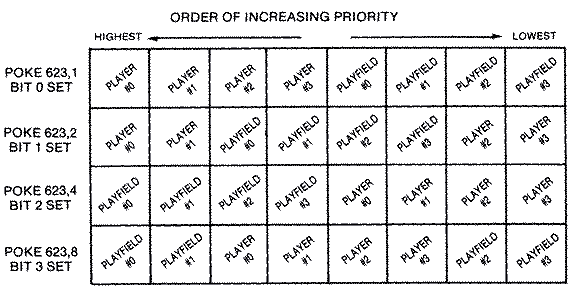
The great advantage of priority control is that you can control what happens to players when they meet the background color display. Perhaps you have an aerial combat game. You may want the plane to fly behind clouds, yet always remain in front of the scrolling ground far below. Setting bit three in GPRIOR will give two of the playfields higher priority than the players, and the remaining two playfields the lowest priority.
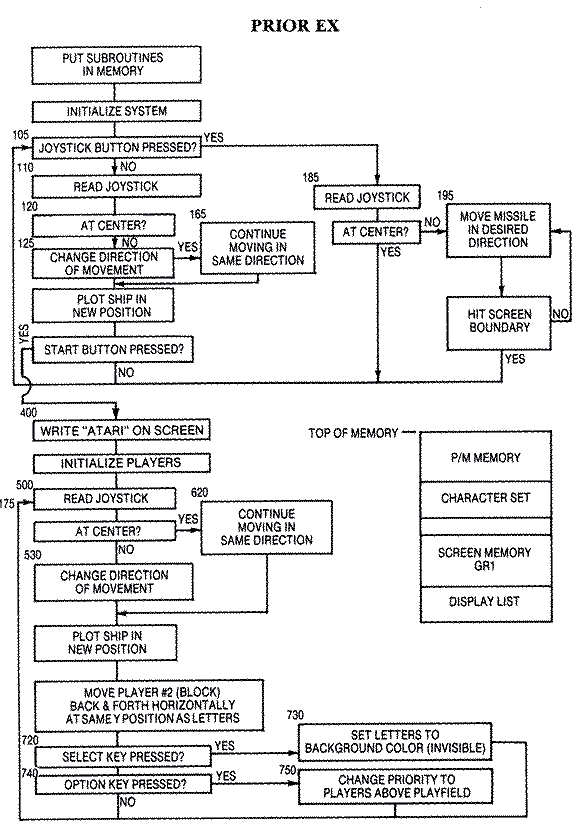
In our example, we have the word ATARI written in playfield #0, a spaceship (player #0), and a moving block (player #2). Initially, bit I is set in GPRIOR (POKE 623,2) so that player #0 moves in front of the letters while player #2 moves behind the letters. This part of the example can be reached by pressing the START key. The IF statement in line 175 tests for this possibility. The spaceship is joystick-controlled exactly like the first part; however, the missiles have been disabled.
Pressing the OPTION key does two different things. First, it restores the playfield #O's color to its default color and luminance. Second, it changes the GPRIOR to I so that all players have priority over all playfields. Now both our block and our spaceship are in front of the letters. The ship (player #0) still has priority over the moving block (player #2).
Download PMEXAMP2.BAS (Saved BASIC)
Download / View PMEXAMP2.LST (Listed BASIC)
Explanation of Player-Missile Subroutine
The player-missile subroutine was designed to handle both players and missiles simultaneously. In order to do this while retaining compact and relocatable code, several compromises were made. First, only single-line player resolution is offered. We felt that the coarser, double-line resolution could be simulated by setting the player-missile stripe at double width, then double plotting each of the shape's bytes. An attempt to give you a choice of resolution modes would have created a long and messy algorithm since the memory requirements of each are quite different mathematically. In single-line resolution the actual memory storage areas for each player are exactly one page or 256 bytes apart. This makes setting the pointers to the memory area easy since only the high byte is involved. But in double-line resolution the memory areas are 128 bytes apart. A much more complicated multi-byte add is required to set the pointers.Second, we decided to erase the old shape completely before drawing the player shape in its new position. It is a faster technique since the more traditional method needs to do a series of block memory moves to shift the shape more than one line at a time. Our method requires storing the shapes in a permanent safe spot. We choose the first 256 bytes of the player-missile area. Since there are four player shapes, each shape is limited to 64 bytes or scan lines.
Advanced Assembly language programmers will notice that we did not write the subroutine in VBLANK. We felt that BASIC was slow enough without adding small delays while waiting for the VBLANK interrupt to begin our subroutine. Moving several players and their corresponding missiles on the screen at the same time could slow the game down. Motion smoothness is another reason for using VBLANK for player-missile graphics. However, as you will see in the following game examples, the animation frame rate is not fast enough to produce smooth animation with or without VBLANK.
The subroutine is divided into three parts: a routine to interpret and store the passed parameters in the USR function; a routine for erasing and drawing the player shape; and a routine for erasing and drawing a missile. Once the parameters are stored, a test on the player number determines if it is actually a missile, and if so, branches to that part of the code.
Interpreting USR Parameters
A USR function in BASIC pushes all of its parameters onto the stack before it enters the Machine language subroutine. The stack is like a dish dispenser in that the last value placed on the stack must be pulled off first. The first byte contains the number of passed parameters, a useless value, and one to be discarded. The other parameters are stored in two-byte pairs, high-byte first, in the order that you passed them, The high-bytes in our example are useless since none of our values exceeds 255. The five pairs are pulled off the stack in an indexed loop using the X register. They are pulled two bytes at a time. Only the second, or low byte is stored sequentially at PLAYNUM,X ($691, X). Thus location $691 contains the player number, $692 the player length, $693 the value for OLDY, etc.
Erasing and Storing Player Shapes
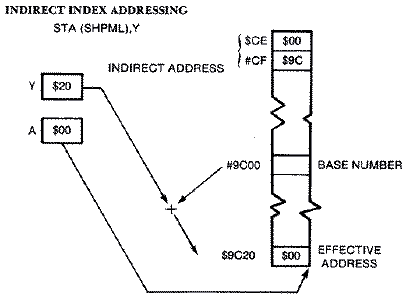
The pointers to move our player or missile shape from their storage area to the proper player-missile memory area are set up next, The shape is stored at SHAPEL, SHAPEH. The high byte BASE is just the beginning of the P/M storage area which was POKEd into location 1686 decimal ($696) from BASIC. The low byte is obtained from a table called INDEX. Each of the values in this four-byte table are sixty-four bytes ($40) apart. The actual memory location that the shape is to be stored at in the P/M area is SHPML, SHPMH. Since each player is 256 bytes or a page apart in memory, we added #$04 to BASE in order to set it for player #0. We then did a cute little trick. We put it in a loop and incremented SHPMH for each player number.Erasing the old player shape from memory could be handled quite easily with simple indexing in the form STA ADDRESS,Y if only one single player were involved. ADDRESS would be the absolute address of that player's P/M memory, and the Y register would contain the value YOLD. Unfortunately, the high byte of each player's P/M memory area is different. Rather than try to update ADDRESS each-time, it is more efficient if the two-byte page address is stored in zero page. Then indirect index addressing in the form STA (SHPML),Y can be used either to erase or plot player-missile data.
If the computer finds a $00 in location $CE (SHPML), and a $9C in location $CF (SHPMH), then the base address is $9C00. The Y register contains the value of the OLDY position. If the shape was thirty-two scan lines down the screen, then the Y register = $20. If the computer wished to erase the shape, then it would store a #300 in the Accumulator into memory location $9C00 + $20, or $9C20 as shown:
ERASE   LDA OLDY     ;Y VALUE
        STA SHPML
        LDA #$00     ;ERASE WITH 0
        TAY          ;Y REGISTER = 0
.1      STA(SHPML),Y ;STORE IN PROPER P/M AREA
        CPY PLAYLEN  ;DONE?
        BLT .1
The code for drawing our shape is quite similar, except that instead of storing zeros in P/M memory, we transfer the player shape from its storage area to its proper place in P/M memory. The pointers to its storage area, SHAPEL, SHAPEH were previously set up in zero page. We need update only SHPML, the low byte pointer to the place we are actually moving our player, with the NEWY position. The high byte SHPMH remains the same. The code follows:
        LDA NEWY	;NEW Y VALUE
        STA SHPML	;SETUP POINTER TO PLOT
        LDY #$00
DRAW    LDA (SHAPEL),Y;LOAD BYTE FROM PLAYER SHAPE TABLE
        STA (SHPML),Y	;STORE IN PROPER P/M PLAYER AREA
        INY	        ;NEXT BYTE
        CPY PLAYLEN	;DONE?
        BLT DRAW
Handling Missiles
Player numbers 4-7 refer to missiles 0-3 respectively in our player-missile subroutine. If we didn't use different numbers, the user would have to type in a letter M or P to differentiate between the two different kinds of sprites.While missiles are just narrow players, all four reside in the same 256-byte block or page of memory. The missiles, each of which is two bits wide, are arranged parallel to each other. Essentially, all four two-bit pairs for each scan line are in the same byte of data. This makes moving one missile but not others somewhat difficult.
Missile #0 uses the first two or lowest two bits of the byte, missile #1 bits three and four, missile #2 the fifth and sixth, and missile #3 the two highest bits. While the data in one byte determines which pixels are lit for all four missiles on any scan line, each missile has an independent horizontal position register. Thus, each of the missiles can have movement completely independent of the others.
As we mentioned, moving one missile vertically without changing the other missiles' data. can be a problem. If we had just two missiles initially on the same scan line, and we attempted to move missile #0 downward one scan line, either a memory move or an erase before redrawing would affect the missile #1 as well. In the first case, missile #1 would move in tandem with missile #0, while in the second case missile #1 would be erased. The solution is to mask off the other missile's bits during the erase, and to draw the missile's new position using another masking operation that will not affect the remaining bits.
ORA Instruction
This drawing technique uses the OR memory with Accumulator (ORA) instruction. It works on the bit level. If the bits in either memory or the Accumulator are on, then the result is one. If neither is on, the result is zero.
     ACCUMULATOR MEMORY RESULT BIT IN
         BIT     BIT    ACCUMULATOR
          0       0         0
ORA       1       0         1
          1       0         1
          1       1         1
If missile #0 was already on a particular scan line and you wanted missile #1 to be on the same scan line you would ORA missile #1 with the byte in P/M memory.
	0 0 0 0 0 0 1 1	MEMORY
ORA	0 0 0 0 1 1 0 0	MISSILE SHAPE
	0 0 0 0 1 1 1 1	RESULT
AND Instruction
Another selective drawing technique is the And Memory with Accumulator (AND) instruction. It too works on a bit level and is used to filter or mask out certain bits in the Accumulator. Both the memory bit and the Accumulator bits must be set (on) for the result to be one. If either memory bit is off, or both bits are off, the result is zero. We put ones where we don't want to change bit values, and zeroes where we do. We can erase one missile at a time without affecting the others.
     ACCUMULATOR MEMORY RESULT BIT IN
         BIT     BIT    ACCUMULATOR
          0       0         0
AND       0       1         0
          1       0         0
          1       1         1
If you wish to erase only one of the two missiles on the same scan line, you AND the data byte with a mask that always produces a zero bit result in the missile bits to be erased, and a one in all the other bits. For example, to erase missile #0 and not missile #2, the mask with which you AND the data bit is $FC.
	0 0 1 1 0 0 1 1	MEMORY
AND	1 1 1 1 1 1 0 0	MISSILE SHAPE
	0 0 1 1 0 0 0 0	RESULT
There are four different missile masks:
Missile mask #0 1 1 1 1 1 1 0 0 $FC
Missile mask #1 1 1 1 1 0 0 1 1 $F3
Missile mask #2 1 1 0 0 1 1 1 1 $CF
Missile mask #3 0 0 1 1 1 1 1 1 $3F
Likewise, there are four different missile shapes. For simplicity and visibility we made each missile two pixels wide. The height is controlled by the length, which is nominally two bytes, However, missiles can assume tall, thin dimensions if the user chooses a length of four or more bytes.
Missile shape #0 0 0 0 0 0 0 1 1 $03
Missile shape #1 0 0 0 0 1 1 0 0 $0C
Missile shape #2 0 0 1 1 0 0 0 0 $30
Missile shape #3 1 1 0 0 0 0 0 0 $C0
The data for the above two tables appears in our player-missile subroutine as MASKS and SHOTS.
The heart of the missile routine is the erase and draw code. Each is a mere three lines long. The selected missile is erased by ANDing memory with the proper mask.
LDA (SHPML),Y ;LOAD OLD MISSILE DATA
AND MASKS,X ;ERASE IT BUT DON'T DISTURB OTHER MISSILES
STA (SHPML),Y ;STORE RESULT BACK IN MEMORY
The selected missile redrawn in its new position with the following three lines of code.
LDA (SHPML),Y ;LOAD OLD MISSILE DATA
ORA SHOTS,X ;MERGE SHOT DATA WITH OTHER MISSILES
STA (SHPML),Y ;STORE NEW COMBINED MISSILE BYTE IN MEMORY
The technique is best illustrated with an example where we have three missiles on the screen. Missiles #0 and #1 are on the same two scan lines. Missile #2 is on the same scan line where we wish to move our missile.
Download PMINTB.EXE (Executable program)
Download PMINTB.OBJ (Object code)
Download / View PMINTB.LST (Assembler listing)
Download / View PMINTB.S (Source file)
Download / View PMINTB.RAW (As printed in book)
Two Ship Example
We can write a simple two-player shoot-'em-up game in BASIC if we use our player-missile subroutine to provide enough animation frame or speed for playability. The code for the second ship is nearly identical to that for the first ship. In fact, with the exception of using variables having a I at the tail end of the variable names, the code is the same, line for line. The code for player #2 follows the code for player #1.The code for each player includes: a joystick read routine to determine the ship's new velocity vector and to update its position; a similar routine to determine the missile's velocity and direction; and logic to prevent either the ship or the missile from leaving the screen boundaries. The ship in our previous example stopped dead while the missile moved. These ships, however, not only continue in their present course during the missile flight; they even alter course to evade enemy missiles.
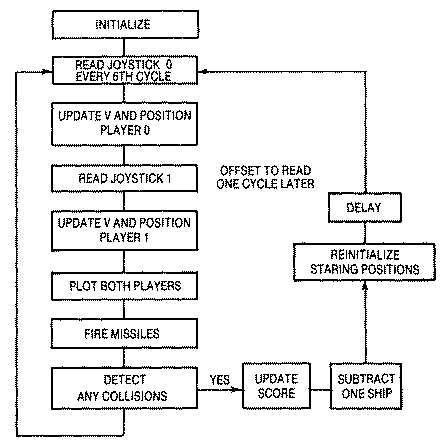
If you look at the game's flow chart for each player, you will notice that the two possible paths are decided by whether the joystick button is pressed. Pressing the button fires a missile in the desired direction, only if there isn't another missile already on the screen. Of course, if you don't give it a direction (joystick centered), it skips firing the missile and just updates the ship's position based on its current heading. When it fires the missile, it turns the missile flag on (M0FLAG = 1). To prevent it from firing again before the missile reaches the edge of the playfield, the program tests M0FLAG in line 430. If the flag is on, it just updates the missile's position based on its current trajectory. Finally, once the missile reaches the screen edge, it turns the flag off (M0FLAG = 0) and plots the missile offscreen.
When the joystick button isn't pressed, the program code reaches line 110, the beginning of the joystick read routine which determines the ship's new velocity vector. This enables the ship to change direction. Thus, if a player wishes to change direction immediately upon firing his missile, he must release the button quickly, so that it reaches this code on the next animation frame.
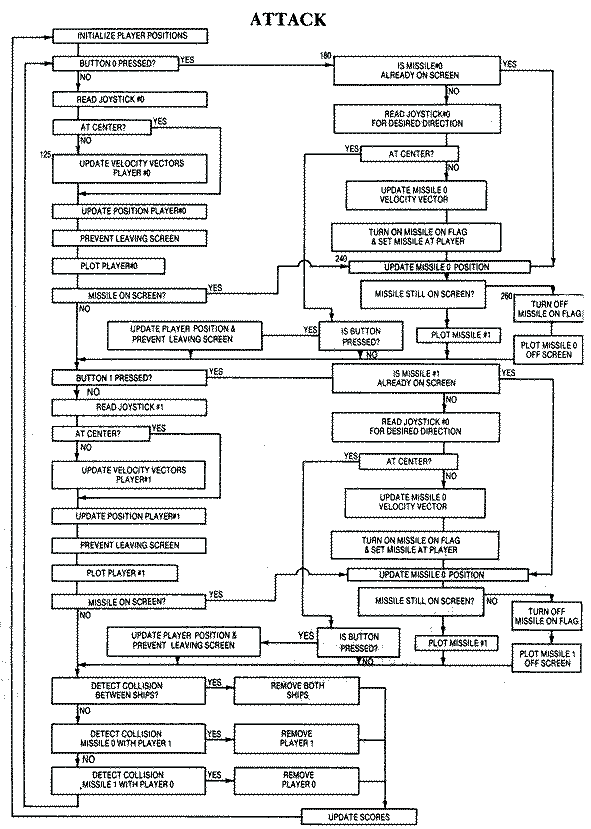
Collision and Explosions
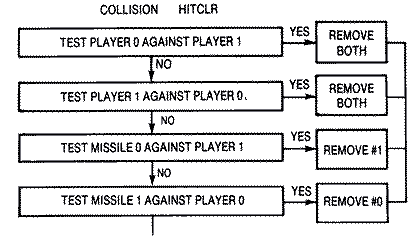
A game wouldn't be complete if we couldn't detect if one or the other ship were killed in combat. There are two ways to die in this type of game-by collision with the opponent's ship or by missile fire. The collision register at decimal 53260 ($D00C) detects player #0 to player collisions. If it returns a value greater than zero, two players have collided. Likewise, collision registers at 53256 ($D008) and 53257 ($D009) detect collisions between missiles and players. The first will return the value 2 if missile #0 collides with player #1, and the latter will return the value I if missile #1 collides with player #0. It is important that these collision registers are cleared to zero before plotting players and missiles on the screen. You do this via the HITCLR register at decimal 53278 (DO1E) in line 90. This line at the beginning of the animation frame loop clears all of the collision registers before any players or missiles are placed on the screen.The rather simplistic explosions are linked to the sound routine. Each ship brightens from luminance 4 to luminance 14 in its own color, then blacks out quickly. The luminance changes within a low, rumbling sound loop. The formulas in lines 1570 and 1580 were designed to prevent INT (10-I*0.66) from becoming larger than the value 10. If the ship's luminance of 4 when added to this value became larger than 15, the ship's color and luminance would change as the color value would wrap to the next higher color with a low luminance.
Recall that the sound statement is SOUND (Voice, Pitch, Distortion, Volume). The pitch is set to 250, a very low tone, with a distortion value of 4. The even numbered distortion levels 0,2,4,8,12 introduce different amounts of noise into the pure tones, 10 and 14. The FOR ... NEXT loop (lines 1150-1580) decreases the volume level very slowly.
This example's slow animation frame rate produces a game lacking smoothness. BASIC is slow even with the use of Machine language subroutines. There are a lot of IF ... THEN statements that slow the game down. The game, however, will run a little faster if all of the REM statements are deleted. Arcade games really need to be written entirely in Assembly language to achieve fast, smooth animation. The Space War game that is developed at the end of the chapter is a very similar game, but smoother and more controllable.
Download TWOSHIP.BAS (Saved BASIC)
Download / View TWOSHIP.LST (Listed BASIC)
Shoot Bricks Game
The next example uses both playfield and player-missile graphics in a timed game in which the object is to survive the longest between two crushing brick walls. The joystick-manueverable player can use a pistol to shoot any of the bricks out in the ten rows on either side of him. The bricks are replenished randomly at a rate slightly faster than the player can remove them. Thus, it becomes a matter of strategy and endurance to last for any reasonable length of time.When designing a game like this, you must anticipate the player's strategy. The player, when confronted with the impossiblity of keeping the entire wall back, will retreat to either the top or bottom and shoot just at the blocks immediately surrounding him. If the bricks were still placed on the screen randomly even after a row of bricks closed completely, the player would have plenty of time to shoot at the few random blocks appearing in the rows adjacent to him. However, if the random blocks are not put on the screen in the already closed rows, bricks would appear more rapidly in the few open rows. This makes the game fast-paced and somewhat challenging. The game itself has little play depth, so don't expect it to hold your interest as a game. It was primarily designed to teach programming technique.
It is desirable to have a different color for each of the ten rows of bricks, but there is a maximum of only four color registers in the non-GTIA graphics modes. Therefore, we use display list interrupts to change a single color register while ANTIC is drawing the screen. It would be easier to use GTIA mode 11, but, unfortunately, this mode does not support collision registers.
We choose to do the display in ANTIC 5, one of the non-BASIC graphics modes, because the four-color characters are sixteen scan lines high. Each of the lines contains forty characters. The blocks are four color dots wide by 16 scan lines tall. The bricks are added and removed in adjacent pairs (two characters) so that they appear to be square-shaped. The availability of the extra colors had little to do with the initial programming design, but when we put in a scorekeeping timer at the bottom of the screen, we were able to draw the characters using a different color register from that of the blocks. A collision is never detected when the player touches the score line.
Setting Up Display List
The screen resides just below the top of memory which has been lowered twelve pages to make room for both the player-missile memory and new character set. We choose to modify the display list for a Graphics I screen because the display memory (20 columns x 24 rows) is the same as ANTIC 5 (40 columns x 12 rows), and our display list is slightly shorter. The start of the display list, which is shadowed at locations 560 and 561, is exactly the same for both graphics modes. Therefore, it is easy to POKE in our new display list at DUST = PEEK(560)+PEEK(561)*256. This value is 37216 for 48K machines. If we substitute the following 20-byte display list for the original, we will have an ANTIC 5 screen.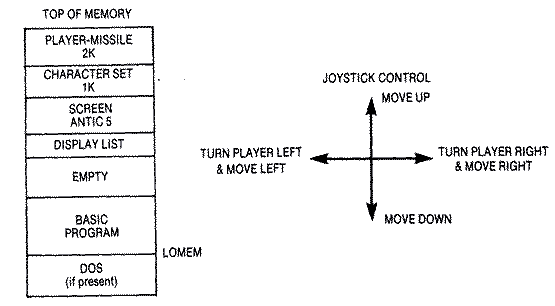
112	These three instructions print
112	24 blank scan lines at the top
112	of the screen
69	ANTIC 5 with a LMS instruction added
128	Address of the first line of screen data
145	145*256 +128 = 37248
133	Display the rest of the data in
133	ANTIC 5 with a DLI added
133	We have a total of 11 Antic 5 lines
133
133
133
133
133
133
133
7	Text mode 2 for timer display
65	jump and wait for vertical blank
96	Address of vertical display list itself
145	145*256+ 96 =37216
	(return to the top of this list)
Initialization
The initialization for this game resembles our previous example. The playermissile, clear memory, and display list interrupt subroutines are each POKEd into memory in their appropriate places in page 6. The code is stored as DATA statements. The first half of the character set (512 bytes) is then moved to its new location, just above the top of memory, starting at location CHRSET which is equal to PEEK(106)*256. Only the first two characters are used to generate the screen. The 0th character is a blank and is used where there are no blocks. This includes our empty 0th row at the very top. The first character is rewritten as a solid shape using color register 1. The bit pattern for each line in the character is 10 10 10 10 decimal 170 or $AA. Using this bit pattern for color register I is a deliberate choice. The characters in the score line use color register 2. Thus, a collision with our score letters and numbers (playfield 2) will not produce the same value as a collision with a block (playfield 1).Blocks are placed initially on the screen in rows I through 10 for columns 0 to I I and 28 to 39. There are six pairs of blocks situated on each side of the player on each row. The offset into screen memory for any block is OFFSET = 40*R + C, where R and C are the row and column respectively. The location of the screen is shadowed at locations decimal 88 and 89. With SCREEN = PEEK(88) + PEEK(89)*256, the actual memory location of any block is SCREEN + OFFSET.
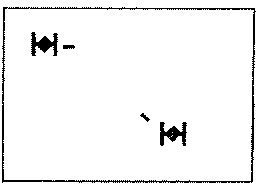
Player-missile graphics appear to be double-line resolution set at double width, but they are actually single-line resolution with each byte doubled. Two different players are used for the man. Player #0 faces left, and player #I faces right. They are the same color and have the same vertical position. Player #1 is placed on the screen initially at X=125, Y=50.
The two levels of difficulty are selected with the SELECT key. It toggles between putting blocks on the screen at one-half second intervals and one second intervals. An asterisk (*) at the bottom right of the screen denotes the easier level. The START key starts the game.
Main Game Loop
The game loop tests when to place a block randomly on the screen at one-half or one second intervals. VBLANK increments the timer at decimal 20 every sixtieth of a second. When it overflows (TIMER >255), location 19 is incremented. If we set TIMER = 195, after sixty cycles occur(one second), location 19 becomes 1. This makes a convenient test to determine when one second has elapsed. Likewise if TIMER is set to 225 with the SELECT key, after one-half second location 19 would be incremented. The'test at line 210, IF PEEK(19)=O THEN 344, skips putting a new block on the screen and updating the scoring timer unless the proper timing interval has elapsed.
Collision Test
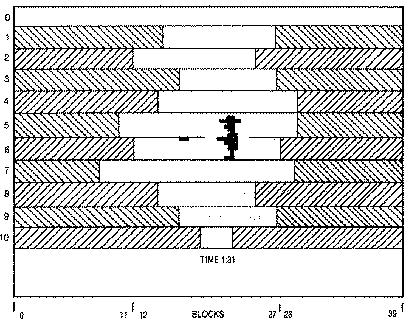
A collision between either player and the playfield #1 blocks has to be tested in two different places in the game code. Obviously the test must be done just after the player moves, but it also has to be done just after anew random block is placed on the screen. A collision is detected in either case if the value 2 is set in player #0's collision register 53252 ($D004) or player #1's collision register 53253 ($D005). Since the bricks appear to be crushing our man, it is effective to squash him by setting the player width back to normal. When this happens, it appears that the man is compressed towards the left. This occurs because the player image is always plotted from left to right and begins at the value in the horizontal position register. The GTIA just double plots player pixels when set to double width. The player struck by the left wall remains in contact with the wall when it is compressed, but the player struck by the right wall will shift to the left, or away from the wall, eight pixels. If we just correct the X position by adding 8, it will remain in contact with the right wall and look like it was also crushed by the block.While a collision between a missile and a block isn't difficult to detect, the program must determine which block was hit. Obviously, the block must be in the row directly in line with the pistol. If you look at the diagram below, you will see that the pistol is sixteen scan lines below the top of the man. Since the top left position of the man is at X,Y, then YM = Y+ 16. The bullet fires from the tip of the gun at XM = X when facing left, and at XM = X + 8 when facing right. The movement routine prevents the pistol from going beyond the top of the first row of blocks. When the pistol is at the top of the first row of blocks (YM = 48) the man is at Y=32. Therefore, the formula ROW=INT((YM-32)/16) determines which row the bullet travels. If we substitute YM = Y+ 16 the expression simplifies to ROW=INT((Y-16)/16). For example, if the man is at the very top (Y=32) then his pistol is aimed along ROW=INT(32-16)/16 or ROW=1 as expected. The bullet moves 2 pixels horizontally each frame until it eventually collides with a block. The pairs of blocks are then removed from the side the player faces. Since the player can't move while the bullet is in motion, there is no ambiguity possible. For example, if the player (PLAY=O) were facing left on row 2, and the left block pointer L(2)= 9, then blocks 2,9 and 2,8 are removed. You need only POKE a 0 into locations SCREEN+OFFSET and SCREEN+OFFSET-1 where OFFSET 40*ROW + L(ROW). Likewise, if a player were facing right (PLAY= 1), the two blocks that need to be removed are at locations SCREEN+OFFSET and SCREEN+OFFSET + 1 where OFFSET = 40*ROW + R(ROW).
Extra Colors via a Display List Interrupt Subroutine
Some of the advanced programmers might find the display list interrupt subroutine to be of interest. It changes the color value in color register 1 ($2C5) each time ANTIC calls it via a display list -interrupt. Since it keeps an internal counter called PLACE for its X register index, it must know when to reset its pointer. It does this by checking the value in the vertical line counter which increments by one for every two scan lines. When it is equal to line 50, which is two scan lines beyond the beginning of row # 1, it resets PLACE to 0. It loads PLACE into the X register, indexes into the color table, and stores it in the color register. Now PLACE is incremented by one. The next DLI just loads the next color in the table into the color register. The pushes and pulls on the stack at the beginning and end of our subroutine save the current X register and Accumulator so that they are restored upon return to your program.
Download SHOOT.BAS (Saved BASIC)
Download / View SHOOT.LST (Listed BASIC)
Space War Game
Space War, the first game with a fully steerable spaceship, was developed at MIT. While most of the newer computer owners won't remember this game, practically everyone is familiar with Asteroids. Most versions of this game have a fully steerable spaceship that can be thrust in the direction that it is headed. Although some versions invoke an automatic deceleration mode, some Asteroid games require the player to turn his ship around so that it thrusts in the opposite direction to slow down.Dynamics of Motion with Acceleration
We demonstrated earlier in this chapter that objects move in the direction of their velocity vector. An object's new position is its old position plus its change in position due to velocity.Using the Atari's screen coordinate system for the example above, VY is negative and VX is positive. Therefore,
X=X+VX
Y=Y+(-VY)
While the velocity vector may remain constant for many animation cycles, so that a ship will continue to move in the same direction, sooner or later a new velocity vector will be input to change the object's course. This new velocity is the vector sum of the old velocity vector and the new velocity vector.
Those readers who have taken Physics will recall that the velocity of a body in motion changes due to external forces on it while it is in motion. In spaceships, that force is thrust. Thrust causes an acceleration of the object's mass as shown in the equation.
F=m*a=m* delta V
When thrust is applied to a spaceship, it accelerates. If a ship is light and has a big engine with considerable thrust, it will accelerate quickly. But if it is heavy, it will accelerate much slower. Acceleration is essentially caused by a change in the object's velocity if you ignore the object's mass,
Unless you are doing an actual simulation, in which the values of thrust or force and an object's mass are important, only acceleration values need to be considered. Suitable values for arcade games are small and scaled, so that objects don't move fast relative to their size, or fly off the screen in the blink of an eye.
If we consider a spaceship that is in motion for three frames, then thrust only during the fourth frame, it will change direction depending on the vector sum of its old and new velocity vectors. This is illustrated below. The applied thrust is straight upwards, so that VX = 0 and VY = -2. The ship's new velocity vectors for each direction are calculated as follows:
VX = VX(old) + delta VX = 2 + 0 = 2
VY = VY(old) + delta VY = -1+(-2) = -3
Likewise, the ship's new position is equal to its old position plus its change in position due to velocity for that animation frame. This breaks dowq into components for the X and Y directions.
X = X(old) + VX
Y = Y(old) + VY
The ship's new velocity vector causes it to move two units in the X direction and three in the negative Y direction during each frame until a new thrust vector is applied. The resultant position can be summarized in the table below.
Frame    X    Y    delta VX   delta VY
  0     10  100       2         -1
  1     12   99       2         -1
  2     14   98       2         -1
  3     16   97       2         -3  Thrust applied here
  4     18   94       2         -3
  5     20   91       2         -3
Now, when the acceleration on an object, is sustained over many animation frames, the increase in velocity is cumulative. For example, if thrust were applied to a stationary object in the positive X direction with a force of 1 unit/frame, the new VX would increase from zero by units of one for each animation frame.
        CYCLE   VX    X                  CYCLE    VY     Y
          0     0     0                   0       0      0
          1     1     1                   1       2      2
VX=1      2     2     3   Similarly VY=2  2       4      6
          3     3     7                   3       6     12
          4     4    10                   4       8     20
Our example makes it clear that if you accelerate for too many animation frames, the spaceship will be moving too fast. A limit should be set on the velocity vector for both directions. just what the limit should be depends on the effect you wish to achieve. Obviously, if your animation rate is that of VBLANK, 60 frames per second, a ship velocity of 5 units/cycle will race across the screen in one-half second.
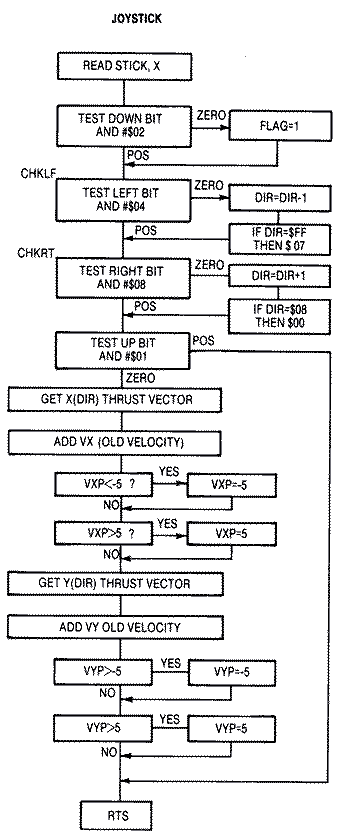
Joystick Routine
A joystick will control the ship's direction in our game. Pushing to the left or right rotates the ship to one of eight directions. Pushing up thrusts the ship. The joystick is read in the VBLANK routine every 1/60th of a second. While a Machine language subroutine is more than equal to the task of keeping up with the update, its speed creates a small problem. If a player turns his ship by pushing left or right on his joystick, the ship will spin rapidly, making 1/8 of a turn every 1/60 of a second, That translates to 7 and 1/2 turns per second, a speed that is obviously uncontrollable. The joystick must be read less often, say every sixth VBLANK cycle if the ship is to turn slowly enough to steer.Machine language joystick routines are inherently simpler because only four bit positions for up, down, left and right, need to be tested. Diagonals are usually ignored because they nearly always represent combinations of commands. For example, a diagonal up and right command in our game means thrust while turning right. The joystick read subroutine will detect the bit pattern twice, once when testing the up bit to determine if it should reset the velocity, and a second time when testing the right bit to determine if it should turn the ship. The bit pattern is as follows.
  X    X    X    X RIGHT LEFT DOWN  UP
128   64   32   16     8    4    2   1
All of the bits are normally set when the joystick is centered or in the neutral position (I I 1 1). When the joystick is pushed in any direction its particular bit position is turned off, as illustrated in the diagram below.
To test a particular bit position you only need to AND it with that bit. For example, to test if the left bit is turned off:
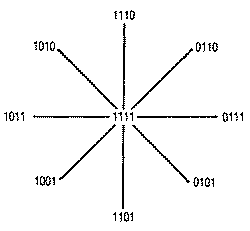
00001010     Diagonal left & up
00000100     AND #$04
00000000     Result=0
The result is zero if the bit is turned off when the joystick is being pushed in that direction. If the joystick were in the neutral position, the third bit would be on, and the result after the AND operation would be non-zero. When the result is zero we want to decrement DIR, the ship's direction, and make sure that if it becomes negative ($FF) it is reset to #$07. The code is as follows. All of the code is indexed with the player number in the X register.
CHKLF	LDA STICK,X	;READ JOYSTICK
	AND #$04	;LEFT BIT
	BNE CHKLF	;BRANCH IF NOT ZERO
	DEC DIR,X	;DECREMENT THE SHIP'S DIRECTION
	LDA DIR,X	;CHECK IF NEGATIVE
	CMP #$FF
	BNE .1
	LDA #$07	;SET DIR=7
	STA DIR,X
.1	JMP CHKFD	;CAN'T BE RIGHT IF PUSHED LEFT
CHKRT	LDA STICK,X
Pushing forward on the joystick thrusts the spaceship. ANDing the joystick value with #$01 tests the up bit. If the result is zero, the joystick has been pushed up. The acceleration or thrust vector depends on the ship's direction. If the ship points to the right, DIR = 2, then VXT = 1, and VYT = 0. If the ship points diagonally upward and to the left, DIR = 7, then VXT = -1, and VYT = -1.
Ship's Direction and Velocity Vectors
Note that many of our ship's directions produce negative velocity values, while others produce positive values. Separate routines are required for adding and subtracting in Machine language. BASIC, however, just adds a negative number (X = 5+ (-1)). That's the clue. Adding a negative number is exactly the same as adding a positive number in Machine language. The difference is that negative numbers, like -1, are represented by the two's complement which for -1 is $FF. There is a limit for signed numbers of + or -127, because the BMI instruction tests the carry bit and considers the value if set. With the simplification of our thrust vector addition problem, we can construct a table of velocity vectors for each DIR value.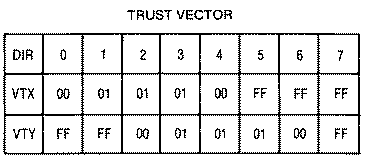
VXP = VX(old) + VTX(DIR)
VYP = VY(old) + VTY(DIR)
A speed brake can be incorporated into the algorithm to prevent the velocity from exceeding a preset value. This would be analogous to wind resistance on a fastmoving automobile. It prevents a vehicle's speed from increasing infinitely. I choose a maximum velocity of 5 units per frame. It is based on keeping the animation smooth and the speed in bounds. The code for the X direction is as follows:
	LDA DIR,X	;GET PLAYER DIR
	TAY
	CLC
	LDA VTX,Y	;GET X(DIR) THRUST VECTOR
	ADC VX	;ADD OLD VELOCITY VECTOR
	CMP #$FA	;IS IT -6?
	BNE .5
	LDA #$FB	;CLIP TO -5
.5	CMP #$06
	BNE .6
	LDA #$05	;CLIP TO 5
.6	STA VX
	STA VXP,X	;STORE NEW SHIP VELOCITY IN X DIRECTION
Addressing the Correct Shape Table
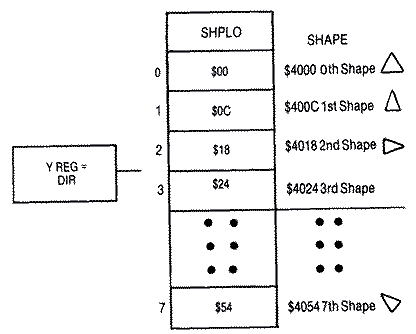
Now that we can control our ship in eight directions, we need shape tables for each of these directions. That means eight separate shapes, each twelve bytes long. The plot subroutine that places the shape in the player-missile memory area is virtually the same as that used in our player-missile subroutine discussed earlier in the chapter.The zero page pointers to our shape and to its eventual storage location in player-missile graphics memory are set up in a subroutine called PLOTSET0 for player #0 and PLOTSET1 for player #1. Since our drawing routine takes the direction into consideration in order to obtain the correctly rotated shape from our shape table, we can find the correct low byte of the shape by the following formula:
SHPL = SHPLO(DIR)
The shape number DIR, which is also our direction, is placed in the Y register so that we can find the low byte pointer to our shape stored in a table called SHPLO. Each of the values in that table are twelve bytes apart starting at #300. The high byte is constant for all shapes.
	LDY DIR		;VALUE FOR DIRECTION OF ROTATED SHAPE
	LDA SHPLO,Y	;AS INDEX TO PROPER LOW BYTE OF SHAPE
	STA SHPL	;STORE LOW BYTE POINTER IN ZERO PAGE
	LDA /SHAPEO	;HIGH BYTE
	STA SHPH	;STORE HIGH BYTE IN ZERO PAGE
Smoothing the Ship's Movement
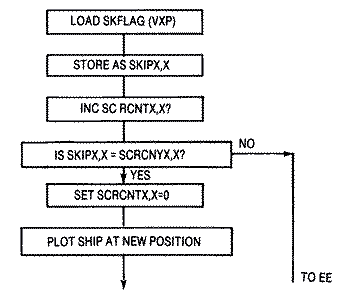
Recall that when we updated our ship's position in our last BASIC example, movement wasn't very smooth because of the slow animation frame rate. Potentially, we face a very similar problem here because the ship's velocity vector that controls its next position is only updated every sixth frame. If the ship's position is updated in the same loop as the ship's velocity, it will appear to have very jerky movement, sometimes moving as much as five pixels per frame. It would be better to move the ship in smaller increments more often, even as fast as the scan rate of sixty times per second. Of course, at slower velocities the ship would have to be moved less often. The trick is to control the rate.If the ship were moving in a direction at full speed, VX = 5, we would want to update the position every frame, but if the ship were moving slowly, VX = 1, we would want to update the screen every fifth or sixth cycle. This means that we should skip plotting the ship at its new position until a number of frames has passed. We could use a counter called SKFLAG to check when we should plot. Naturally, it would be different for each velocity and could be stored in a lookup table for easy access. Its values would nearly be the reciprocal of the velocity. At VXP = 5 we would want to replot each frame so SKFLAG = 1, and when VXP = 1 we would want to replot every fifth or sixth cycle or SKFLAG = 6. The relationship between the ship's movement and its actual velocity VXP isn't exactly linear. If you look in the table you will notice that it is fairly linear at slow speeds, but jumps from twenty pixels every sixty frames at VXP = 3, to thirty pixels every sixty frames at VXP = 4, to a whopping sixty pixels every sixty frames at VXP = 5. Fortunately, this is only a game, and the discrepancy is not noticeable.
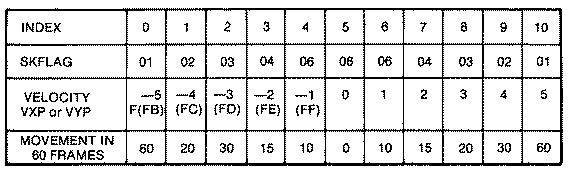

UPDATEX	CLC		;LOAD PLAYER'S HORIZ. VELOCITY
	LDA VXP,X	;SO NEG #S APPEAR IN TABLE TOO
	TAY		;USE AS INDEX
	LDA SKFLAG,X	;GET VALUE FROM TABLE
	INC SCRCNTX,X	;INC. COUNTER FROM LAST UPDATE
	CMP SCRCNTX,X	;AT UPDATE TIME?
	BGE .1
	JMP EE		;NO! DON'T UPDATE
.1	LDA #$00	;RESET COUNTER
	STA SCRCNTX,X
	LDA VXP,X	;BEGIN UPDATING PLAYER POSITION
The screen has a wraparound feature in this game. This means that when a ship reaches the right side of the screen and exits, it reappears on the left side with its velocity and direction the same. This is true in the vertical direction, too. A ship leaving the top of the screen will reappear at the bottom. All that is needed is a simple check to determine if the ship has reached the screen boundary. If it has, its position is reset to the opposite screen boundary. Since the boundaries of the playfield screen don't quite reach the edges of the television set, we extended the screen boundary coordinates by eight pixels in all directions. The ship's vanishing point should be nearly at the edge. If a ship is traveling to the right, it will vanish at X = 216 ($D8) and reappear at X = 40 ($28). Don't confuse playermissile coordinates with the screen coordinates used in PLOT and DRAWTO statements. The top left corner of the playfield in player-missile coordinates is X = 48, Y = 32. Coordinate 0,0 is offscreen.
Missile Movement
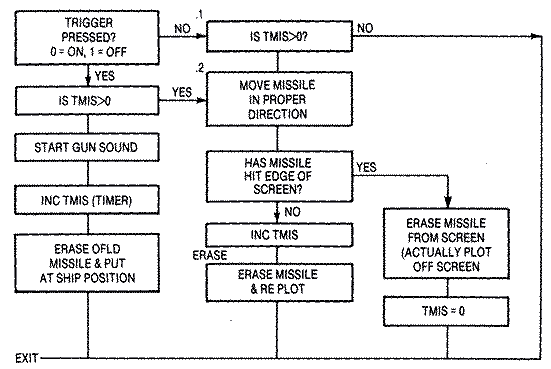
The missiles in this game are controlled entirely by a separate subroutine. The subroutine needs only the player number inputted in the X register to operate correctly. It decides if a new missile can be fired or if one is already on the screen, then moves the missiles appropriately. There is no need to read a joystick for missile direction as in our earlier game, because the missile fires and moves in the direction, DIR, that our ship faces. Also we don't need to worry about updating the ship's position while in the missile subroutine, since the main program loop takes care of this.The subroutine's initial decision is whether the joystick trigger STRIG0,X ($284,X) is being pressed. When the button is pressed, the subroutine returns a zero, and, if untouched, a one. There are also timers TMIS,X for each missile, to count the number of screen cycles that a missile travels. The actual values are unimportant, except whether they are zero or not. When TMIS,X is greater than zero, the missile is already on the screen and merely has to be moved while checking for screen edge boundaries. However, if TMIS,X is zero, the missile has to be placed initially at the ship's position, and the firing sound started.
Since we only have one missile per player, we can't have rapid fire missiles or more than one missile on the screen at a time. Games that allow a train of five or six missile tracks on the screen at one time are using character set animation or bit mapping, not missiles. We could have allowed the player to reset his missile track each time he pressed the trigger, but instead we decided that you couldn't refire until the missile reached the screen's edge or hit its target. Since many players might hold the trigger down indefinitely we had to test in both branches for whether the missile was already on the screen. If we had omitted this test, the missile track would reset each time a player pressed the trigger. If you wish to change the game to this mode of firing, just remove the test.
XMIS(new) = XMIS(old)+VTX(DIRM0)
YMIS(new) = YMIS(old)+VTY(DIRM0)
The code is as follows:
.2 	LDY DIRMO,X	;LOAD Y REG. WITH MISSILE'S DIRECTION
	LDA VTX,Y	;LOOK UP X DIRECTION VELOCITY VECTOR
	ASL		;DOUBLE VELOCITY VECTOR
	CLC
	ADC XMISO,X	;ADD MISSILE'S OLD X POSITION
	STA XMISO,X	;STORE NEW X POSITION
	LDA VTY,Y	;LOOK UP Y DIRECTION VELOCITY VECTOR
	ASL
	CLC
	ADC YMISO,X	;ADD MISSILE'S OLD Y POSITION
	STA XMISO,X 	;STORE NEW Y POSITION
These missile shapes are not the square 2 by 2 blocks of our earlier example. They are two pixels set vertically, horizontally, or diagonally in the direction of travel. A chart of their shapes follows:
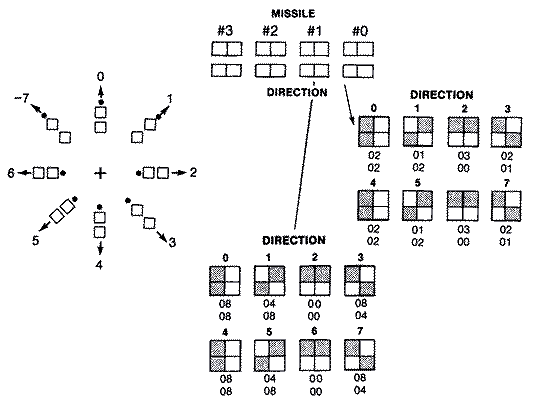
The missile setup subroutine sets up the zero page pointers to the correct shape and to the storage location in player-missile memory. This area is just below the players or.75K from the start of player-missile memory. In addition, the proper mask for that player is stored as MASK,
Plotting the missile requires erasing the old missile first by ANDing the byte containing all four missiles with the proper mask. This step erases only the desired missile because the mask contains zeros in the missile bits to be erased and ones elsewhere. We then plot the missile on the screen by ORAing with a byte in the missile memory that may or may not contain other missiles. For example, if we wish to erase missile #I in a byte that contains missile #0, we AND it with the mask $FC.
    00001010 MEMORY
AND 11111000 MASK
    00000110 RESULT
If we move missile #1 to a scan line that contains missile #3 then we ORA its shape with the byte in missile memory for that scan line.
    00000100 MEMORY
ORA 00000010 SHAPE
    00001000 RESULT
s

MPLOT	LDY #$00
.1	LDA (SHPMOL),Y;LOAD OLD SHAPE
	AND MASK	;MASK WITH PROPER MISSILE BEING MOVED
	STA (SHPMOL),Y;STORING IT DOESN'T ERASE OTHER MISSILES
	INY	;NEXT BYTE
	CPY #$02	;MISSILE 2 BYTES HIGH
	BLT .1
	LDY #$00
.2	LDA (SHPL),Y ;GET BYTE FROM CORRECT SHAPE TABLE
	ORA (SHPML),Y ;ORA AGAINST OTHER MISSILES ON SCAN LINE
	STA (SHPML),Y ;PUT IN MISSILE AREA
	INY	;NEXT BYTE
	CPY #$02
	BLT .2
Derez Style Explosion
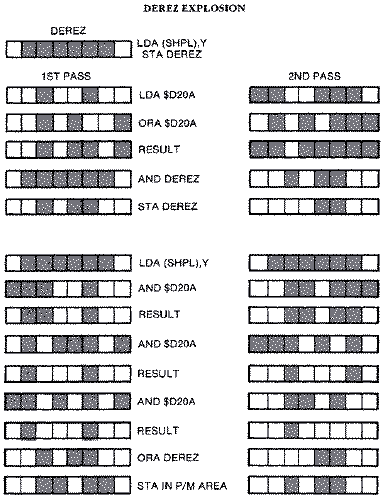
There are many types of explosions suitable for destroying a killed spaceship. One of the more effective methods is to de-rez the object. This technique makes the object appear to slowly disintegrate by randomly flickering the individual pixels until most of the pixels vanish.The trick is to take the ship and store it into a temporary shape table called DEREZ. We load a random number, then ORA it with another random number to insure that we don't get a number with a few of bits "on". We then AND it with the shape in DEREZ and store it there. If we then AND the original ship's shape with this value three times, we get a significantly degraded image of the ship. We then ORA this with our degraded temporary shape in DEREZ so that we get a less degraded shape than we would get if we performed only the first of the two previous steps. Since we wanted this effect to last at least 30 cycles or half a second, the routine was largely experimentally determined. The image begins to degrade slightly during each cycle but isn't quite steady. Any byte's image can improve slightly but randomly in any frame, but the overall effect is continued degradation. The loop is 48 cycles but the image usually vanishes completely after 30 cycles. An example of two separate passes for a single byte is shown below.
10 FOR SBANG=64 TO 0 STEP -1
20 X=INT(SBANG/4)
30 SOUND 0,224+X,0,X
40 SOUND 1,224+X,8,X
50 NEXT SBANG
Scorekeeping
The score line is Written directly into GRAPHICS 1 (ANTIC 2) playfield memory beginning at the top of the screen memory. These locations SCREEN to SCREEN+ 19 contain internal character code valves stored initially in a table called SCLINE. During initialization they are moved into screen memory and the scoring digits, SCREEN+7, SCREEN+8 (tens digit, ones digit) for ship #0 and SCREEN+18, SCREEN+19 (tens digit, one's digit) for ship #1 are updated during the game. A diagram showing the score line and its internal character data is illustrated below.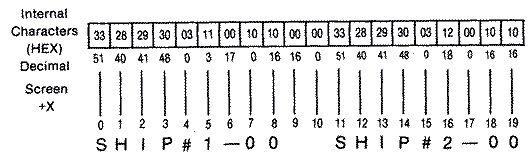
Flow Chart & Game Code
Download SPACEWAR.EXE (Executable program)
Download SPACEWAR.OBJ (Object code)
Download / View SPACEWAR.LST (Assembler listing)
Download / View SPACEWAR.S (Source file)
Download / View SPACEWAR.RAW (As printed in book)
Player Missile Editor
We have included a player-missile editor that will make designing player shapes easy. The grid on the left hand side of the screen supports a shape twenty-two scan lines high in the single-resolution mode. Each of the enlarged blocks is the same shape as the individual pixels on the screen.The cursor appears in the upper left hand corner. The message at the upper right initially is set in the NOPLOT mode. To put the cursor in the PLOT mode, press the letter P, for the ERASE mode, press the letter E, or return to the NOPLOT mode by pressing N. Pressing any of the arrow keys without the control key moves the cursor. Move the cursor to your desired starting position, and press P for plot. A block fills for each position of the shape, and the byte's decimal and hexadecimal value appears to the side.
As your shape forms, you will begin to see an actual sized player shape emerge in the lower right portion of the screen. You can toggle the player width by pressing the W key. It will progress from single width to double width to quadruple width before returning to single width. Likewise, toggle the player resolution from singleline resolution to double-line resolution by pressing the R key. If you wish to clear the entire screen of your shape, just press SHIFT-CLEAR.
The editor, which is written in BASIC, is somewhat slow. Most of its slowness is due to our decision to write it in graphics mode 8, so that we could plot accurately while simutaneously incorporating text on the screen. Machine language programmers need the hexadecimal values of the player shapes for their shape tables. Owners of the ABC BASIC compiler by Monarch Data Systems will find that the program compiles with no modification, and runs significantly faster.
Download PMEDITOR.BAS (Saved BASIC)
Download / View PMEDITOR.LST (Listed BASIC)
Player-Missile Movement Using Strings
An alternate method of moving player shapes vertically at close to Machine language speed is to take advantage of Atari BASIC's string manipulation routines. One in particular in the form of PO$(N)=SO$ will take a smaller string such as S0$="ABCD" and place it starting at the Nth position of the larger string P0$. Thus, if N=6, P0$ would be as follows:
	BYTE	VALUE
	1	0
	2	0
	3	0
	4	0
	5	0
	6	ASCII A
	7	ASCII B
	8	ASCII C
	9	ASCII D
	10	0
	11	0
The shorter string could just as easily be our player shape. It would be very easy to move it just by changing the value of N. The only hitch is that we would have to erase its previous position before we moved it, or the player string would begin to repeat itself, or parts of itself, within the larger (256 byte) player area string. Since there is no need to move the player more than two bytes at a time, we can easily accomplish the erase by overwriting the trailing or leading edge of our last position with two trailing null or zero characters at each end.
How BASIC Stores Strings
The biggest problem in this method is -to fool Atari BASIC into assigning the player-missile display area as a string variable. In order to understand how to do this, it is necessary to know how Atari BASIC stores variables in memory. Two areas are set aside in memory. The first, the Variable Value Table Pointer (VVTP), stores eight bytes of information for each variable declared in your BASIC program. The second, the String Array Table, reserves space in memory according to the size specified when you dimension an array. The VVTP table is arranged as in the following example. If it were for a string dimensioned as P0$(255) it would have these values: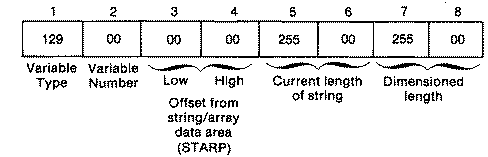
If we change the pointers to bytes 3 and 4 so that they now point to the playermissile area for player #0, we could use string move commands to move our player. To do this we will need to calculate the difference between the player-missile area and where BASIC was planning to store our string in STARP.
VVTP= PEEK(134) + 256*PEEK(135)
STARP = PEEK(140) + 256*PEEK(141)
PLAYER0 =PMBASE*256 + 1024
so
OFFSET=PLAYER0 - STARP
If we take this OFFSET value and divide it into its low and high byte values, then POKE them into bytes 3 and 4, BASIC would think that our strings were actually in the player-missile area. Since we have four players, we have to do this for each group of eight bytes in the VVTP table. Your dimensioned player strings should be the first variables in the program; otherwise, you will have to scan through the table looking for a match.
The following example uses this technique to move four players vertically. Horizontal movement is of course done by setting the player's horizontal position register. The example has four randomly moving, bouncing balls which reverse direction upon collision with another ball or the playfield boundary.
Just to give you a rough idea of the actual memory locations and the change we need to make in the VVTP table for player #0, the values for the examy4e are listed below:
VVTP = 7760
STARP = 10932
PMBASE = 38912 (High byte = 152)
PLAYER0 = 39936
so that OFFSET = PLAYER0-STARP = 29004 then LO = 76 and HI = 113 and they are POKED into bytes 3 and 4 respectively.
Download PMDEMO.BAS (Saved BASIC)
Download / View PMDEMO.LST (Listed BASIC)
While this is a clever method of obtaining fast vertical motion for players, there is no easy way to animate more than a single missile when using strings. The technique is shown more for completeness than for usefulness. We suggest that you use our player-missile subroutine for your games and avoid the complications of using string manipulation.
Return to Table of Contents | Previous Chapter | Next Chapter