Joytricks
John Anderson
Ever stare at the controller jacks in the front of your Atari computer and imagine all sorts of exotic hardware to connect up to it? I have, and while my work on a fully articulated robot arm is progressing quite slowly, there are a few modification projects I've undertaken that require little time, cost very few dollars, and provide nice results.
End Discrimination Against Lefties
As a left-handed gamesman, I've long suspected that my scores have been held down by the fact that joysticks are designed for righties. It's a very simple matter to turn a standard issue Atari joystick (fire button top left) into a lefty stick (fire button top right).
When you disassemble the joystick, be careful not to lose any of the screws or the little spring that sits in the trigger button. Hold the circuit board so it resembles the configuration in Figure 1. Note: newer Atari joysticks have all the connectors on one side of the PC board while older ones have three connectors on each side.
The leads must be removed from the board (grasp the collars; do not pull on the wires themselves) and reattached as shown. That's all there is to it--except to prominently label your new lefty joystick so that it does not drive some poor righty mad. The stick is now "referenced" with the trigger to the upper right.
A Pushbutton Peripheral For Under $8
I've been thinking about a homebrew controller jack peripheral for quite some time now, but the genesis of this idea really belongs to Rick Rowland. Though the controller is at its best when playing a limited number of games, you can do quite a bit with it. If you have a joystick that has seen better days and is ready for retirement, you can reincarnate it as a pushbutton peripheral.
The idea is simple: create a panel of pushbuttons to control all joystick functions. The Asteroids you'll find in arcades, as well as Space Invaders, Galaxian, and other games, use button rather than joystick input. You can open up this realm at home with a few parts readily available at Radio Shack, and the cord from an old stick (you may try finding a DE-9 plug at an electronics store, and making a cord yourself).
You need only a few short snips of wire, some switches, and a box to mount it all in. I used three packages of push button switches (Radio Shack catalog 275-609). These are momentary contact switches, packed two to a package. I mounted five of them in a deluxe project case (Radio Shack 270-222). The total cost of these items was under $8.00, and created a new and enjoyable input device.
Probably the toughest thing about the whole project is putting the mounting holes into the project case. If you don't have access to a drill with a suitably sized bit or hole cutter, you can do what I did: use your soldering iron to start the hole, and then ream it to size using the blade of a scissors. The two tricks to this technique are to work slowly, constantly checking the diameter of the hole against the switch collar, and not burning and/or cutting yourself. It can be done, and that's an advantage of a plastic project case (another is its low price).
|
|
|
Figure 1. |

|
|
|
Figure 1A. New Style Joystick. |

|
|
|
Figure 2. |
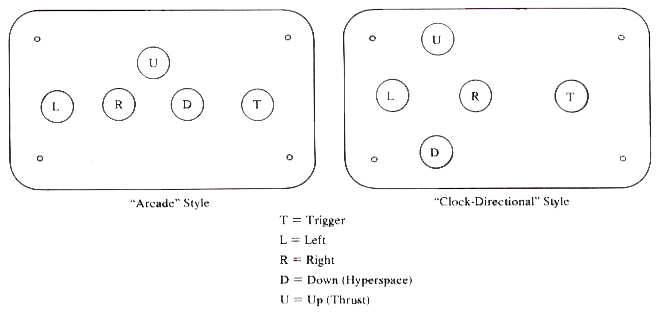
Refer to Figure 2 for possible button configurations. The first is the "classic" Asteroids format. If you're building a peripheral just to play Asteroids, this is the way to go. The second is what we might call a "clock-directional" format, which in the long run proves to be a more versatile set-up. I made up one of each, and prefer the clock-directional arrangement for a variety of games.
You will need a groove in the box portion of the case to allow the cord to pass through. You may again use the soldering iron to do this, making the groove only wide enough to push the retaining collar in. This way it won't be easy to yank the wire out by its roots.
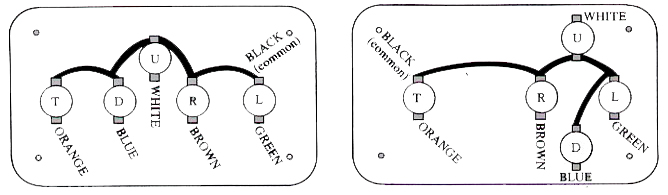
In order to wire up the new peripheral, refer to Figure 3. As far as I know, this color scheme is standard. In order to attach connectors to the pushbuttons, you'll want to press each connector lightly between the jaws of a pliers. If you are careful about this, you will create a good connection without losing the ability to remove the cable later. Those of you who wish to make your own cord will have to find a DE-9 connector, (which may not be easy), and wire it as shown in Figure 4.
Necessarily, diagonal motion is tough with this configuration, as it requires two buttons to be pressed simultaneously. As a result, games in which the player moves in one dimension are especially suited for pushbutton input (Asteroids is a notable exception). If you feel really brave, try it with a maze game, like Jawbreaker.
Double Your Fire Power
If you construct a pushbutton peripheral with the parts I've listed above, you will have an extra button left over. It is a relatively simple matter to attach this button to the handle of an existing joystick, thereby adding a second trigger in a very handy place. It's nice to be able to fire with the same hand that steers, and because the conventional trigger remains enabled, you can easily squeeze off more shots this way.
Use a blade of your trusty (and by this time, quite dull) scissors to press a hole through the top of the stick. Next, disassemble the stick, following the instructions given above for the "lefty" modification. Remove the white plastic stem from inside the handle. Using a saw or serrated kitchen knife, cut off about a half an inch from the top of the stem. This will provide the needed room for the switch.
|
|
|
Figure 3. Flip-Side Wiring Diagram. |
Unscrew all collars and retainers from the neck of the button. Solder two 12-inch lengths of wire to the switch contacts, braiding these leads together. Pass them through the hole you made on top of the stick, and through the white plastic stem. Then screw the pushbutton directly into the top of the joystick handle. The other ends of the leads attach as shown in Figure 5. Reassemble the stick, remaining mindful of that little spring that sits on the original trigger button. You will effectively have doubled your firing ability. Remember, however, some games do not allow for excessively rapid fire play.
|
|
|
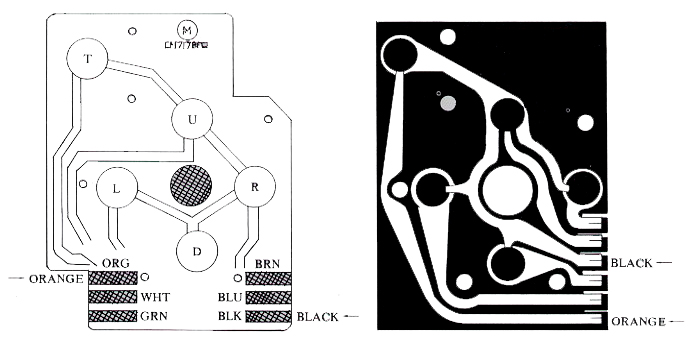
Figure 4. Atari Controller Jack Pin Configuration and Color Code. |

|
||
|
Figure 5. Second Trigger Wiring. |
Figure 5A. New Style Stick. |
|
|
John Anderson is an associate editor for Creative Computing magazine.
Table of Contents
Previous Section: Axlon RAMDisk
Next Section: New RAMS for Old
